
Arduino UNO and L298N Motor Driver Controlled Linear Actuator System with Bluetooth Connectivity
View and Edit Project In Cirkit Designer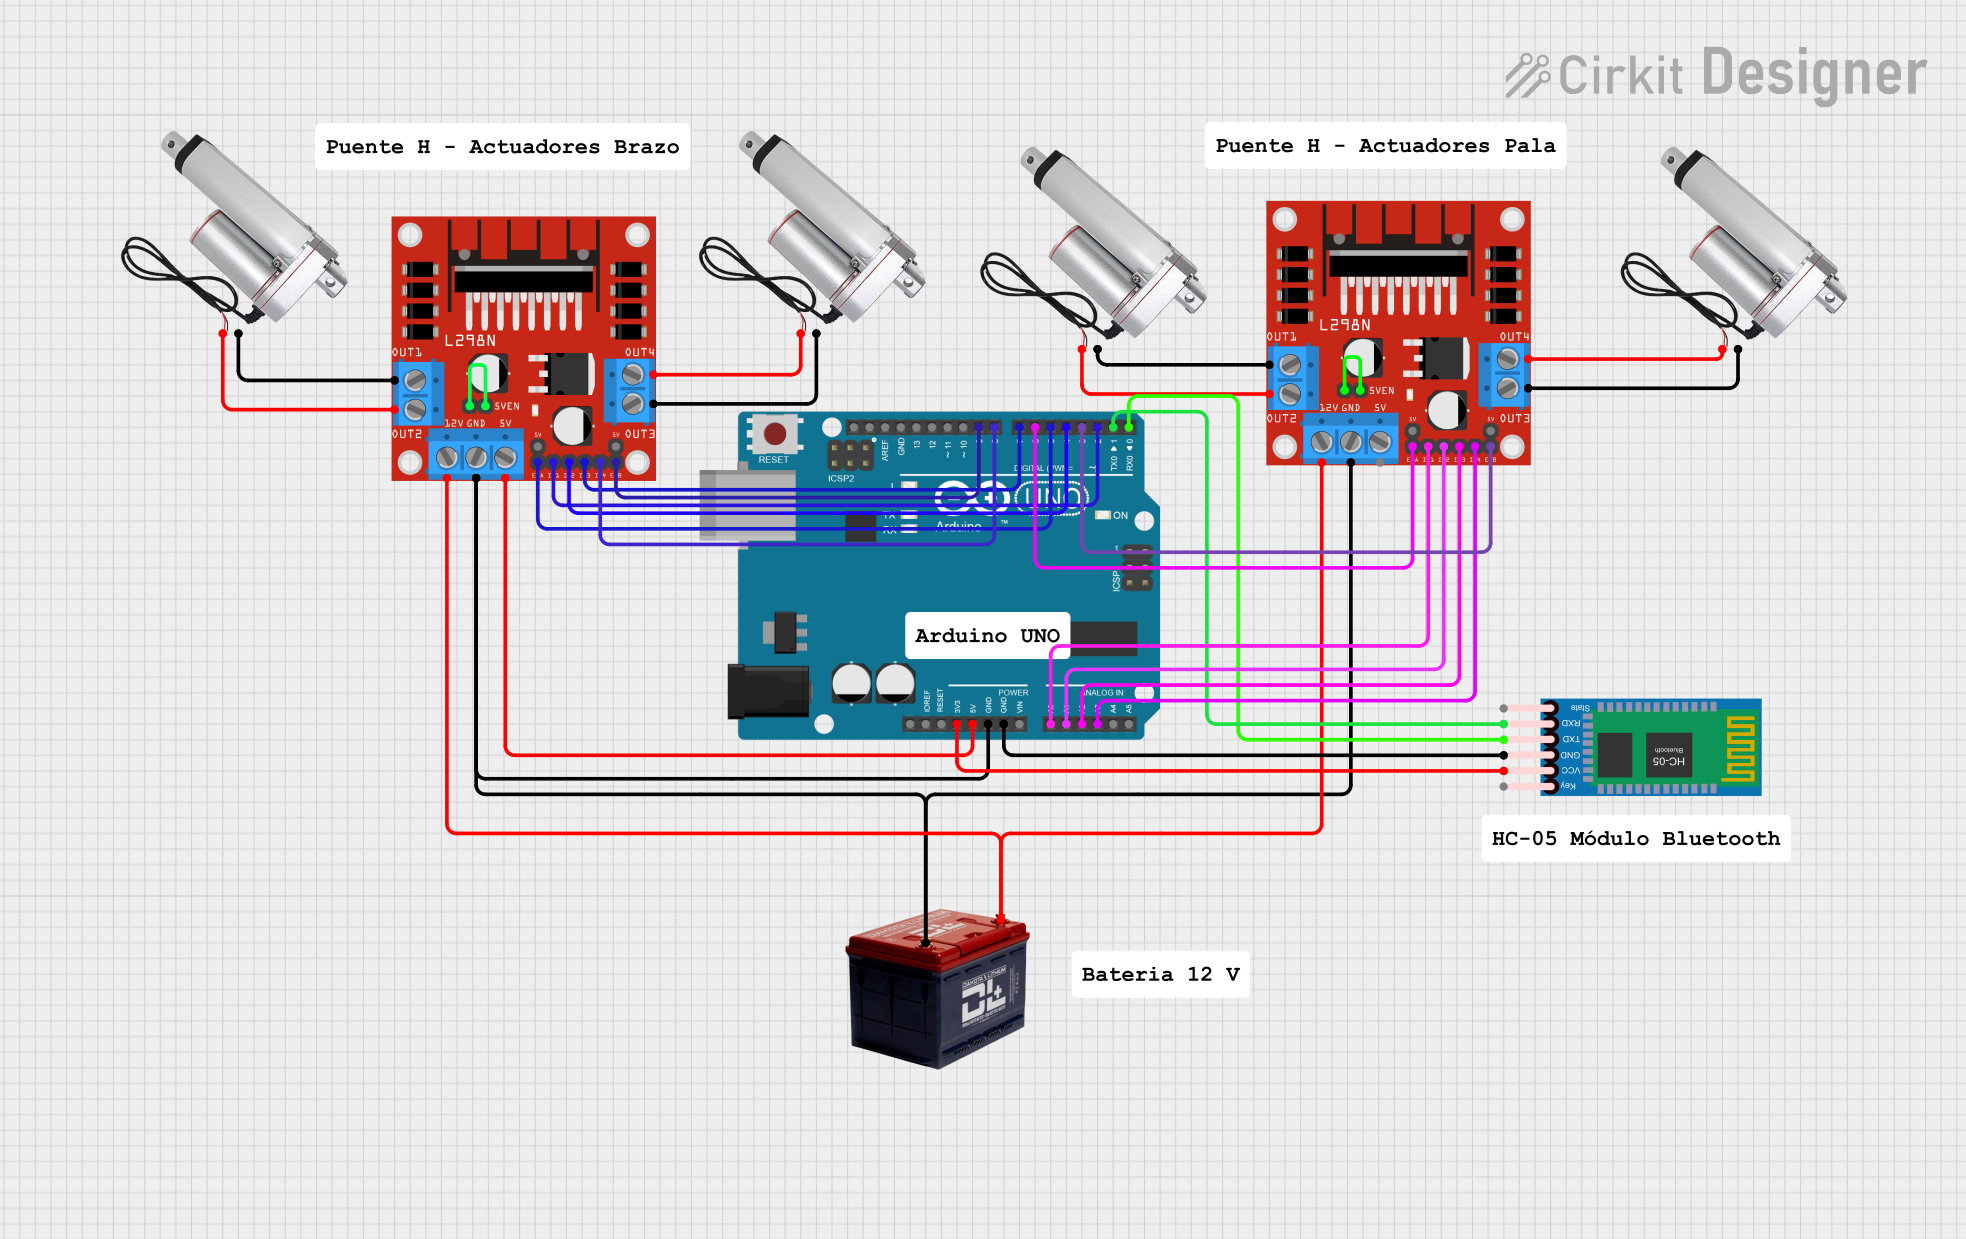
Circuit Documentation
Summary
This circuit is designed to control multiple linear actuators using two L298N DC motor drivers, an Arduino UNO, and a 12V battery. The Arduino UNO is programmed to manage the motor drivers and communicate with an HC-05 Bluetooth module for wireless control.
Component List
L298N DC Motor Driver
- Description: Dual H-Bridge motor driver for controlling DC motors.
- Pins: OUT1, OUT2, 12V, GND, 5V, OUT3, OUT4, 5V-ENA-JMP-I, 5V-ENA-JMP-O, +5V-J1, +5V-J2, ENA, IN1, IN2, IN3, IN4, ENB
Linear Actuator
- Description: Actuator for linear motion.
- Pins: +, -
Battery 12V
- Description: Power source for the circuit.
- Pins: -, +
Arduino UNO
- Description: Microcontroller for controlling the motor drivers and Bluetooth module.
- Pins: UNUSED, IOREF, Reset, 3.3V, 5V, GND, Vin, A0, A1, A2, A3, A4, A5, SCL, SDA, AREF, D13, D12, D11, D10, D9, D8, D7, D6, D5, D4, D3, D2, D1, D0
HC-05 Bluetooth Module
- Description: Bluetooth module for wireless communication.
- Pins: Key, VCC, GND, TXD, RXD, State
Wiring Details
L298N DC Motor Driver 1
- OUT1 connected to Linear Actuator 1 (-)
- OUT2 connected to Linear Actuator 1 (+)
- 12V connected to Battery 12V (+)
- GND connected to Battery 12V (-) and Arduino UNO (GND)
- 5V connected to Arduino UNO (5V)
- OUT3 connected to Linear Actuator 2 (-)
- OUT4 connected to Linear Actuator 2 (+)
- 5V-ENA-JMP-I connected to 5V-ENA-JMP-O
- ENA connected to Arduino UNO (D5)
- IN1 connected to Arduino UNO (D2)
- IN2 connected to Arduino UNO (D4)
- IN3 connected to Arduino UNO (D7)
- IN4 connected to Arduino UNO (D8)
- ENB connected to Arduino UNO (D9)
L298N DC Motor Driver 2
- OUT1 connected to Linear Actuator 3 (-)
- OUT2 connected to Linear Actuator 3 (+)
- 12V connected to Battery 12V (+)
- GND connected to Battery 12V (-) and Arduino UNO (GND)
- OUT3 connected to Linear Actuator 4 (-)
- OUT4 connected to Linear Actuator 4 (+)
- 5V-ENA-JMP-I connected to 5V-ENA-JMP-O
- ENA connected to Arduino UNO (D6)
- IN1 connected to Arduino UNO (A0)
- IN2 connected to Arduino UNO (A1)
- IN3 connected to Arduino UNO (A2)
- IN4 connected to Arduino UNO (A3)
- ENB connected to Arduino UNO (D3)
Battery 12V
- + connected to L298N DC Motor Driver 1 (12V) and L298N DC Motor Driver 2 (12V)
- - connected to L298N DC Motor Driver 1 (GND), L298N DC Motor Driver 2 (GND), and Arduino UNO (GND)
Arduino UNO
- 5V connected to L298N DC Motor Driver 1 (5V)
- GND connected to Battery 12V (-), L298N DC Motor Driver 1 (GND), and L298N DC Motor Driver 2 (GND)
- D5 connected to L298N DC Motor Driver 1 (ENA)
- D2 connected to L298N DC Motor Driver 1 (IN1)
- D4 connected to L298N DC Motor Driver 1 (IN2)
- D7 connected to L298N DC Motor Driver 1 (IN3)
- D8 connected to L298N DC Motor Driver 1 (IN4)
- D9 connected to L298N DC Motor Driver 1 (ENB)
- D6 connected to L298N DC Motor Driver 2 (ENA)
- A0 connected to L298N DC Motor Driver 2 (IN1)
- A1 connected to L298N DC Motor Driver 2 (IN2)
- A2 connected to L298N DC Motor Driver 2 (IN3)
- A3 connected to L298N DC Motor Driver 2 (IN4)
- D3 connected to L298N DC Motor Driver 2 (ENB)
- 3.3V connected to HC-05 Bluetooth Module (VCC)
- GND connected to HC-05 Bluetooth Module (GND)
- D1 connected to HC-05 Bluetooth Module (RXD)
- D0 connected to HC-05 Bluetooth Module (TXD)
HC-05 Bluetooth Module
- VCC connected to Arduino UNO (3.3V)
- GND connected to Arduino UNO (GND)
- RXD connected to Arduino UNO (D1)
- TXD connected to Arduino UNO (D0)
Code Documentation
Arduino UNO Code
void setup() {
  // put your setup code here, to run once:

}

void loop() {
  // put your main code here, to run repeatedly:

}
This code is a basic template for the Arduino UNO. The setup() function is where you initialize your components and settings, and the loop() function is where you place the main code that runs repeatedly.