
Arduino Uno R3 Distance Measurement and Display System with Ultrasonic Sensor and LCD
View and Edit Project In Cirkit Designer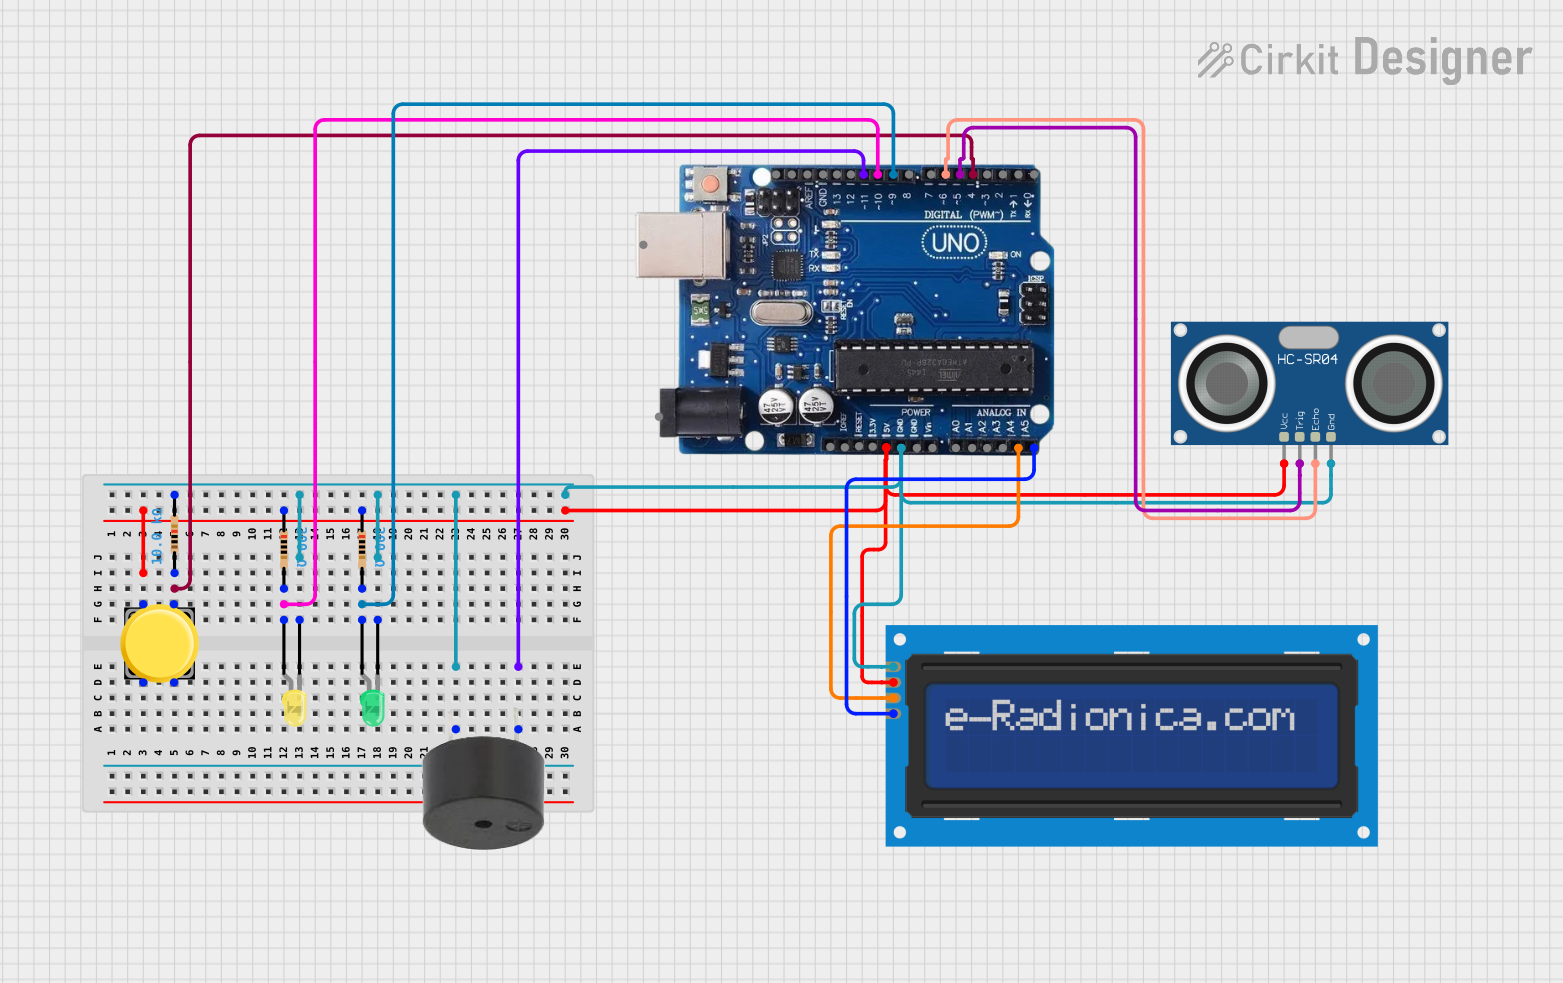
Circuit Documentation
Summary
This circuit is designed to interface an Arduino Uno R3 with a variety of components including an LCD screen, an ultrasonic sensor, pushbuttons, LEDs, buzzers, and resistors. The primary function of this circuit is to measure distance using the HC-SR04 Ultrasonic Sensor and display the measured distance on the LCD screen. The user can interact with the system using a pushbutton to toggle the display mode between centimeters and meters. Visual feedback is provided by yellow and green LEDs, and an audible alert is generated by a buzzer.
Component List
LCD screen 16x2 I2C
- Description: A 16x2 character LCD display with an I2C interface.
- Pins: SCL, SDA, VCC, GND
HC-SR04 Ultrasonic Sensor
- Description: An ultrasonic sensor for measuring distance.
- Pins: VCC, TRIG, ECHO, GND
Pushbutton
- Description: A standard pushbutton for user input.
- Pins: Pin 1, Pin 2, Pin 3, Pin 4
Resistor (10k Ohms)
- Description: A resistor with a resistance of 10k Ohms.
- Pins: pin1, pin2
LED: Two Pin (yellow)
- Description: A yellow LED for visual indication.
- Pins: cathode, anode
LED: Two Pin (green)
- Description: A green LED for visual indication.
- Pins: cathode, anode
Resistor (200 Ohms)
- Description: A resistor with a resistance of 200 Ohms.
- Pins: pin1, pin2
Buzzer
- Description: A buzzer for audible alerts.
- Pins: PIN, GND
Arduino Uno R3
- Description: A microcontroller board based on the ATmega328P.
- Pins: USB Port, Power Jack, Not Connected, IOREF, RESET, 3.3V, 5V, GND, VIN, A0-A5, SCL, SDA, AREF, Digital Pins 0-13
Wiring Details
LCD screen 16x2 I2C
- SCL connected to Arduino Uno R3 A5/SCL
- SDA connected to Arduino Uno R3 A4/SDA
- VCC connected to 5V power net
- GND connected to ground net
HC-SR04 Ultrasonic Sensor
- VCC connected to 5V power net
- TRIG connected to Arduino Uno R3 pin 5
- ECHO connected to Arduino Uno R3 pin 6
- GND connected to ground net
Pushbutton
- Pin 1 connected to 5V power net
- Pin 3 connected to Arduino Uno R3 pin 4 through a 10k Ohm resistor
Resistor (10k Ohms)
- One side connected to Pushbutton Pin 3
- Other side connected to ground net
LED: Two Pin (yellow)
- Anode connected to Arduino Uno R3 pin 10 through a 200 Ohm resistor
- Cathode connected to ground net
LED: Two Pin (green)
- Anode connected to Arduino Uno R3 pin 9 through a 200 Ohm resistor
- Cathode connected to ground net
Buzzer
- PIN connected to Arduino Uno R3 pin 11
- GND connected to ground net
Documented Code
#include <Wire.h>
#include <LiquidCrystal_I2C.h>

const int trigPin = 10;
const int echoPin = 11;

long duration;
int distance;
float distanceInMeters;

LiquidCrystal_I2C LCD (0x27, 16, 2);

int buttonPin = 2; // Button pin in Arduino
int press = 0, totalPress = 0;

void setup() {
  pinMode(trigPin, OUTPUT);
  pinMode(echoPin, INPUT);

  LCD.begin(16, 2);
  LCD.backlight();

  pinMode(buttonPin, INPUT);
}

void loop() {
    distance = ultrasonicSensor();
    press = digitalRead(buttonPin);

    if (press == HIGH){
        totalPress += 1;

        delay(300);
    }

    if (totalPress == 1){
        LCD.clear();
        LCD.setCursor(4, 0);
        LCD.print("MODE: CM");
        LCD.setCursor(4, 1);
        LCD.print("Distance: " + String(distance) + " cm");
    }
    if (totalPress == 2){
        distanceInMeters = distance / 100.00;
        LCD.clear();
        LCD.setCursor(4, 0);
        LCD.print("MODE: M");
        LCD.setCursor(4, 1);
        LCD.print("Distance: " + String(distanceInMeters) + " m");
    }
    if (totalPress == 3){
        LCD.clear();
        totalPress = 0;
    }
}

int ultrasonicSensor(){
    digitalWrite(trigPin, LOW);
    delayMicroseconds(2);

    digitalWrite(trigPin, HIGH);
    delayMicroseconds(10);
    digitalWrite(trigPin, LOW);

    duration = pulseIn(echoPin, HIGH);

    distance = duration * 0.034 / 2;

    return distance;
}
This code is designed to run on the Arduino Uno R3 and handles the interaction with the ultrasonic sensor, LCD display, and pushbutton. It includes functions for measuring distance, displaying the distance on the LCD, and toggling the display mode with the pushbutton.