
Circuit Documentation
Summary
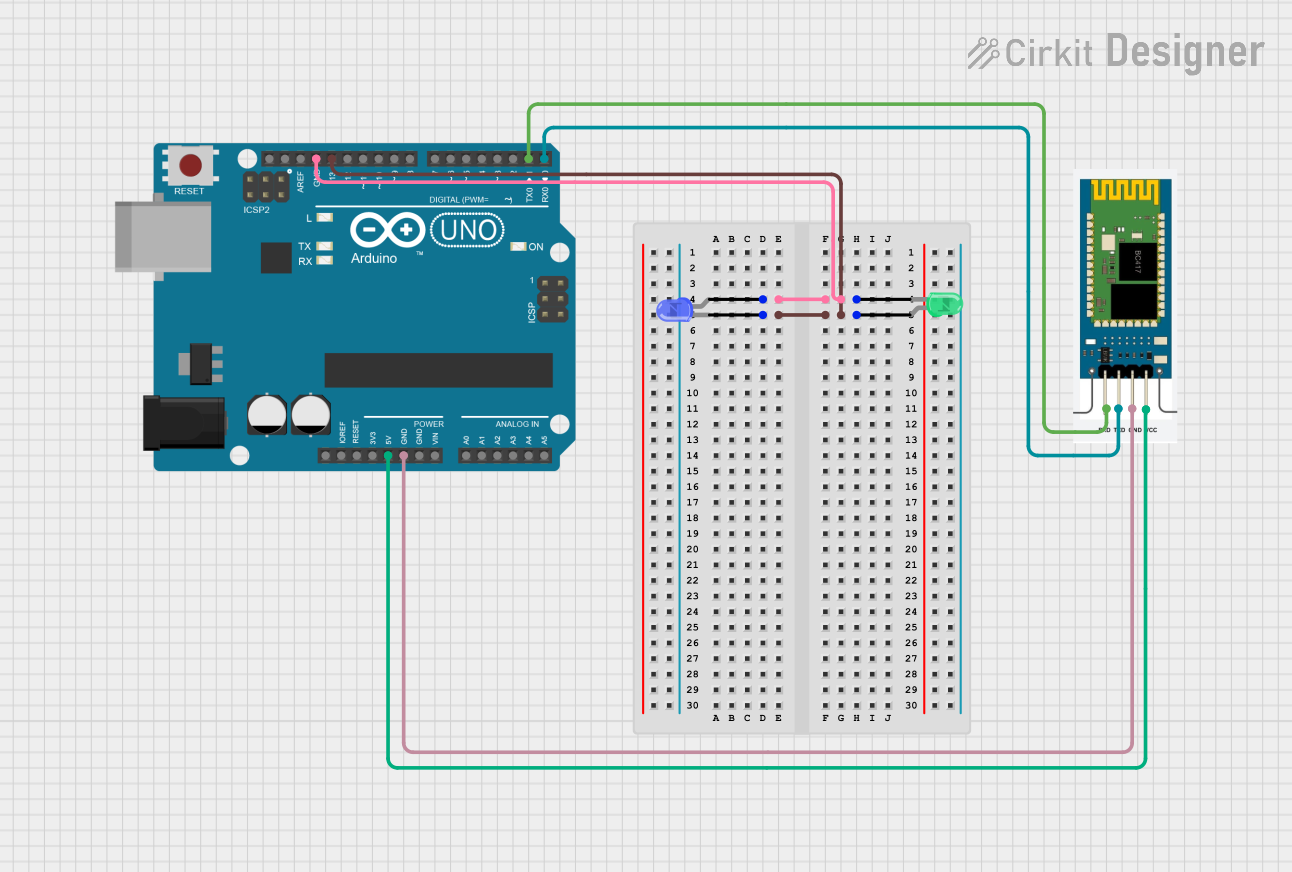
This circuit consists of an Arduino UNO microcontroller, an HC-06 Bluetooth module, and two LEDs (one blue and one green). The Arduino UNO is used to control the LEDs based on commands received via the HC-06 Bluetooth module. The LEDs are connected in such a way that they can be turned on or off based on the received commands.
Component List
Arduino UNO
- Description: A microcontroller board based on the ATmega328P.
- Pins: UNUSED, IOREF, Reset, 3.3V, 5V, GND, Vin, A0, A1, A2, A3, A4, A5, SCL, SDA, AREF, D13, D12, D11, D10, D9, D8, D7, D6, D5, D4, D3, D2, D1, D0
HC-06
- Description: A Bluetooth module used for wireless communication.
- Pins: RXD, TXD, GND, VCC
LED: Two Pin (blue)
- Description: A blue LED with two pins.
- Pins: cathode, anode
LED: Two Pin (green)
- Description: A green LED with two pins.
- Pins: cathode, anode
Wiring Details
Arduino UNO
GND is connected to:
- GND of HC-06
- cathode of LED (blue)
- cathode of LED (green)
5V is connected to:
- VCC of HC-06
D13 is connected to:
- anode of LED (blue)
- anode of LED (green)
D1 is connected to:
- RXD of HC-06
D0 is connected to:
- TXD of HC-06
HC-06
GND is connected to:
- GND of Arduino UNO
VCC is connected to:
- 5V of Arduino UNO
RXD is connected to:
- D1 of Arduino UNO
TXD is connected to:
- D0 of Arduino UNO
LED: Two Pin (blue)
cathode is connected to:
- GND of Arduino UNO
- cathode of LED (green)
anode is connected to:
- D13 of Arduino UNO
- anode of LED (green)
LED: Two Pin (green)
cathode is connected to:
- GND of Arduino UNO
- cathode of LED (blue)
anode is connected to:
- D13 of Arduino UNO
- anode of LED (blue)
Code Documentation
// generated by mBlock5 for <your product>
// codes make you happy

#include <Arduino.h>
#include <Wire.h>
#include <SoftwareSerial.h>

SoftwareSerial Bluetooth(10,11);
char Data;

void _delay(float seconds) {
  long endTime = millis() + seconds * 1000;
  while(millis() < endTime) _loop();
}

void setup() {
  Bluetooth.begin(38400);
  pinMode(5,OUTPUT);
  pinMode(6,OUTPUT);
  pinMode(7,OUTPUT);
  while(1) {
      if(Bluetooth.available()) {
          Data=Bluetooth.read();
          // LED 1 on
          if (Data==('5')) {
              digitalWrite(5,1);

          }
          // LED 1 off
          if (Data==('1')) {
              digitalWrite(5,0);

          }
          // LED 2  on
          if (Data==('6')) {
              digitalWrite(6,1);

          }
          // LED 2  off
          if (Data==('2')) {
              digitalWrite(6,0);

          }
          // LED 3 on
          if (Data==('7')) {
              digitalWrite(7,1);

          }
          // LED 3 off
          if (Data==('3')) {
              digitalWrite(7,0);

          }
          // ALL LEDS on
          if (Data==('9')) {
              digitalWrite(5,1);
              digitalWrite(6,1);
              digitalWrite(7,1);

          }
          // ALL LEDS off
          if (Data==('0')) {
              digitalWrite(5,0);
              digitalWrite(6,0);
              digitalWrite(7,0);

          }

      }

      _loop();
  }

}

void _loop() {
}

void loop() {
  _loop();
}
This code initializes the Bluetooth module and sets up three pins (5, 6, and 7) as outputs. It continuously checks for available data from the Bluetooth module and performs actions based on the received data. The actions include turning on or off the LEDs connected to pins 5, 6, and 7.