
Arduino UNO Controlled NEMA 17 Stepper Motor with TB6600 Driver and Pushbutton Interface
View and Edit Project In Cirkit Designer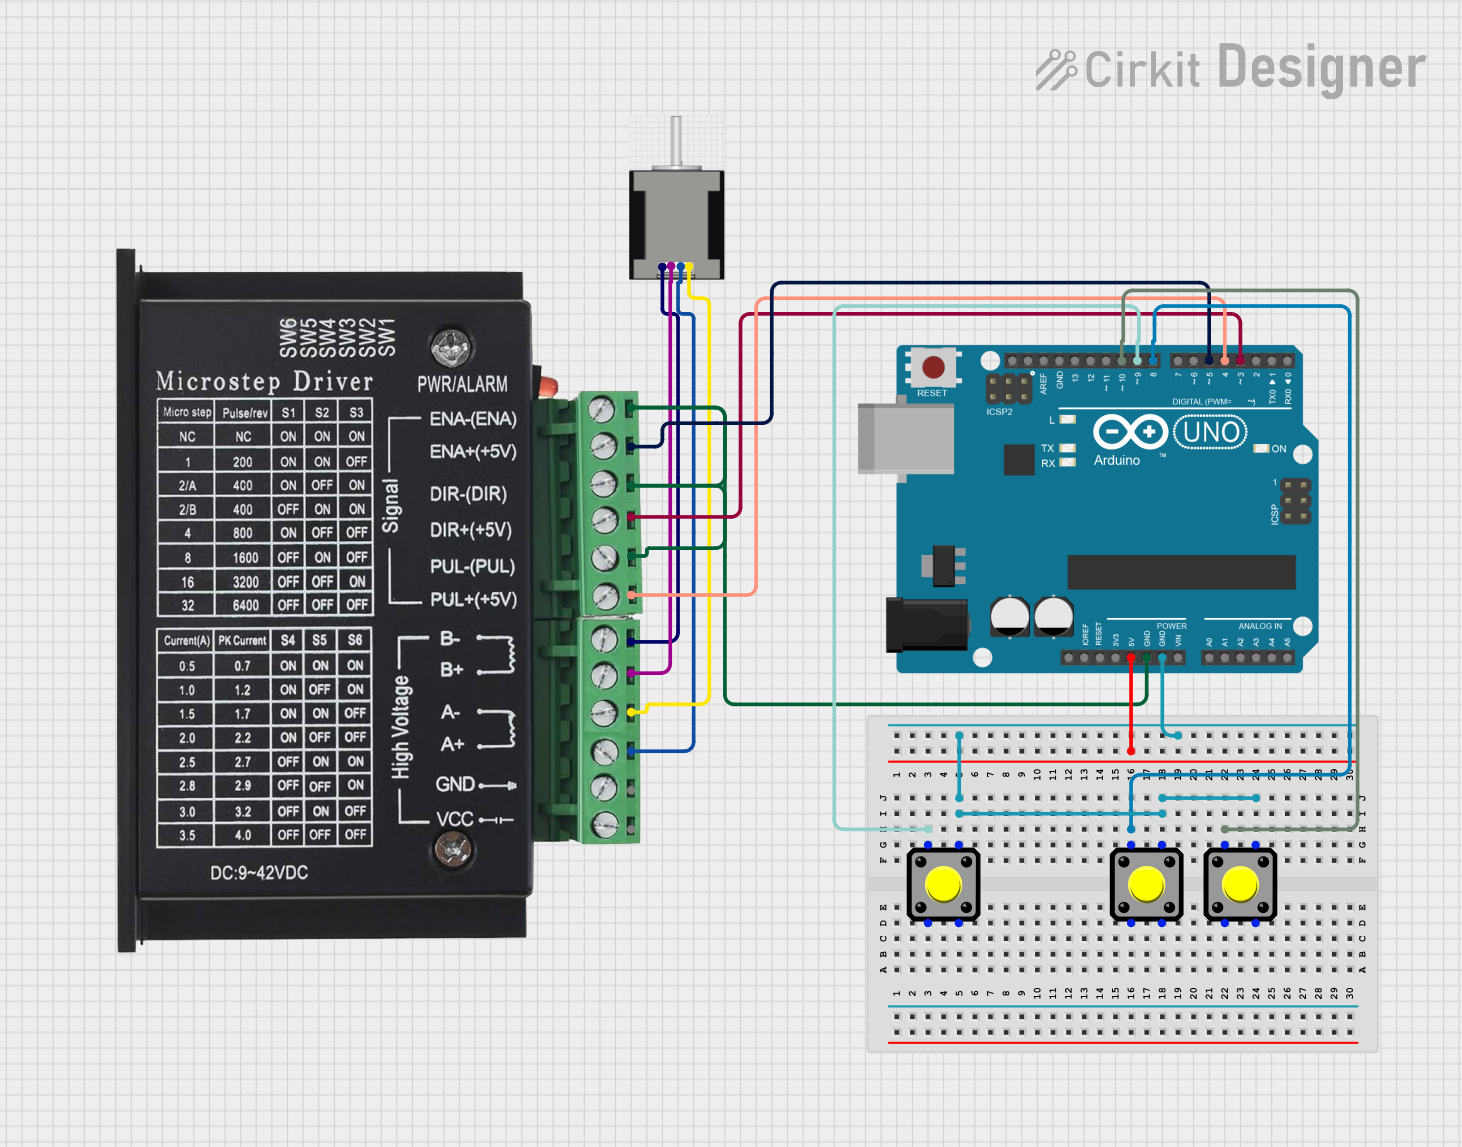
Circuit Documentation
Summary
This circuit involves an Arduino UNO microcontroller, a TB6600 stepper motor driver, a NEMA 17 stepper motor, and three pushbuttons. The Arduino UNO controls the TB6600 driver, which in turn drives the NEMA 17 stepper motor. The pushbuttons are used as inputs to the Arduino UNO.
Component List
Arduino UNO
- Description: A microcontroller board based on the ATmega328P.
- Pins: UNUSED, IOREF, Reset, 3.3V, 5V, GND, Vin, A0, A1, A2, A3, A4, A5, SCL, SDA, AREF, D13, D12, D11, D10, D9, D8, D7, D6, D5, D4, D3, D2, D1, D0
TB6600
- Description: A stepper motor driver capable of driving a NEMA 17 stepper motor.
- Pins: ENA-, ENA+, DIR-, DIR+, PUL-, PUL+, B-, B+, A-, A+, GND, VCC
NEMA 17 HS4401
- Description: A bipolar stepper motor.
- Pins: RED (B2), BLACK (B1), BLUE (A2), GREEN (A1)
Pushbutton (x3)
- Description: A simple pushbutton switch.
- Pins: Pin 2, Pin 1, Pin 3, Pin 4
Wiring Details
Arduino UNO
- 5V: Not connected
- GND: Connected to TB6600 (ENA-, DIR-, PUL-), Pushbutton 1 (Pin 4), Pushbutton 2 (Pin 4), Pushbutton 3 (Pin 4)
- D10: Connected to Pushbutton 3 (Pin 1)
- D9: Connected to Pushbutton 1 (Pin 1)
- D8: Connected to Pushbutton 2 (Pin 1)
- D5: Connected to TB6600 (ENA+)
- D4: Connected to TB6600 (PUL+)
- D3: Connected to TB6600 (DIR+)
TB6600
- ENA-: Connected to Arduino UNO (GND)
- DIR-: Connected to Arduino UNO (GND)
- PUL-: Connected to Arduino UNO (GND)
- ENA+: Connected to Arduino UNO (D5)
- DIR+: Connected to Arduino UNO (D3)
- PUL+: Connected to Arduino UNO (D4)
- B-: Connected to NEMA 17 (RED (B2))
- B+: Connected to NEMA 17 (BLACK (B1))
- A-: Connected to NEMA 17 (GREEN (A1))
- A+: Connected to NEMA 17 (BLUE (A2))
NEMA 17 HS4401
- RED (B2): Connected to TB6600 (B-)
- BLACK (B1): Connected to TB6600 (B+)
- GREEN (A1): Connected to TB6600 (A-)
- BLUE (A2): Connected to TB6600 (A+)
Pushbutton 1
- Pin 1: Connected to Arduino UNO (D9)
- Pin 4: Connected to Arduino UNO (GND)
Pushbutton 2
- Pin 1: Connected to Arduino UNO (D8)
- Pin 4: Connected to Arduino UNO (GND)
Pushbutton 3
- Pin 1: Connected to Arduino UNO (D10)
- Pin 4: Connected to Arduino UNO (GND)
Documented Code
Arduino UNO Code (sketch.ino)
void setup() {
  // put your setup code here, to run once:

}

void loop() {
  // put your main code here, to run repeatedly:

}
Documentation (documentation.txt)
This documentation provides a comprehensive overview of the circuit, including a summary, detailed component list, wiring details, and the code used in the Arduino UNO microcontroller.