
Arduino Nano Weather Station with AHT10 Sensor and Wi-Fi Connectivity
View and Edit Project In Cirkit Designer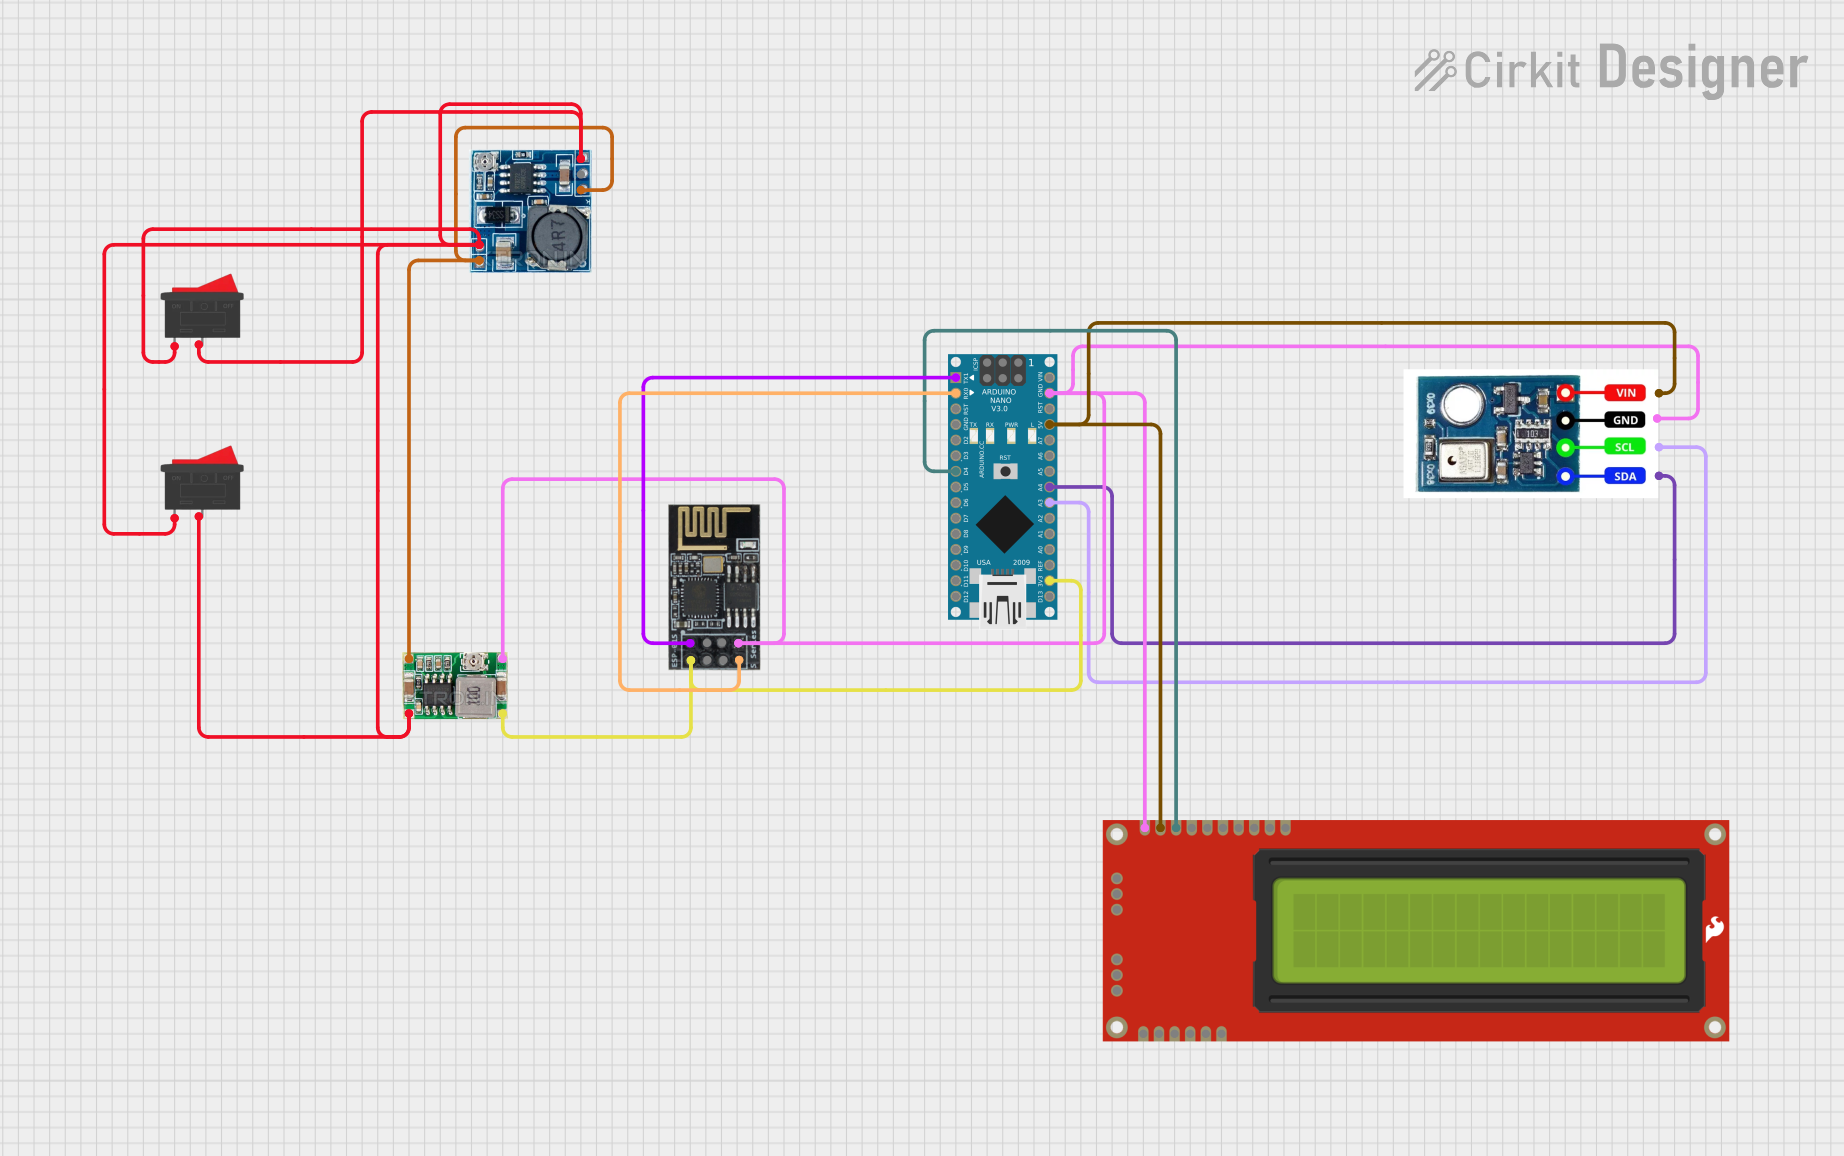
Circuit Documentation
Summary
This circuit is designed to interface an Arduino Nano with an AHT10 temperature and humidity sensor, an ESP8266-01 WiFi module, and a Serial Enabled 16x2 LCD. The Arduino Nano reads temperature and humidity data from the AHT10 sensor, displays it on the LCD, and sends it over WiFi using the ESP8266-01 module. The circuit is powered by a Step Down Module and a Mini 360 Buck Converter.
Component List
Mini 360 Buck Converter
- Description: A DC-DC step-down converter used to step down voltage.
- Pins: IN-, OUT-, OUT+, IN+
AHT10
- Description: A temperature and humidity sensor.
- Pins: Vcc, Gnd, SCL, SDA
Step Down Module
- Description: A module used to step down voltage from 24V to 5V.
- Pins: 24v IN+, GND, 12v IN+, 5v OUT+, 5v OUT-
Arduino Nano
- Description: A small, complete, and breadboard-friendly board based on the ATmega328.
- Pins: D1/TX, D0/RX, RESET, GND, D2, D3, D4, D5, D6, D7, D8, D9, D10, D11/MOSI, D12/MISO, VIN, 5V, A7, A6, A5, A4, A3, A2, A1, A0, AREF, 3V3, D13/SCK
Rocker Switch
- Description: A simple on/off switch.
- Pins: 1, 2
Wifi module ESP8266-01
- Description: A WiFi module used for wireless communication.
- Pins: RX, GPIO0, GPIO2, GND, +3V3, Reset, CH-PD Chip power down, TX
Serial Enabled 16x2 LCD - Black on Green 5V
- Description: A 16x2 character LCD with serial interface.
- Pins: GND, RX, VDD, RS, R/W, E, DB4, DB5, DB6, DB7, BL+, PGM, PGC, PGD, VPP
Wiring Details
Mini 360 Buck Converter
- IN-: Connected to GND of Step Down Module and 5v OUT- of Step Down Module
- OUT-: Connected to Gnd of AHT10, GND of Serial Enabled 16x2 LCD, GND of Wifi module ESP8266-01, and GND of Arduino Nano
- OUT+: Connected to +3V3 of Wifi module ESP8266-01 and 3V3 of Arduino Nano
- IN+: Connected to 24v IN+ of Step Down Module, 5v OUT+ of Step Down Module, pin 1 of Rocker Switch, pin 2 of Rocker Switch, pin 1 of another Rocker Switch, and pin 2 of another Rocker Switch
AHT10
- Vcc: Connected to VDD of Serial Enabled 16x2 LCD and 5V of Arduino Nano
- Gnd: Connected to OUT- of Mini 360 Buck Converter
- SCL: Connected to A3 of Arduino Nano
- SDA: Connected to A4 of Arduino Nano
Step Down Module
- 24v IN+: Connected to IN+ of Mini 360 Buck Converter
- GND: Connected to IN- of Mini 360 Buck Converter and 5v OUT- of Step Down Module
- 5v OUT+: Connected to IN+ of Mini 360 Buck Converter
- 5v OUT-: Connected to IN- of Mini 360 Buck Converter and GND of Step Down Module
Arduino Nano
- GND: Connected to OUT- of Mini 360 Buck Converter
- 3V3: Connected to OUT+ of Mini 360 Buck Converter
- 5V: Connected to Vcc of AHT10 and VDD of Serial Enabled 16x2 LCD
- A3: Connected to SCL of AHT10
- A4: Connected to SDA of AHT10
- D1/TX: Connected to RX of Wifi module ESP8266-01
- D0/RX: Connected to TX of Wifi module ESP8266-01
- D4: Connected to RS of Serial Enabled 16x2 LCD
Rocker Switch
- Pin 1: Connected to IN+ of Mini 360 Buck Converter
- Pin 2: Connected to IN+ of Mini 360 Buck Converter
Wifi module ESP8266-01
- RX: Connected to D1/TX of Arduino Nano
- TX: Connected to D0/RX of Arduino Nano
- GND: Connected to OUT- of Mini 360 Buck Converter
- +3V3: Connected to OUT+ of Mini 360 Buck Converter
Serial Enabled 16x2 LCD - Black on Green 5V
- GND: Connected to OUT- of Mini 360 Buck Converter
- VDD: Connected to Vcc of AHT10 and 5V of Arduino Nano
- RS: Connected to D4 of Arduino Nano
Code Documentation
/*
 * Arduino Nano Circuit Project
 * This code interfaces with an AHT10 sensor, an ESP8266-01 WiFi module,
 * and a Serial Enabled 16x2 LCD. It reads temperature and humidity data
 * from the AHT10 sensor, displays it on the LCD, and sends it over WiFi.
 */

#include <Wire.h>
#include <Adafruit_Sensor.h>
#include <Adafruit_AHT10.h>
#include <SoftwareSerial.h>

Adafruit_AHT10 aht;
SoftwareSerial espSerial(0, 1); // RX, TX

void setup() {
  Serial.begin(9600);
  espSerial.begin(9600);
  Wire.begin();

  if (!aht.begin()) {
    Serial.println("AHT10 not found");
    while (1) delay(10);
  }
  Serial.println("AHT10 found");

  pinMode(4, OUTPUT); // LCD RS pin
  digitalWrite(4, LOW); // Initialize LCD
}

void loop() {
  sensors_event_t humidity, temp;
  aht.getEvent(&humidity, &temp);

  Serial.print("Temperature: ");
  Serial.print(temp.temperature);
  Serial.print(" C");
  Serial.print(" Humidity: ");
  Serial.print(humidity.relative_humidity);
  Serial.println(" %");

  // Send data to ESP8266
  espSerial.print("Temperature: ");
  espSerial.print(temp.temperature);
  espSerial.print(" C");
  espSerial.print(" Humidity: ");
  espSerial.print(humidity.relative_humidity);
  espSerial.println(" %");

  // Display data on LCD
  digitalWrite(4, HIGH); // Enable LCD
  delay(10);
  digitalWrite(4, LOW); // Disable LCD

  delay(2000); // Wait 2 seconds before next read
}
This code initializes the AHT10 sensor and the ESP8266-01 WiFi module. It reads temperature and humidity data from the AHT10 sensor, displays it on the Serial Enabled 16x2 LCD, and sends it over WiFi using the ESP8266-01 module. The LCD is controlled via the RS pin connected to D4 of the Arduino Nano.