
Circuit Documentation
Summary
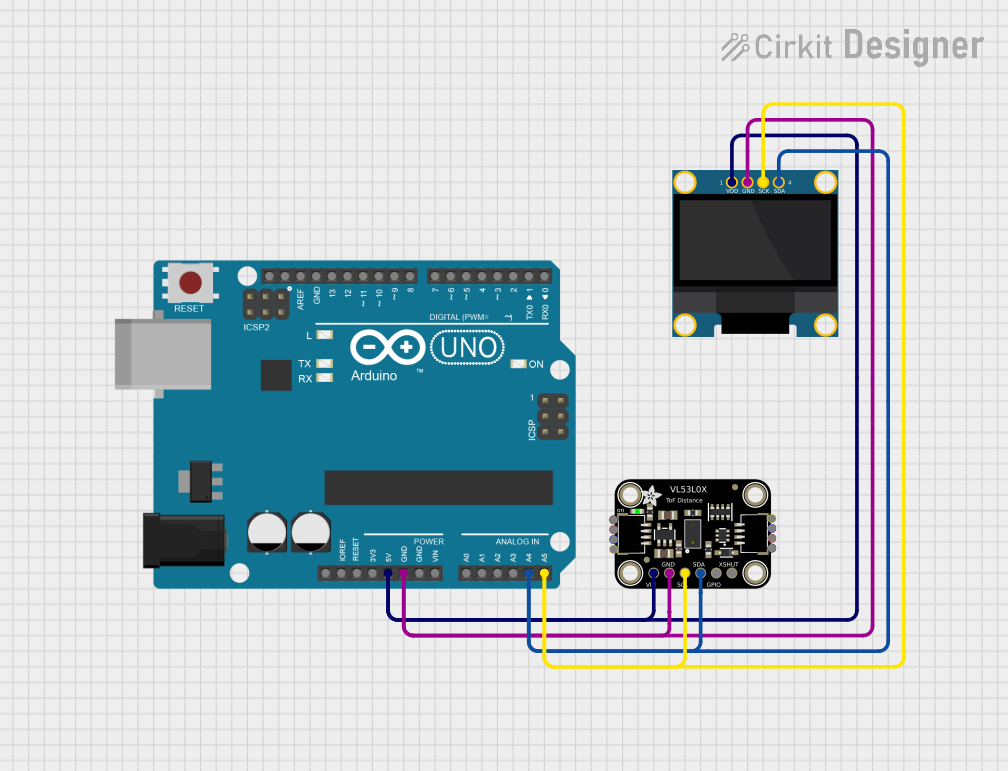
This circuit is designed to interface an Adafruit VL53L0X distance sensor with an OLED display using an Arduino UNO as the microcontroller. The Arduino communicates with both the sensor and the display via I2C protocol. The distance measured by the VL53L0X sensor is displayed on the OLED screen in real-time.
Component List
1. Adafruit VL53LOX
- Description: A time-of-flight distance sensor that provides accurate distance measurements.
- Purpose: To measure the distance to an object in front of the sensor.
2. Arduino UNO
- Description: A microcontroller board based on the ATmega328P.
- Purpose: To control the circuit, process data from the VL53L0X sensor, and manage the display output on the OLED.
3. OLED 128x64 I2C Monochrome Display
- Description: A small OLED display that can show graphics and text.
- Purpose: To visually display the distance readings from the VL53L0X sensor.
Wiring Details
Adafruit VL53LOX
- VCC: Connected to the 5V pin of the Arduino UNO.
- GND: Connected to the GND pin of the Arduino UNO.
- SCL: Connected to the A5 pin of the Arduino UNO (I2C clock).
- SDA: Connected to the A4 pin of the Arduino UNO (I2C data).
- GPIO: Not connected in this circuit.
- XSHUT: Tied to VCC (not used in this configuration).
Arduino UNO
- 5V: Supplies power to the VL53LOX and OLED display.
- GND: Common ground for all components.
- A4: I2C data line connected to the SDA pin of the VL53LOX and OLED display.
- A5: I2C clock line connected to the SCL pin of the VL53LOX and OLED display.
OLED 128x64 I2C Monochrome Display
- VDD: Connected to the 5V pin of the Arduino UNO.
- GND: Connected to the GND pin of the Arduino UNO.
- SCK: Connected to the A5 pin of the Arduino UNO (I2C clock).
- SDA: Connected to the A4 pin of the Arduino UNO (I2C data).
Documented Code
/*
 * Arduino Sketch for interfacing with the Adafruit VL53L0X sensor and
 * displaying the distance on an OLED display. This code initializes the
 * I2C communication with both the VL53L0X sensor and the OLED display
 * connected to the Arduino UNO. It reads the distance in millimeters
 * from the sensor and displays it on the OLED. The sensor and display
 * are powered by the 5V pin and communicate via the default SDA and SCL
 * pins on the Arduino UNO.
 */

#include <Wire.h>
#include <Adafruit_GFX.h>
#include <Adafruit_SSD1306.h>

#define SCREEN_WIDTH 128 // OLED display width, in pixels
#define SCREEN_HEIGHT 64 // OLED display height, in pixels

// Declaration for an SSD1306 display connected to I2C (SDA, SCL pins)
Adafruit_SSD1306 display(SCREEN_WIDTH, SCREEN_HEIGHT, &Wire, -1);

static const uint8_t VL53_ADDR = 0x29;   // VL53L0X default I2C address

// If you wired XSHUT to a digital pin, set that pin number here.
// If you tied XSHUT directly to VCC, set to -1.
static const int XSHUT_PIN = -1;         // XSHUT is tied to VCC

int readDistanceMm() {
  // Request 2 bytes; simulator returns big-endian mm
  Wire.requestFrom(VL53_ADDR, (uint8_t)2);
  if (Wire.available() < 2) {
    // Not enough data (device off, bus issue, etc.)
    return -1;
  }
  uint16_t hi = Wire.read();
  uint16_t lo = Wire.read();
  return (int)((hi << 8) | lo);
}

void setup() {
  Serial.begin(115200);
  while (!Serial) { /* wait for Serial on some boards */ }

  if (XSHUT_PIN >= 0) {
    pinMode(XSHUT_PIN, OUTPUT);
    digitalWrite(XSHUT_PIN, HIGH);  // bring sensor out of shutdown
    delay(10);
  }

  Wire.begin();          // uses default SDA/SCL pins for your board
  Wire.setClock(100000); // 100 kHz is fine

  if (!display.begin(SSD1306_SWITCHCAPVCC, 0x3C)) {
    Serial.println(F("SSD1306 allocation failed"));
    for (;;); // Don't proceed, loop forever
  }

  display.clearDisplay();
  display.setTextSize(1);
  display.setTextColor(SSD1306_WHITE);
  display.setCursor(0, 0);
  display.println(F("VL53L0X Distance:"));
  display.display();

  Serial.println(F("VL53L0X (sim) distance reader"));
}

void loop() {
  int mm = readDistanceMm();
  display.clearDisplay();
  display.setCursor(0, 0);
  display.println(F("VL53L0X Distance:"));
  if (mm >= 0) {
    Serial.print(F("Distance: "));
    Serial.print(mm);
    Serial.println(F(" mm"));
    display.setCursor(0, 10);
    display.print(mm);
    display.println(F(" mm"));
  } else {
    Serial.println(F("Read failed (is XSHUT HIGH and sensor on 0x29?)"));
    display.setCursor(0, 10);
    display.println(F("Read failed"));
  }
  display.display();
  delay(200);
}
This documentation provides a comprehensive overview of the circuit, detailing the components used, their connections, and the code that drives the functionality of the system.