
Circuit Documentation
Summary
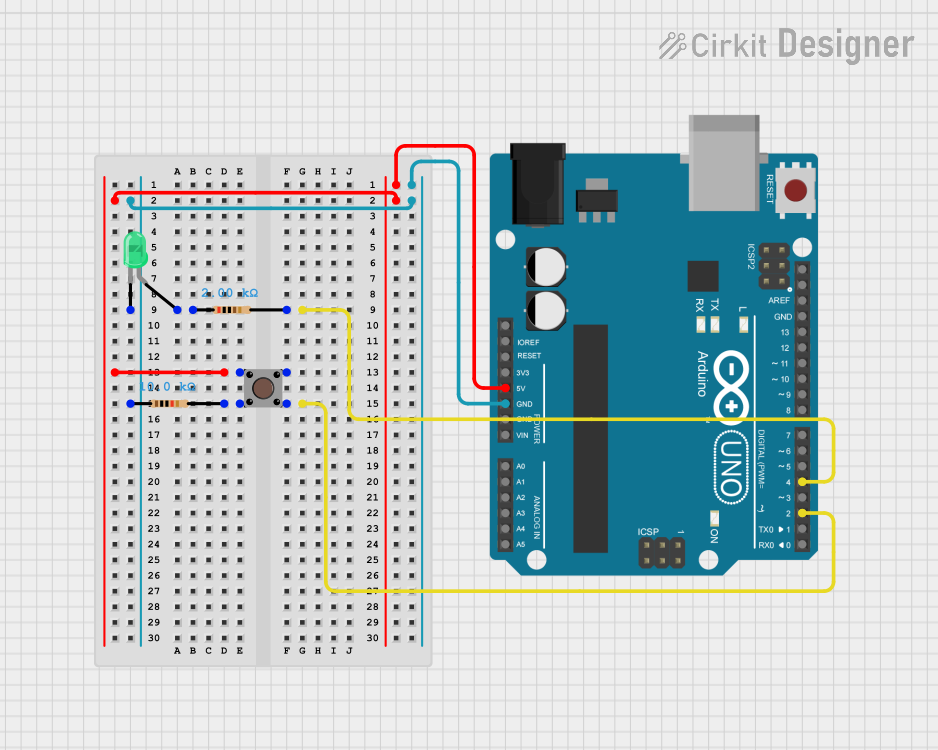
This circuit consists of an Arduino UNO microcontroller, a pushbutton, a green LED, and two resistors. The pushbutton is used to control the LED, which is connected to the Arduino through the resistors. The Arduino is programmed to respond to the pushbutton input and control the LED accordingly.
Component List
Arduino UNO
- Description: A microcontroller board based on the ATmega328P.
- Pins: UNUSED, IOREF, Reset, 3.3V, 5V, GND, Vin, A0, A1, A2, A3, A4, A5, SCL, SDA, AREF, D13, D12, D11, D10, D9, D8, D7, D6, D5, D4, D3, D2, D1, D0
Resistor (10k Ohms)
- Description: A resistor with a resistance of 10,000 Ohms.
- Pins: pin1, pin2
- Properties:
- Resistance: 10,000 Ohms
Resistor (2k Ohms)
- Description: A resistor with a resistance of 2,000 Ohms.
- Pins: pin1, pin2
- Properties:
- Resistance: 2,000 Ohms
Pushbutton
- Description: A simple pushbutton switch.
- Pins: Pin 3 (out), Pin 4 (out), Pin 1 (in), Pin 2 (in)
LED: Two Pin (green)
- Description: A green LED with two pins.
- Pins: cathode, anode
Wiring Details
Arduino UNO
- D4: Connected to pin2 of the 2k Ohm resistor.
- 5V: Connected to Pin 2 (in) of the pushbutton.
- D2: Connected to Pin 3 (out) of the pushbutton.
- GND: Connected to pin1 of the 10k Ohm resistor and cathode of the green LED.
Resistor (10k Ohms)
- pin1: Connected to GND of the Arduino UNO.
- pin2: Connected to Pin 4 (out) of the pushbutton.
Resistor (2k Ohms)
- pin1: Connected to anode of the green LED.
- pin2: Connected to D4 of the Arduino UNO.
Pushbutton
- Pin 2 (in): Connected to 5V of the Arduino UNO.
- Pin 3 (out): Connected to D2 of the Arduino UNO.
- Pin 4 (out): Connected to pin2 of the 10k Ohm resistor.
LED: Two Pin (green)
- cathode: Connected to GND of the Arduino UNO.
- anode: Connected to pin1 of the 2k Ohm resistor.
Code Documentation
Arduino UNO Code
sketch.ino
void setup() {
  // put your setup code here, to run once:

}

void loop() {
  // put your main code here, to run repeatedly:

}
documentation.txt