
Nucleo 401RE Dual 7-Segment Display Counter with User Button Control
View and Edit Project In Cirkit Designer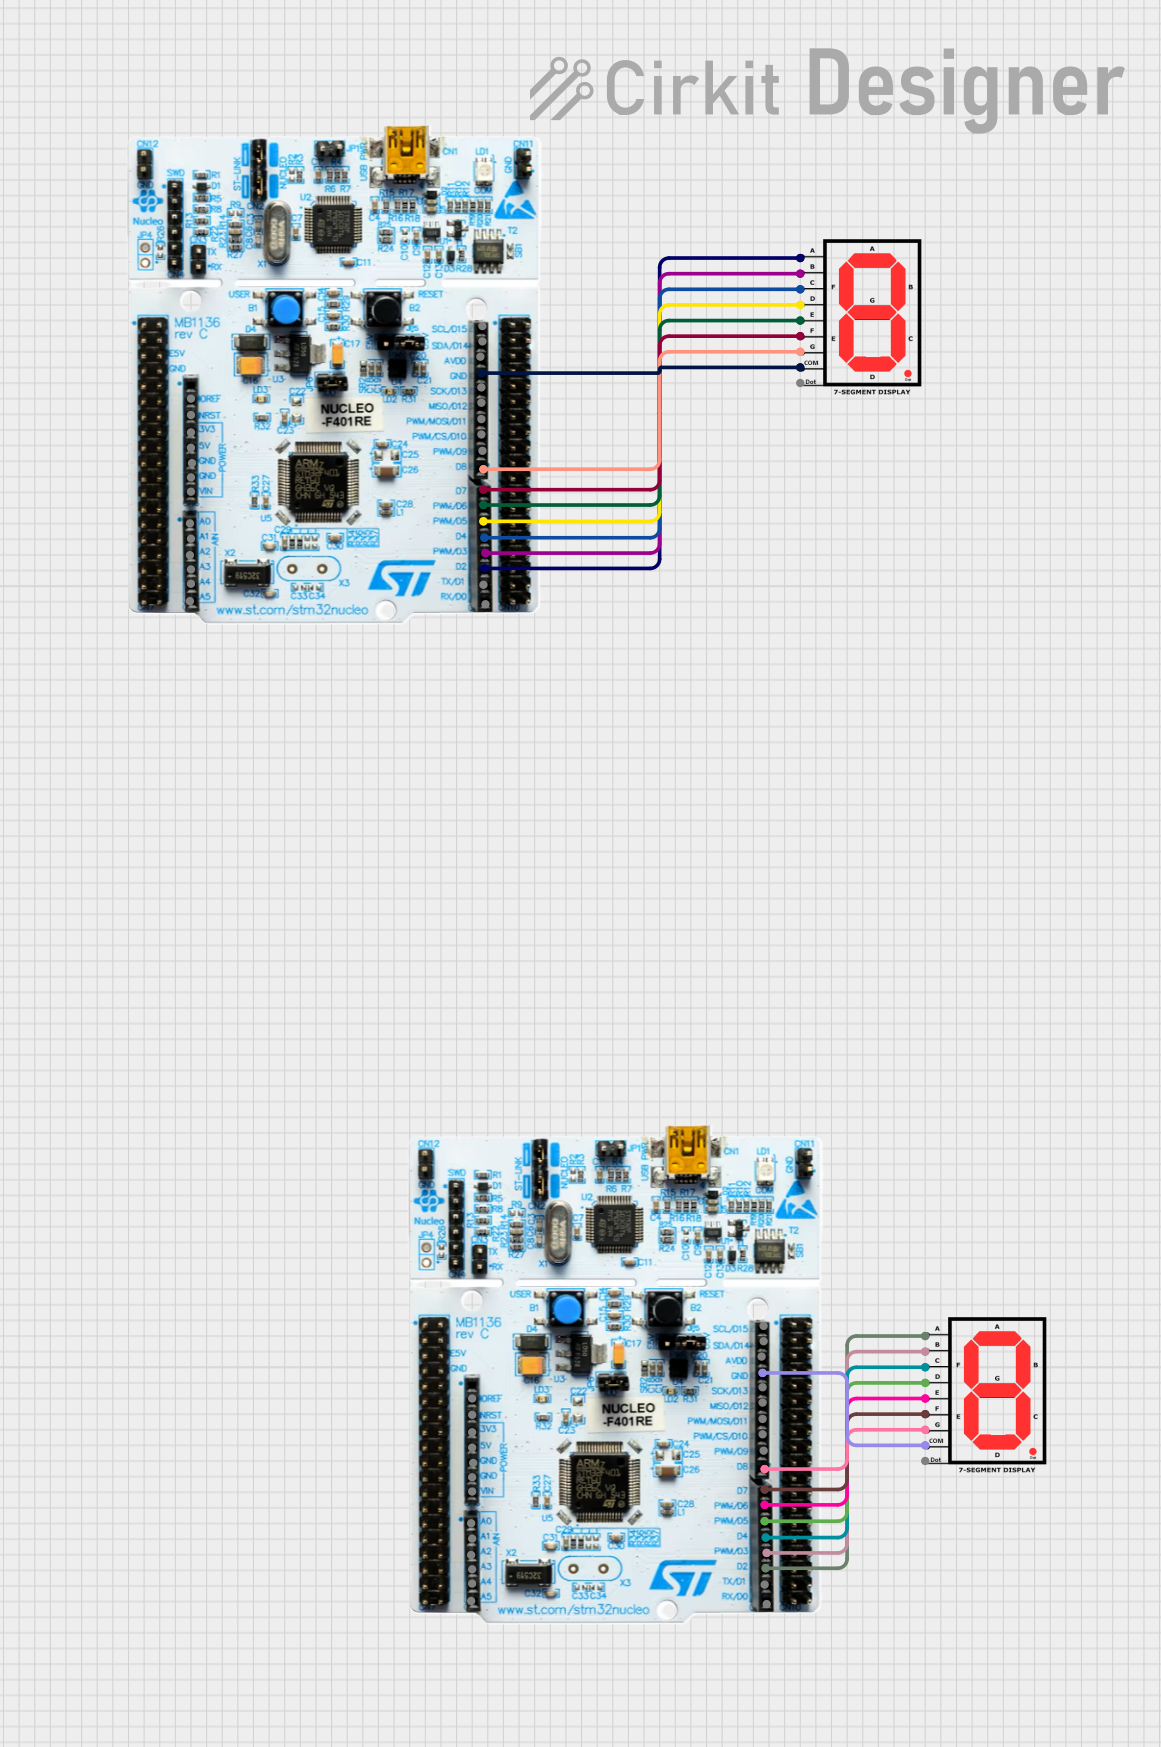
Circuit Documentation
Summary
This circuit involves two Nucleo 401RE microcontrollers and two 7-segment displays. Each microcontroller is connected to a 7-segment display, and one of the microcontrollers is programmed to count from 0 to 9 every second, displaying the count on the 7-segment display.
Component List
Nucleo 401RE
- Description: A development board featuring the STM32F401RE microcontroller.
- Pins: IOREF, NRST, 3V3, 5V, GND, VIN, A0, A1, A2, A3, A4, A5, D0, D1, D2, D3, D4, D5, D6, D7, D8, D9, D10, D11, D12, D13, AVD0, D14, D15
7-segment Display
- Description: A common anode 7-segment display.
- Pins: A, B, C, D, E, F, G, COM, dot
Wiring Details
Nucleo 401RE to 7-segment Display (First Pair)
- Nucleo 401RE Pin D2 to 7-segment Display Pin A
- Nucleo 401RE Pin D3 to 7-segment Display Pin B
- Nucleo 401RE Pin D4 to 7-segment Display Pin C
- Nucleo 401RE Pin D5 to 7-segment Display Pin D
- Nucleo 401RE Pin D6 to 7-segment Display Pin E
- Nucleo 401RE Pin D7 to 7-segment Display Pin F
- Nucleo 401RE Pin D8 to 7-segment Display Pin G
- Nucleo 401RE Pin GND to 7-segment Display Pin COM
Nucleo 401RE to 7-segment Display (Second Pair)
- Nucleo 401RE Pin D2 to 7-segment Display Pin A
- Nucleo 401RE Pin D3 to 7-segment Display Pin B
- Nucleo 401RE Pin D4 to 7-segment Display Pin C
- Nucleo 401RE Pin D5 to 7-segment Display Pin D
- Nucleo 401RE Pin D6 to 7-segment Display Pin E
- Nucleo 401RE Pin D7 to 7-segment Display Pin F
- Nucleo 401RE Pin D8 to 7-segment Display Pin G
- Nucleo 401RE Pin GND to 7-segment Display Pin COM
Code Documentation
Nucleo 401RE (First Microcontroller)
// Part 2: RTC with User Button
// This code uses a user button to start counting on the 7-segment display from 0 to 9 every second
// using a simple delay to simulate the RTC update every second.

#include "mbed.h"

// Define 7-segment display pins with letters from "Sohailla"
DigitalOut segS(D2);   // Segment A
DigitalOut segO(D3);   // Segment B
DigitalOut segH(D4);   // Segment C
DigitalOut segA(D5);   // Segment D
DigitalOut segI(D6);   // Segment E
DigitalOut segL(D7);   // Segment F
DigitalOut segA2(D8);  // Segment G (to differentiate, using A2)

// Define user button pin
InterruptIn userButton(PA_0);  // User button interrupt

// RTC state variables
bool counting = false;  // Flag to indicate counting state
int count = 0;          // Counter for the 7-segment display

// Function to update the 7-segment display
void displayNumber(int number) {
    switch (number) {
        case 1:
            segS = 0; segO = 1; segH = 1; segA = 0; segI = 0; segL = 0; segA2 = 0; // Display "1"
            break;
        case 2:
            segS = 1; segO = 1; segH = 0; segA = 1; segI = 1; segL = 0; segA2 = 1; // Display "2"
            break;
        case 3:
            segS = 1; segO = 1; segH = 1; segA = 1; segI = 0; segL = 0; segA2 = 1; // Display "3"
            break;
        case 4:
            segS = 0; segO = 1; segH = 1; segA = 0; segI = 0; segL = 1; segA2 = 1; // Display "4"
            break;
        case 5:
            segS = 1; segO = 0; segH = 1; segA = 1; segI = 0; segL = 1; segA2 = 1; // Display "5"
            break;
        case 6:
            segS = 1; segO = 0; segH = 1; segA = 1; segI = 1; segL = 1; segA2 = 1; // Display "6"
            break;
        case 7:
            segS = 1; segO = 1; segH = 1; segA = 0; segI = 0; segL = 0; segA2 = 0; // Display "7"
            break;
        case 8:
            segS = 1; segO = 1; segH = 1; segA = 1; segI = 1; segL = 1; segA2 = 1; // Display "8"
            break;
        case 9:
            segS = 1; segO = 1; segH = 1; segA = 1; segI = 0; segL = 1; segA2 = 1; // Display "9"
            break;
        default:
            segS = 1; segO = 1; segH = 1; segA = 1; segI = 1; segL = 1; segA2 = 0; // Default: Display "0"
            break;
    }
}

// Function to handle user button press
void userButtonPress() {
    counting = true;  // Start the counting process
    count = 0;        // Initialize the counter
}

// Main function to handle counting
int main() {
    userButton.fall(userButtonPress);  // Attach user button press handler

    while (true) {
        if (counting) {
            displayNumber(count);  // Display the current count (0-9)
            count = (count + 1) % 10; // Increment count, reset to 0 after 9

            // Simulate 1-second delay using sleep
            ThisThread::sleep_for(1s); // Sleep for 1 second
        }
    }
}
Nucleo 401RE (Second Microcontroller)
void setup() {
  // put your setup code here, to run once:

}

void loop() {
  // put your main code here, to run repeatedly:

}
This documentation provides a comprehensive overview of the circuit, including a summary, component list, wiring details, and the code used for the microcontrollers.