
Battery-Powered Voltage Monitoring System with OLED Display using ATmega328P
View and Edit Project In Cirkit Designer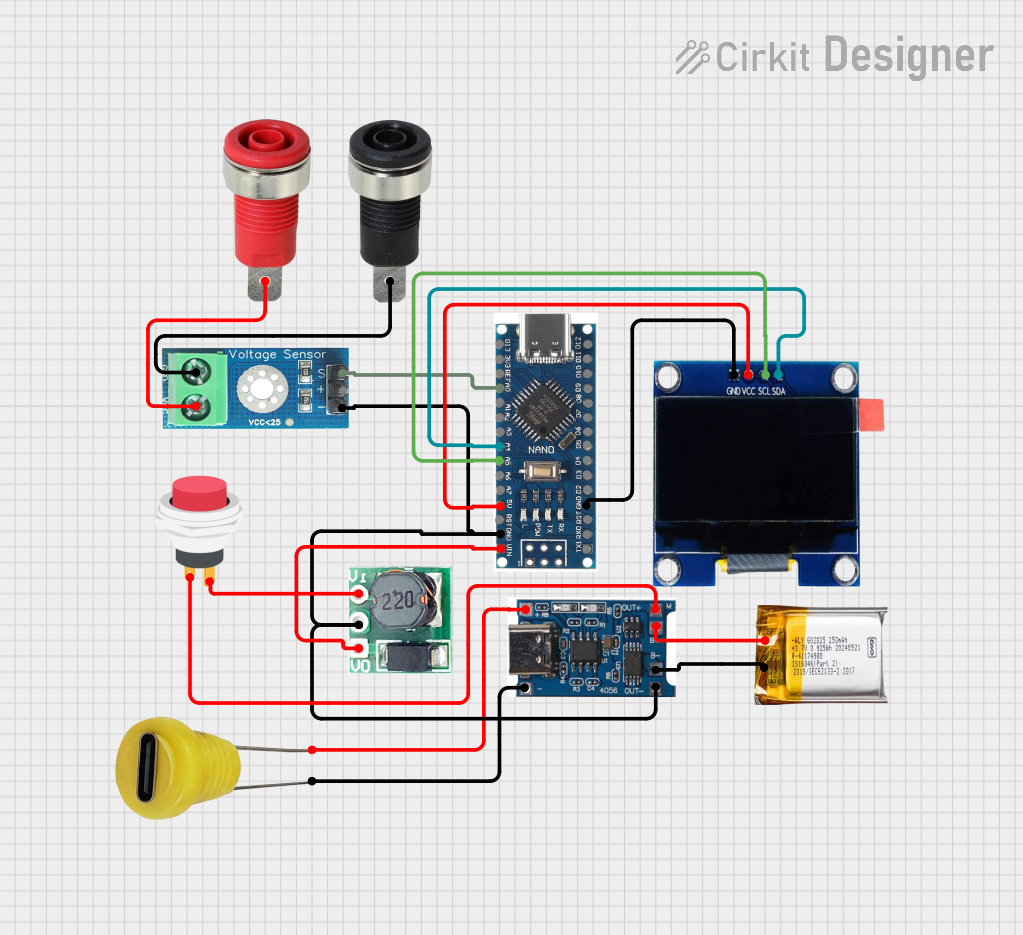
Circuit Documentation
Summary
This circuit is designed to measure and display voltage using an OLED display and a voltage sensor. The core of the circuit is an Arduino Nano 3.0 ATmega328P microcontroller, which reads the voltage from the sensor and displays it on the OLED screen. The circuit is powered by a 3.7V LiPo battery, which is charged using a battery charger module. A step-up boost converter is used to provide a stable 5V supply to the microcontroller and other components.
Component List
Nano 3.0 ATmega328P Type-C USB CH340 Controller Board
- Description: Microcontroller board based on the ATmega328P.
- Pins: D13, 3V3, REF, A0, A1, A2, A3, A4, A5, A6, A7, 5V, RST, GND, VIN, D11, D10, D9, D8, D7, D6, D5, D4, D3, D2, RX0, TX1, D12
OLED 1.3"
- Description: 1.3-inch OLED display.
- Pins: GND, VCC, SCL, SDA
Voltage Sensor DC 25V
- Description: Sensor to measure DC voltage up to 25V.
- Pins: +, -, output, gnd, vcc
2Pin Push Switch
- Description: Simple push-button switch.
- Pins: Input +, Output +
3.7v LiPo
- Description: 3.7V Lithium Polymer battery.
- Pins: +Ve, GND
Battery Charger 4.2v
- Description: Module to charge 3.7V LiPo batteries.
- Pins: OUT+, OUT-, B+, B-, IN+, IN-
Black Panel Mount 4mm Banana Socket
- Description: Black banana socket for panel mounting.
- Pins: Black_Pin
Red Panel Mount 4mm Banana Socket
- Description: Red banana socket for panel mounting.
- Pins: Red_Pin
5v Type C Dc Socket
- Description: Type-C DC socket for 5V input.
- Pins: - Negative, + Positive
Step Up Boost 3v-5v
- Description: Boost converter to step up voltage from 3V to 5V.
- Pins: Vi, GND, Vo
Wiring Details
Nano 3.0 ATmega328P Type-C USB CH340 Controller Board
- A0 connected to Voltage Sensor DC 25V (output)
- A4 connected to OLED 1.3" (SDA)
- A5 connected to OLED 1.3" (SCL)
- 5V connected to OLED 1.3" (VCC)
- GND connected to Step Up Boost 3v-5v (GND), Battery Charger 4.2v (OUT-), Voltage Sensor DC 25V (-), OLED 1.3" (GND)
- VIN connected to Step Up Boost 3v-5v (Vo)
OLED 1.3"
- SDA connected to Nano 3.0 ATmega328P (A4)
- SCL connected to Nano 3.0 ATmega328P (A5)
- VCC connected to Nano 3.0 ATmega328P (5V)
- GND connected to Nano 3.0 ATmega328P (GND)
Voltage Sensor DC 25V
- output connected to Nano 3.0 ATmega328P (A0)
- - connected to Nano 3.0 ATmega328P (GND)
- gnd connected to Black Panel Mount 4mm Banana Socket (Black_Pin)
- vcc connected to Red Panel Mount 4mm Banana Socket (Red_Pin)
2Pin Push Switch
- Input + connected to Battery Charger 4.2v (OUT+)
- Output + connected to Step Up Boost 3v-5v (Vi)
3.7v LiPo
- +Ve connected to Battery Charger 4.2v (B+)
- GND connected to Battery Charger 4.2v (B-)
Battery Charger 4.2v
- OUT+ connected to 2Pin Push Switch (Input +)
- OUT- connected to Nano 3.0 ATmega328P (GND), Step Up Boost 3v-5v (GND)
- B+ connected to 3.7v LiPo (+Ve)
- B- connected to 3.7v LiPo (GND)
- IN+ connected to 5v Type C Dc Socket (+ Positive)
- IN- connected to 5v Type C Dc Socket (- Negative)
Black Panel Mount 4mm Banana Socket
- Black_Pin connected to Voltage Sensor DC 25V (gnd)
Red Panel Mount 4mm Banana Socket
- Red_Pin connected to Voltage Sensor DC 25V (vcc)
5v Type C Dc Socket
- - Negative connected to Battery Charger 4.2v (IN-)
- + Positive connected to Battery Charger 4.2v (IN+)
Step Up Boost 3v-5v
- GND connected to Battery Charger 4.2v (OUT-), Nano 3.0 ATmega328P (GND)
- Vo connected to Nano 3.0 ATmega328P (VIN)
- Vi connected to 2Pin Push Switch (Output +)
Documented Code
void setup() {
  // put your setup code here, to run once:
#include "U8g2lib.h"

U8G2_SH1106_128X64_NONAME_F_HW_I2C u8g2(U8G2_R0, /* reset=*/U8X8_PIN_NONE);
int progress = 0;         // progress in degrees
int progress_inc = 2;     // progress increment
char string_buffer[10];   // helper buffer for converting numbers into c-style strings
float adjusted_progress;  // adjusted progress for smoother animation

void setup() {
  u8g2.begin();          // begin u8g2
  // Serial.begin(115200);  // begin serial communication

  u8g2.sendBuffer();
  delay(3000);
  u8g2.clearBuffer();
  u8g2.setFont(u8g2_font_luBIS18_tr);
  char title[] = "Physics";
  char prof[] = "Prof. Ace Duque";
  int centerY = (u8g2.getDisplayHeight() - 24) / 2;
  int centerX = (u8g2.getDisplayWidth() - (strlen(title) * 14)) / 2;  // Center horizontally
  u8g2.drawStr(centerX, 30, title);

  // u8g2.setFont(u8g2_font_6x13_me);
  // u8g2.drawStr((u8g2.getDisplayWidth() - (strlen(prof) * 14) / 2), 50, prof);
  u8g2.sendBuffer();
  delay(2000);
  showMembers();
  u8g2.clearBuffer();
}

// those two functions (clamp and smoothstep) are used to add some easing to the animations of the main value
float clamp(float x, float lowerlimit = 0.0f, float upperlimit = 1.0f) {
  if (x < lowerlimit) return lowerlimit;
  if (x > upperlimit) return upperlimit;
  return x;
}

float smoothstep(float x, float edge0 = 0.0f, float edge1 = 1.0f) {
  // Scale, and clamp x to 0..1 range
  x = clamp((x - edge0) / (edge1 - edge0));

  return x * x * (3.0f - 2.0f * x);
}

#define MAX_VALUE 25  // Maximum value for the gauge
void showMembers() {
  const char* names[] = {
    "GROUP III", "",
    "Escarlan, Sherwin",
    "Lopez, Adrianna Rose",
    "Lopez, Mark Anthony",
    "Maigue, Hermie",
    "Manigos, Troy Mike",
    "Medio, Tuesday Smile",
    "Mingute, Agustin", "",
    "BS-IS 403",
    "A.Y 2024-2025"
  };
  const int num