
Circuit Documentation
Summary
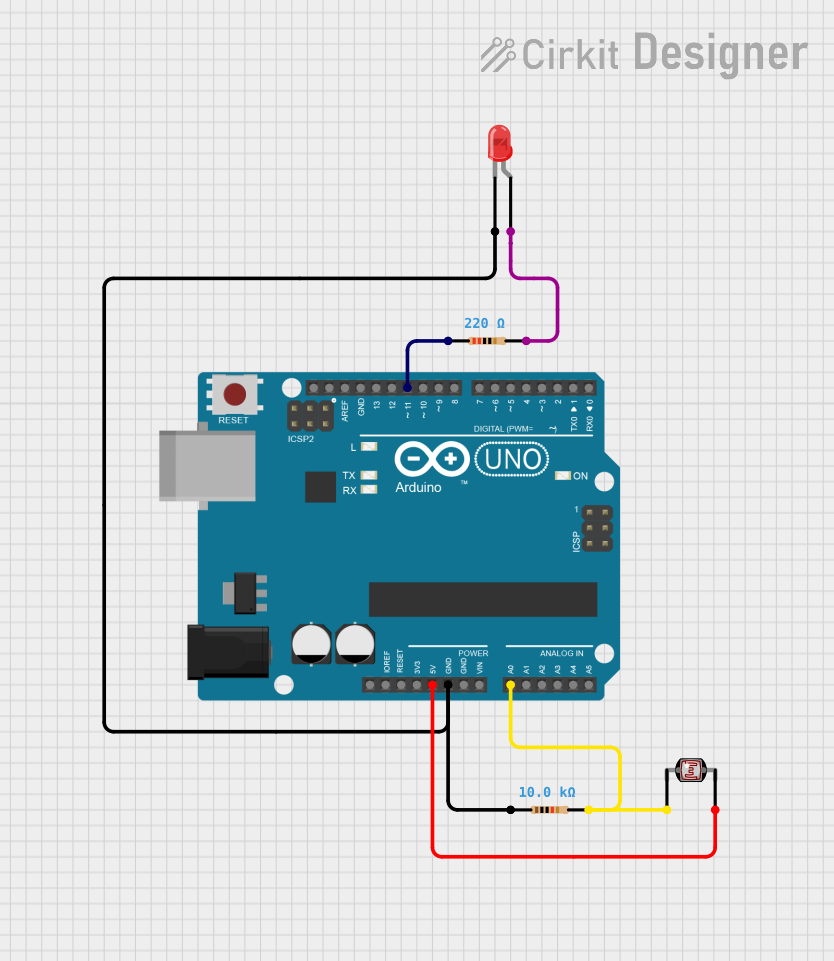
This circuit is designed to measure light intensity using a photocell (Light Dependent Resistor, LDR) and adjust the brightness of an LED accordingly. The photocell forms part of a voltage divider network connected to an Arduino UNO's analog input. The LED's brightness is controlled by a PWM output from the Arduino, which varies in response to the light level detected by the photocell. The circuit includes resistors for current limiting and voltage division purposes.
Component List
Resistor (10k Ohms)
- Description: A resistor with a resistance of 10,000 Ohms, used in the voltage divider with the photocell.
- Pins: pin1, pin2
Resistor (220 Ohms)
- Description: A resistor with a resistance of 220 Ohms, used as a current-limiting resistor for the LED.
- Pins: pin1, pin2
Photocell (LDR)
- Description: A light-dependent resistor whose resistance changes with light intensity.
- Pins: pin 0, pin 1
Arduino UNO
- Description: A microcontroller board based on the ATmega328P, used for processing the signal from the photocell and controlling the LED brightness.
- Pins: UNUSED, IOREF, Reset, 3.3V, 5V, GND, Vin, A0, A1, A2, A3, A4, A5, SCL, SDA, AREF, D13, D12, D11, D10, D9, D8, D7, D6, D5, D4, D3, D2, D1, D0
LED: Two Pin (red)
- Description: A red LED used to indicate light intensity as measured by the photocell.
- Pins: cathode, anode
Wiring Details
Arduino UNO
- 5V pin connected to the Photocell (LDR) pin 1
- GND pin connected to:
- LED (red) cathode
- Resistor (10k Ohms) pin1
- A0 pin connected to:
- Photocell (LDR) pin 0
- Resistor (10k Ohms) pin2
- D11 pin connected to Resistor (220 Ohms) pin1
Photocell (LDR)
- pin 1 connected to Arduino UNO 5V
- pin 0 connected to Arduino UNO A0
Resistor (10k Ohms)
- pin1 connected to Arduino UNO GND
- pin2 connected to Arduino UNO A0
Resistor (220 Ohms)
- pin1 connected to Arduino UNO D11
- pin2 connected to LED (red) anode
LED: Two Pin (red)
- cathode connected to Arduino UNO GND
- anode connected to Resistor (220 Ohms) pin2
Documented Code
/*
  Photocell Light Sensitivity Tester

  This sketch is designed to read the light level from a photocell (also known as a photoresistor or LDR) and adjust
  the brightness of an LED accordingly.
  The photocell is part of a voltage divider connected to analog input A0, with a 10K resistor connecting to ground.
  The LED is connected to digital pin 11 through a current-limiting resistor.
  As the light level decreases, the LED brightness increases.

  Circuit connections:
  - Photocell one end connected to 5V
  - Photocell other end connected to A0
  - 10K resistor from A0 to GND
  - LED anode connected to pin 11 through a resistor
  - LED cathode connected to GND
*/

int photocellPin = A0; // the cell and 10K pulldown are connected to A0
int photocellReading;   // the analog reading from the sensor divider
int LEDpin = 11;        // connect Red LED to pin 11 (PWM pin)
int LEDbrightness;      // variable to store the brightness value

void setup() {
  Serial.begin(9600); // Start serial communication for debugging
}

void loop() {
  photocellReading = analogRead(photocellPin); // read the value from the sensor

  Serial.print("Analog reading = ");
  Serial.println(photocellReading); // print the raw analog reading

  // Invert the reading since the LED gets brighter in darkness
  photocellReading = 1023 - photocellReading;

  // Map the reading to the PWM range (0-255) and set LED brightness
  LEDbrightness = map(photocellReading, 0, 1023, 0, 255);
  analogWrite(LEDpin, LEDbrightness);

  delay(100); // Wait for 100 milliseconds before the next loop
}
This code is designed to run on the Arduino UNO and uses its analog and digital I/O pins to read the light level from the photocell and control the LED brightness. The serial communication is used for debugging purposes to output the raw analog reading from the photocell.