
Arduino Nano-Based Sign Language Interpreter with LCD Display and Flex Sensors
View and Edit Project In Cirkit Designer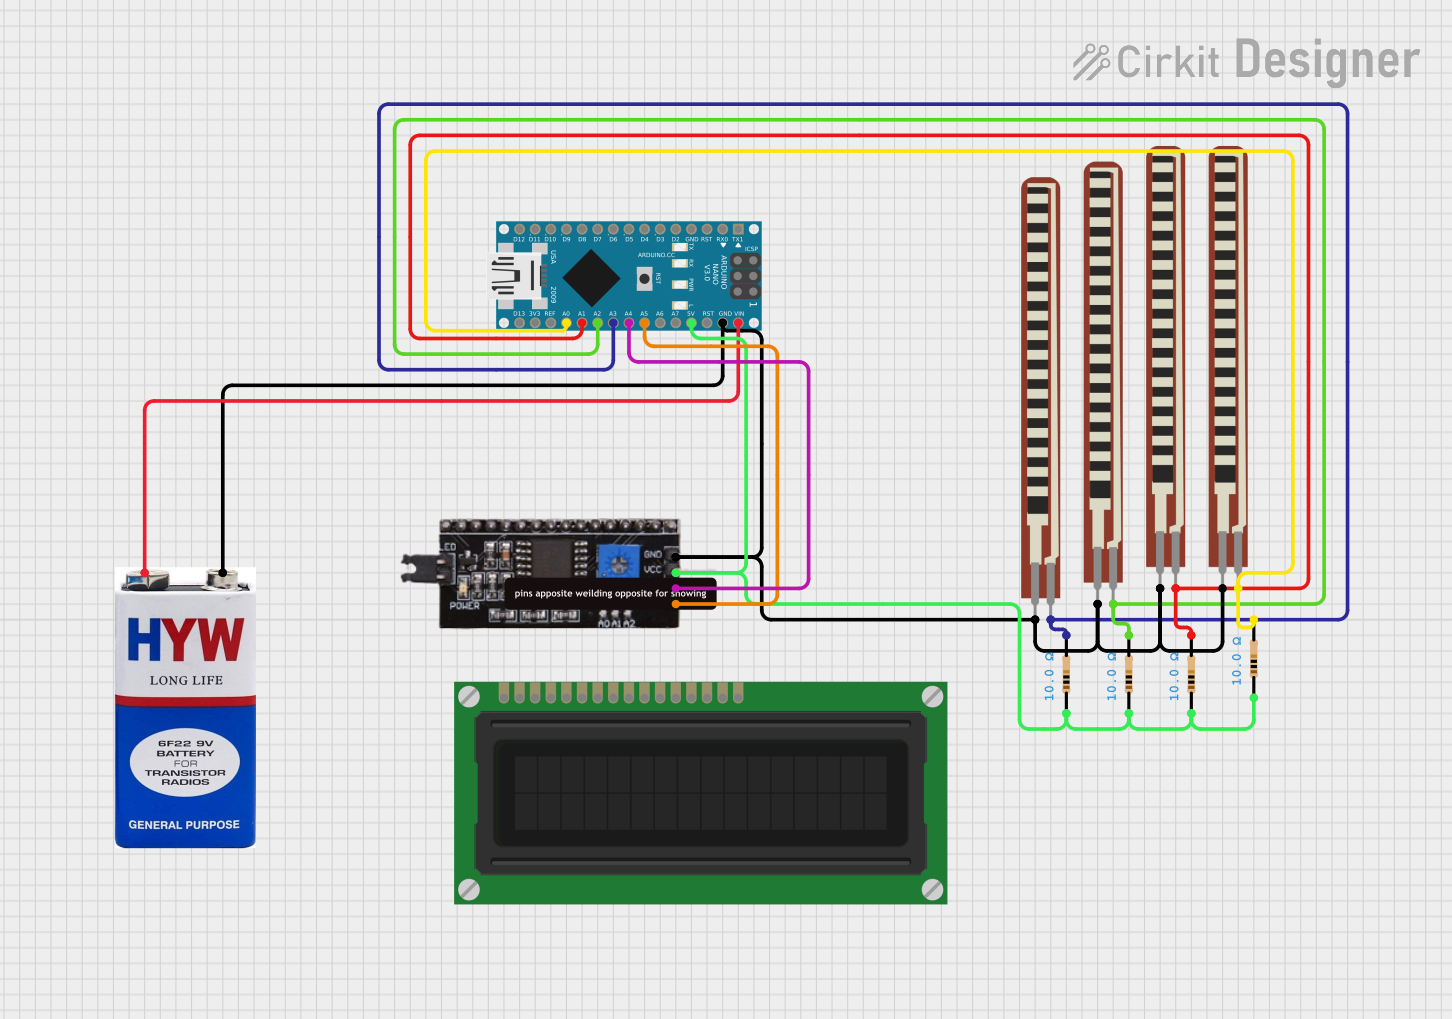
Circuit Documentation
Summary
This circuit involves an Arduino Nano microcontroller interfacing with various components including an I2C module, multiple resistors, flex resistors, a 9V battery, and an LCD display. The circuit is designed to read analog signals from flex resistors and display corresponding messages on an LCD screen. The Arduino Nano also communicates with the I2C module to control the LCD display.
Component List
Arduino Nano
- Description: A small, complete, and breadboard-friendly board based on the ATmega328P.
- Pins: D1/TX, D0/RX, RESET, GND, D2, D3, D4, D5, D6, D7, D8, D9, D10, D11/MOSI, D12/MISO, VIN, 5V, A7, A6, A5, A4, A3, A2, A1, A0, AREF, 3V3, D13/SCK
I2C Module
- Description: A module used for I2C communication.
- Pins: SCL, SDA, VCC, GND
2.2 inch Basic Flex Resistor
- Description: A flex sensor that changes resistance when bent.
- Pins: Pin 2, Pin 1
9V Battery
- Description: A standard 9V battery used to power the circuit.
- Pins: +, -
Resistor (10 Ohms)
- Description: A resistor with a resistance of 10 Ohms.
- Pins: pin1, pin2
LCD Display (16 pin)
- Description: A 16x2 character LCD display.
- Pins: VSS, VDD, VO, RS, R_W, E, DB0, DB1, DB2, DB3, DB4, DB5, DB6, DB7, A, K
Wiring Details
Arduino Nano
5V connected to:
- Resistor pin1
- I2C module VCC
A2 connected to:
- Resistor pin2
- 2.2 inch Basic Flex Resistor pin 1
A1 connected to:
- Resistor pin2
- 2.2 inch Basic Flex Resistor pin 1
A3 connected to:
- Resistor pin2
- 2.2 inch Basic Flex Resistor pin 1
A0 connected to:
- Resistor pin2
- 2.2 inch Basic Flex Resistor pin 1
VIN connected to:
- 9V battery +
GND connected to:
- 9V battery -
- I2C module GND
- 2.2 inch Basic Flex Resistor Pin 2
A5 connected to:
- I2C module SCL
A4 connected to:
- I2C module SDA
I2C Module
VCC connected to:
- Arduino Nano 5V
GND connected to:
- Arduino Nano GND
SCL connected to:
- Arduino Nano A5
SDA connected to:
- Arduino Nano A4
2.2 inch Basic Flex Resistor
Pin 1 connected to:
- Resistor pin2
- Arduino Nano A2, A1, A3, A0
Pin 2 connected to:
- 9V battery -
- Arduino Nano GND
9V Battery
+ connected to:
- Arduino Nano VIN
- connected to:
- Arduino Nano GND
- 2.2 inch Basic Flex Resistor Pin 2
Resistor (10 Ohms)
pin1 connected to:
- Arduino Nano 5V
pin2 connected to:
- 2.2 inch Basic Flex Resistor pin 1
- Arduino Nano A2, A1, A3, A0
LCD Display (16 pin)
- VSS, VDD, VO, RS, R_W, E, DB0, DB1, DB2, DB3, DB4, DB5, DB6, DB7, A, K: Not explicitly connected in the provided net list.
Code Documentation
Arduino Nano Code
//Hardik & veer
#include <Wire.h>
#include <LiquidCrystal_I2C.h>

LiquidCrystal_I2C lcd(0x3F, 16, 2); // 0x3F address i2c, 0x27 address i2c

void setup() {
  Serial.begin(9600);
  lcd.init();
  lcd.backlight();
  lcd.setCursor(0, 0);
  lcd.print("SIGN LANGUAGE");
  pinMode(13, OUTPUT);
}

void loop() {
  int s1 = analogRead(A0);
  int s2 = analogRead(A1);
  int s3 = analogRead(A2);
  int s4 = analogRead(A3);

  Serial.println(s1);
  Serial.println("Washroom");

  Serial.println(s2);
  Serial.println("Drink water");

  Serial.println(s3);
  Serial.println("Food");

  Serial.println(s4);
  Serial.println("Emergency");

  if (s1 < 150) {
    digitalWrite(13, LOW);
    Serial.println("WashRoom");
    lcd.setCursor(0, 1);
    lcd.print("   WASHROOM         ");
    delay(2000);
  } else if (s2 < 200) {
    digitalWrite(13, HIGH);
    Serial.println("Drink Water");
    lcd.setCursor(0, 1);
    lcd.print("  DRINK WATER         ");
    delay(2000);
  } else if (s3 < 150) {
    digitalWrite(13, LOW);
    Serial.println("Food");
    lcd.setCursor(0, 1);
    lcd.print("      FOOD         ");
    delay(2000);
  } else if (s4 < 130) {
    digitalWrite(13, HIGH);
    Serial.println("Emergency");
    lcd.setCursor(0, 1);
    lcd.print("      EMERGENCY         ");
    delay(2000);
  } else {
    Serial.println("   NOTHING      ");
    lcd.setCursor(0, 1);
    lcd.print("    NOTHING        ");
  }
}
I2C Module Code
void setup() {
  // put your setup code here, to run once:
}

void loop() {
  // put your main code here, to run repeatedly:
}
Flex Resistor Code
//Prateek
//wwww.prateeks.in
//www.justdoelectronics.com
//https://www.youtube.com/c/JustDoElectronics/videos

#include "SoftwareSerial.h"
#include <LiquidCrystal_I2C.h>
#include <SoftwareSerial.h>
SoftwareSerial mySerial(3, 2);
LiquidCrystal_I2C lcd(0x27, 16, 2);

#define blue 2
#define green 3
#define red 4

unsigned int f;
unsigned int g;
unsigned int h;

void setup() {
  pinMode(blue, OUTPUT);
  pinMode(green, OUTPUT);
  pinMode(red, OUTPUT);
  Serial.begin(9600);
  mySerial.begin(9600);
  Serial.println();
  lcd.init();
  lcd.backlight();
  lcd.setCursor(0, 0);
  lcd.print("  Welcome To");
  lcd.setCursor(0, 1);
  lcd.print("JustDoElectronic");
  lcd.clear();
  delay(3000);
}

void loop() {
  f = analogRead(1);
  g = analogRead(2);
  h = analogRead(3);

  if (f <= 722) {
    digitalWrite(blue, HIGH);
    digitalWrite(green, LOW);
    digitalWrite(red, LOW);
    mySerial.println("Plz Give Me Water");
    lcd.clear();
    lcd.setCursor(0, 0);
    lcd.print("  Plz Give Me");
    lcd.setCursor(0, 1);
    lcd.print("     Water   ");
    delay(3000);
    lcd.clear();
    lcd.setCursor(0, 0);
    lcd.print(" If Anything");
    lcd.setCursor(0, 1);
    lcd.print("  You Want ");
  } else if (g <= 670) {
    digitalWrite(green, HIGH);
    digitalWrite(blue, LOW);
    digitalWrite(red, LOW);
    mySerial.println("Plz Give Me Food");
    lcd.clear();
    lcd.setCursor(0, 0);
    lcd.print("  Plz Give Me ");
    lcd.setCursor(0, 1);
    lcd.print("     Food   ");
    delay(3000);
    lcd.clear();
    lcd.setCursor(0, 0);
    lcd.print(" If Anything");
    lcd.setCursor(0, 1);
    lcd.print("  You Want ");
  } else if (h <= 675) {