
Arduino UNO Controlled Smoke Detection and Motor Activation System
View and Edit Project In Cirkit Designer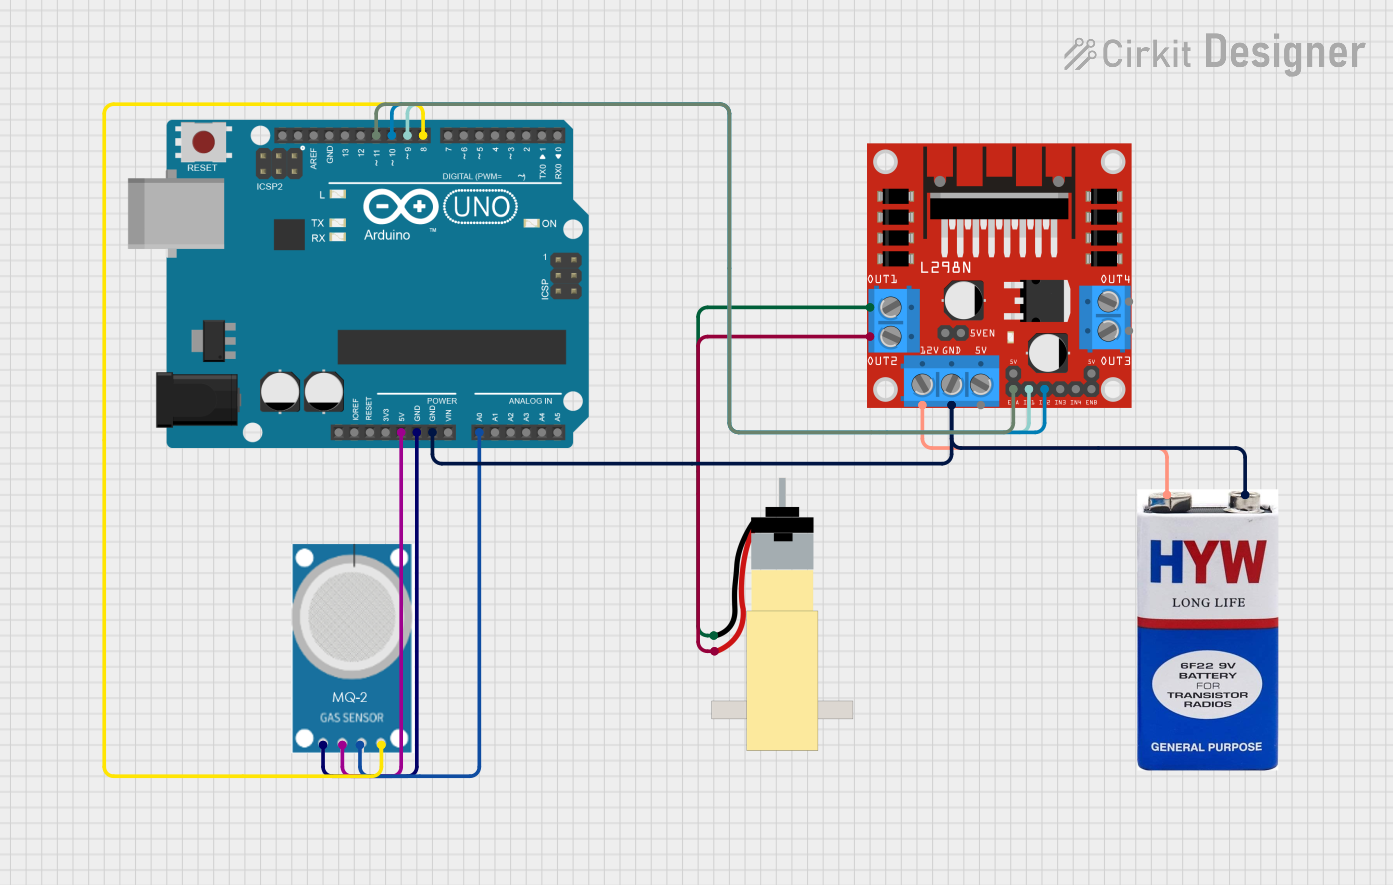
Circuit Documentation
Summary
This circuit is designed to monitor the environment for smoke using an MQ-2 gas sensor and activate a DC motor using an L298N motor driver when smoke is detected. The Arduino UNO serves as the central control unit, reading the sensor data and controlling the motor based on the detected smoke levels. A 9V battery provides power to the motor driver, which in turn drives a hobby gearmotor.
Component List
Arduino UNO
- Description: A microcontroller board based on the ATmega328P.
- Purpose: Acts as the central processing unit for the circuit, reading sensor data and controlling the motor.
L298N DC Motor Driver
- Description: A high-power motor driver module capable of driving up to two DC motors.
- Purpose: Drives the hobby gearmotor based on commands from the Arduino UNO.
Hobby Gearmotor with 48:1 Gearbox
- Description: A DC motor with an attached gearbox for increased torque.
- Purpose: Provides physical action in response to smoke detection.
MQ-2 Gas Sensor
- Description: A gas sensor capable of detecting a variety of gases including smoke.
- Purpose: Monitors the environment for the presence of smoke.
9V Battery
- Description: A standard 9V battery.
- Purpose: Supplies power to the motor driver and, indirectly, to the motor.
Wiring Details
Arduino UNO
- 5V connected to MQ-2 VCC
- GND connected to MQ-2 GND and L298N GND
- A0 connected to MQ-2 ANALOG
- D11 connected to L298N ENA
- D10 connected to L298N IN2
- D9 connected to L298N IN1
- D8 connected to MQ-2 Digital
L298N DC Motor Driver
- GND connected to Arduino UNO GND and 9V Battery -
- 12V connected to 9V Battery +
- ENA connected to Arduino UNO D11
- IN1 connected to Arduino UNO D9
- IN2 connected to Arduino UNO D10
- OUT1 connected to Hobby Gearmotor pin 1
- OUT2 connected to Hobby Gearmotor pin 2
Hobby Gearmotor with 48:1 Gearbox
- Pin 1 connected to L298N OUT1
- Pin 2 connected to L298N OUT2
MQ-2 Gas Sensor
- VCC connected to Arduino UNO 5V
- GND connected to Arduino UNO GND
- ANALOG connected to Arduino UNO A0
- Digital connected to Arduino UNO D8
9V Battery
- + connected to L298N 12V
- - connected to L298N GND
Documented Code
// Define pins
const int mq2Pin = A0;      // Analog pin for MQ2 sensor
const int motorPin1 = 9;    // Motor control pin 1
const int motorPin2 = 10;   // Motor control pin 2
const int enablePin = 11;   // PWM-enabled pin for speed control

// Set threshold for smoke detection
int smokeThreshold = 100;  // Adjust based on sensor calibration

void setup() {
  // Initialize serial communication
  Serial.begin(9600);

  // Set motor pins as output
  pinMode(motorPin1, OUTPUT);
  pinMode(motorPin2, OUTPUT);
  pinMode(enablePin, OUTPUT);
}

void loop() {
  // Read MQ2 sensor value
  int mq2Value = analogRead(mq2Pin);

  // Print MQ2 sensor value for debugging
  Serial.print("Smoke level: ");
  Serial.println(mq2Value);

  // Check if smoke level exceeds threshold
  if (mq2Value > smokeThreshold) {
    Serial.println("Smoke detected! Activating motor...");

    // Turn on the motor
    digitalWrite(motorPin1, HIGH);
    digitalWrite(motorPin2, LOW);
    analogWrite(enablePin, 300);  // Control speed (0-255)

    delay(1000);  // Run motor for 2 seconds
  } else {
    // Stop the motor
    digitalWrite(motorPin1, LOW);
    digitalWrite(motorPin2, LOW);
  }

  // Small delay before next reading
  delay(700);
}
This code is designed to be uploaded to the Arduino UNO. It initializes the motor control pins and the MQ-2 sensor pin. In the main loop, it reads the analog value from the MQ-2 sensor and compares it to a predefined threshold. If the smoke level is above the threshold, it activates the motor for a short period. The motor speed is controlled by a PWM signal on the enable pin.