
Circuit Documentation
Summary
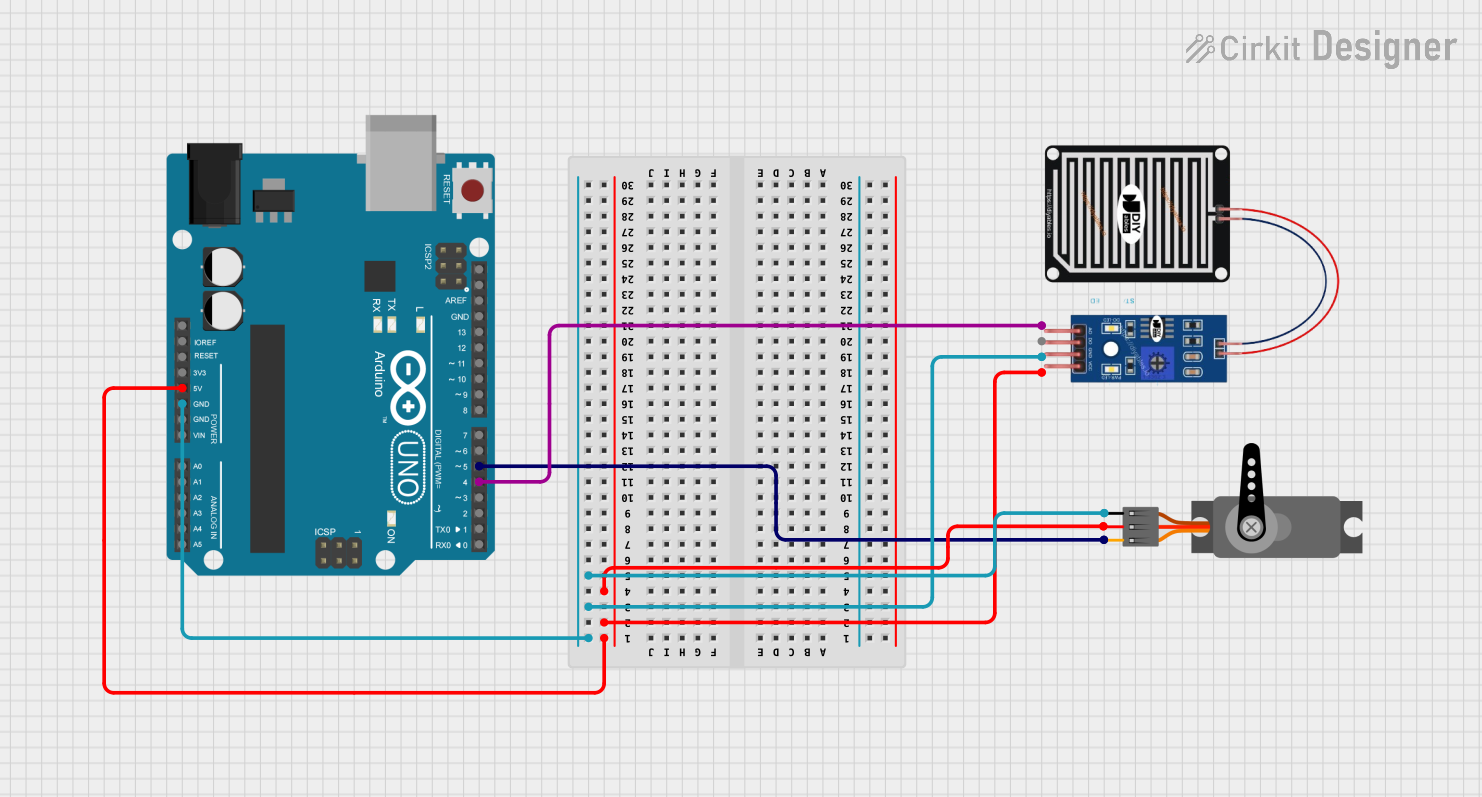
This circuit is designed to interface a rain sensor with an Arduino UNO microcontroller and control a servo motor based on the sensor's input. The rain sensor detects the presence of rain and sends a signal to the Arduino, which processes the input and drives the servo motor to a specific position depending on whether rain is detected or not.
Component List
RAIN SENSOR
- Pins: AO (Analog Output), DO (Digital Output), GRD (Ground), VCC (Power Supply)
- Description: A sensor that detects rain by measuring the resistance of raindrops on its surface.
- Purpose: To provide the Arduino UNO with an analog signal proportional to the amount of rainfall.
Arduino UNO
- Pins: UNUSED, IOREF, Reset, 3.3V, 5V, GND, Vin, A0-A5, SCL, SDA, AREF, D0-D13
- Description: A microcontroller board based on the ATmega328P, with digital and analog I/O pins.
- Purpose: To process the signal from the rain sensor and control the servo motor accordingly.
Servo
- Pins: GND (Ground), VCC (Power Supply), PWM (Pulse Width Modulation)
- Description: An actuator that can be precisely controlled to move to a specific angle.
- Purpose: To perform a physical action (e.g., moving a lever) in response to the rain sensor's input.
Wiring Details
RAIN SENSOR
- AO: Connected to Arduino UNO's D4 pin.
- GRD: Connected to Arduino UNO's GND pin and Servo's GND pin.
- VCC: Connected to Arduino UNO's 5V pin and Servo's VCC pin.
Arduino UNO
- D4: Receives the analog signal from the rain sensor's AO pin.
- GND: Common ground shared with the rain sensor and servo.
- 5V: Provides power to the rain sensor and servo.
- D5: Sends PWM signal to control the servo.
Servo
- GND: Connected to Arduino UNO's GND pin.
- VCC: Receives power from Arduino UNO's 5V pin.
- PWM: Receives PWM control signal from Arduino UNO's D5 pin.
Documented Code
Arduino UNO Code
#include <Servo.h>

Servo tap_servo;

int sensor_pin = 4;
int tap_servo_pin = 5;
int val;

void setup(){
  pinMode(sensor_pin, INPUT);
  tap_servo.attach(tap_servo_pin);
}

void loop(){
  val = digitalRead(sensor_pin);

  if (val == 0) {
    tap_servo.write(0);
  }
  if (val == 1) {
    tap_servo.write(180);
  }
}
Description: This code snippet is for the Arduino UNO. It initializes the rain sensor input pin and the servo motor control pin. In the loop function, it reads the digital value from the rain sensor. If the sensor detects rain (val == 1), the servo is set to 180 degrees. If no rain is detected (val == 0), the servo is set to 0 degrees.
RAIN SENSOR Code
The rain sensor does not have associated embedded code as it is a passive sensor that provides an analog output to the Arduino UNO.
Servo Code
The servo is controlled directly by the Arduino UNO using the Servo library, and as such, it does not have separate embedded code.