
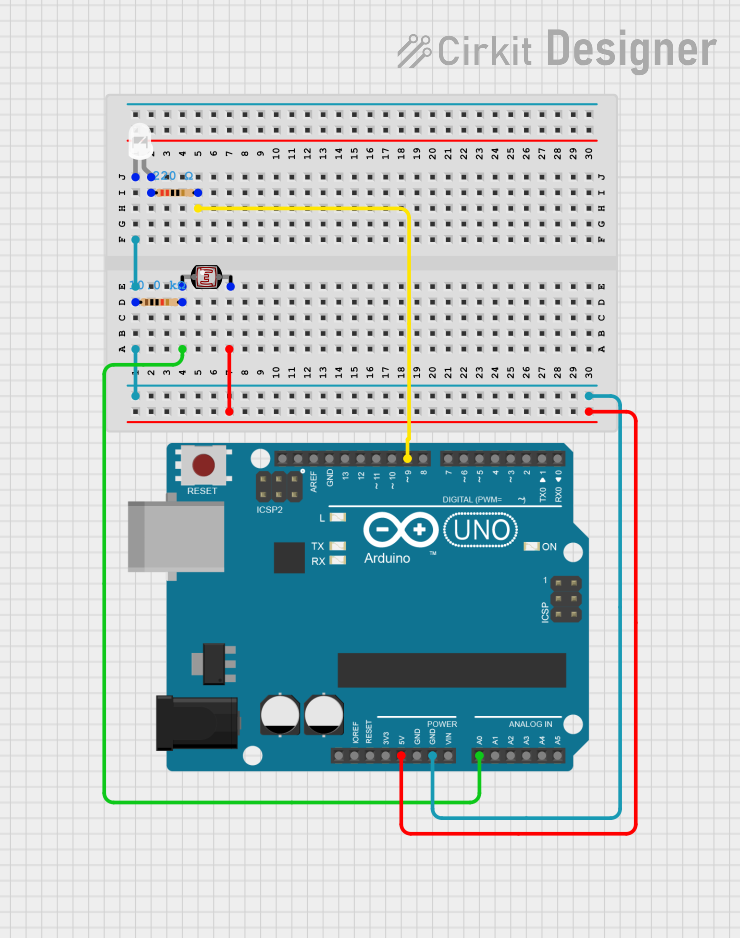
Circuit Documentation
Summary
This circuit is designed to control an LED based on the light intensity detected by a photocell (LDR). The Arduino UNO microcontroller reads the analog value from the photocell and turns the LED on or off depending on the light intensity. The circuit includes resistors to limit current and ensure proper operation of the components.
Component List
Arduino UNO
- Description: A microcontroller board based on the ATmega328P.
- Pins: UNUSED, IOREF, Reset, 3.3V, 5V, GND, Vin, A0, A1, A2, A3, A4, A5, SCL, SDA, AREF, D13, D12, D11, D10, D9, D8, D7, D6, D5, D4, D3, D2, D1, D0
Photocell (LDR)
- Description: A light-dependent resistor that changes its resistance based on the light intensity.
- Pins: pin 0, pin 1
Resistor (220 Ohms)
- Description: A resistor with a resistance of 220 Ohms.
- Pins: pin1, pin2
LED: Two Pin (white)
- Description: A white LED with two pins: anode and cathode.
- Pins: anode, cathode
Resistor (10k Ohms)
- Description: A resistor with a resistance of 10k Ohms.
- Pins: pin1, pin2
Wiring Details
Arduino UNO
- GND: Connected to the cathode of the LED and pin1 of the 10k Ohm resistor.
- A0: Connected to pin2 of the 10k Ohm resistor and pin 0 of the Photocell.
- D9: Connected to pin2 of the 220 Ohm resistor.
- 5V: Connected to pin 1 of the Photocell.
Photocell (LDR)
- pin 0: Connected to pin2 of the 10k Ohm resistor and A0 of the Arduino UNO.
- pin 1: Connected to 5V of the Arduino UNO.
Resistor (220 Ohms)
- pin1: Connected to the anode of the LED.
- pin2: Connected to D9 of the Arduino UNO.
LED: Two Pin (white)
- anode: Connected to pin1 of the 220 Ohm resistor.
- cathode: Connected to GND of the Arduino UNO and pin1 of the 10k Ohm resistor.
Resistor (10k Ohms)
- pin1: Connected to GND of the Arduino UNO and the cathode of the LED.
- pin2: Connected to pin 0 of the Photocell and A0 of the Arduino UNO.
Code Documentation
Arduino Code
// The setup() function runs once when the Arduino starts or is reset
void setup() {
  pinMode(9, OUTPUT);  // Configure digital pin 9 as an output to control an LED or other device
  pinMode(A0, INPUT);  // Configure analog pin A0 as an input to read sensor data
  Serial.begin(9600);  // Start serial communication at 9600 bits per second for debugging or data monitoring
}

// The loop() function runs repeatedly after setup(), forming the main program logic
void loop() {
  int sensor = analogRead(A0); // Read the value from the sensor connected to A0 (ranges from 0 to 1023)

  // Check if the sensor value exceeds the threshold of 320
  if (sensor > 320) {
    digitalWrite(9, LOW); // Turn off the device (e.g., LED) connected to pin 9
  } else {
    digitalWrite(9, HIGH); // Turn on the device (e.g., LED) connected to pin 9
  }
}
This code initializes the Arduino UNO, setting pin 9 as an output and pin A0 as an input. It reads the analog value from the photocell connected to A0 and turns the LED on or off based on the light intensity. If the light intensity is above a certain threshold, the LED is turned off; otherwise, it is turned on.