Cirkit Designer
Your all-in-one circuit design IDE
Home /
Project Documentation
Arduino UNO and OLED FeatherWing Display: Battery-Powered Hello World Project

Circuit Documentation
Summary
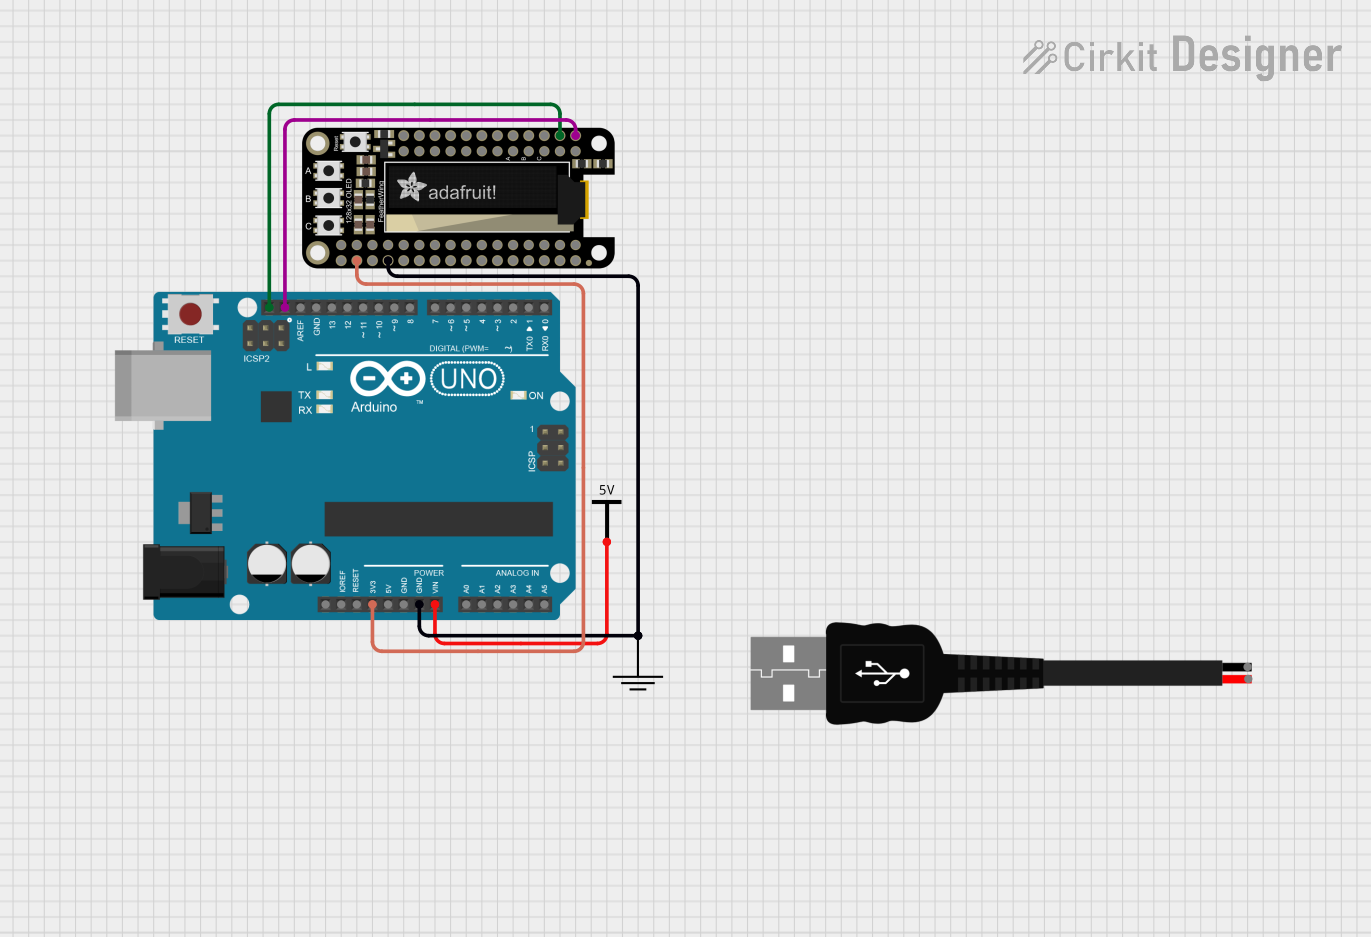
This circuit involves an Arduino UNO microcontroller connected to an Adafruit OLED FeatherWing display. The circuit is powered through a USB connection and includes connections for power (3.3V and GND) and I2C communication (SDA and SCL).
Component List
Adafruit OLED FeatherWing
- Description: OLED display module
- Pins: G, TX, RX, MISO, MOSI, SCK, F, E, D, C, B, A, GND, AREF, 3.3V, !RESET, VBAT, EN, USB, N, M, L, K, J, I, H, SCL, SDA
Arduino UNO
- Description: Microcontroller board
- Pins: UNUSED, IOREF, Reset, 3.3V, 5V, GND, Vin, A0, A1, A2, A3, A4, A5, SCL, SDA, AREF, D13, D12, D11, D10, D9, D8, D7, D6, D5, D4, D3, D2, D1, D0
Vcc
- Description: Power supply
- Pins: Vcc
GND
- Description: Ground connection
- Pins: GND
USB male 2 pin connection
- Description: USB power connection
- Pins: Negative -, Positive +
Wiring Details
Adafruit OLED FeatherWing
- 3.3V: Connected to Arduino UNO 3.3V
- GND: Connected to Arduino UNO GND and GND
- SDA: Connected to Arduino UNO SDA
- SCL: Connected to Arduino UNO SCL
Arduino UNO
- 3.3V: Connected to Adafruit OLED FeatherWing 3.3V
- GND: Connected to Adafruit OLED FeatherWing GND and GND
- SDA: Connected to Adafruit OLED FeatherWing SDA
- SCL: Connected to Adafruit OLED FeatherWing SCL
- Vin: Connected to Vcc Vcc
Vcc
- Vcc: Connected to Arduino UNO Vin
GND
- GND: Connected to Arduino UNO GND and Adafruit OLED FeatherWing GND
USB male 2 pin connection
- Positive +: Not connected in the provided net list
- Negative -: Not connected in the provided net list
Code Documentation
Arduino UNO Code
#include <Wire.h>
#include <Adafruit_GFX.h>
#include <Adafruit_SSD1306.h>

#define SCREEN_WIDTH 128
#define SCREEN_HEIGHT 32
#define OLED_RESET -1
#define SSD1306_I2C_ADDRESS 0x3C

Adafruit_SSD1306 display(SCREEN_WIDTH, SCREEN_HEIGHT, &Wire, OLED_RESET);

void setup() {
  Serial.begin(115200);
  if(!display.begin(SSD1306_SWITCHCAPVCC, SSD1306_I2C_ADDRESS)) {
    Serial.println(F("SSD1306 allocation failed"));
    for(;;);
  }
  display.display();
  delay(2000);
  display.clearDisplay();
}

void loop() {
  display.clearDisplay();
  display.setTextSize(1);
  display.setTextColor(SSD1306_WHITE);
  display.setCursor(0, 0);
  display.print("Hello, World!");
  display.display();
  delay(2000);
}
This code initializes the OLED display and continuously displays "Hello, World!" on the screen with a 2-second delay between updates.