Cirkit Designer
Your all-in-one circuit design IDE
Home /
Project Documentation
Arduino Nano-Controlled Audio Player with Interactive LED Effects
Circuit Documentation
Summary
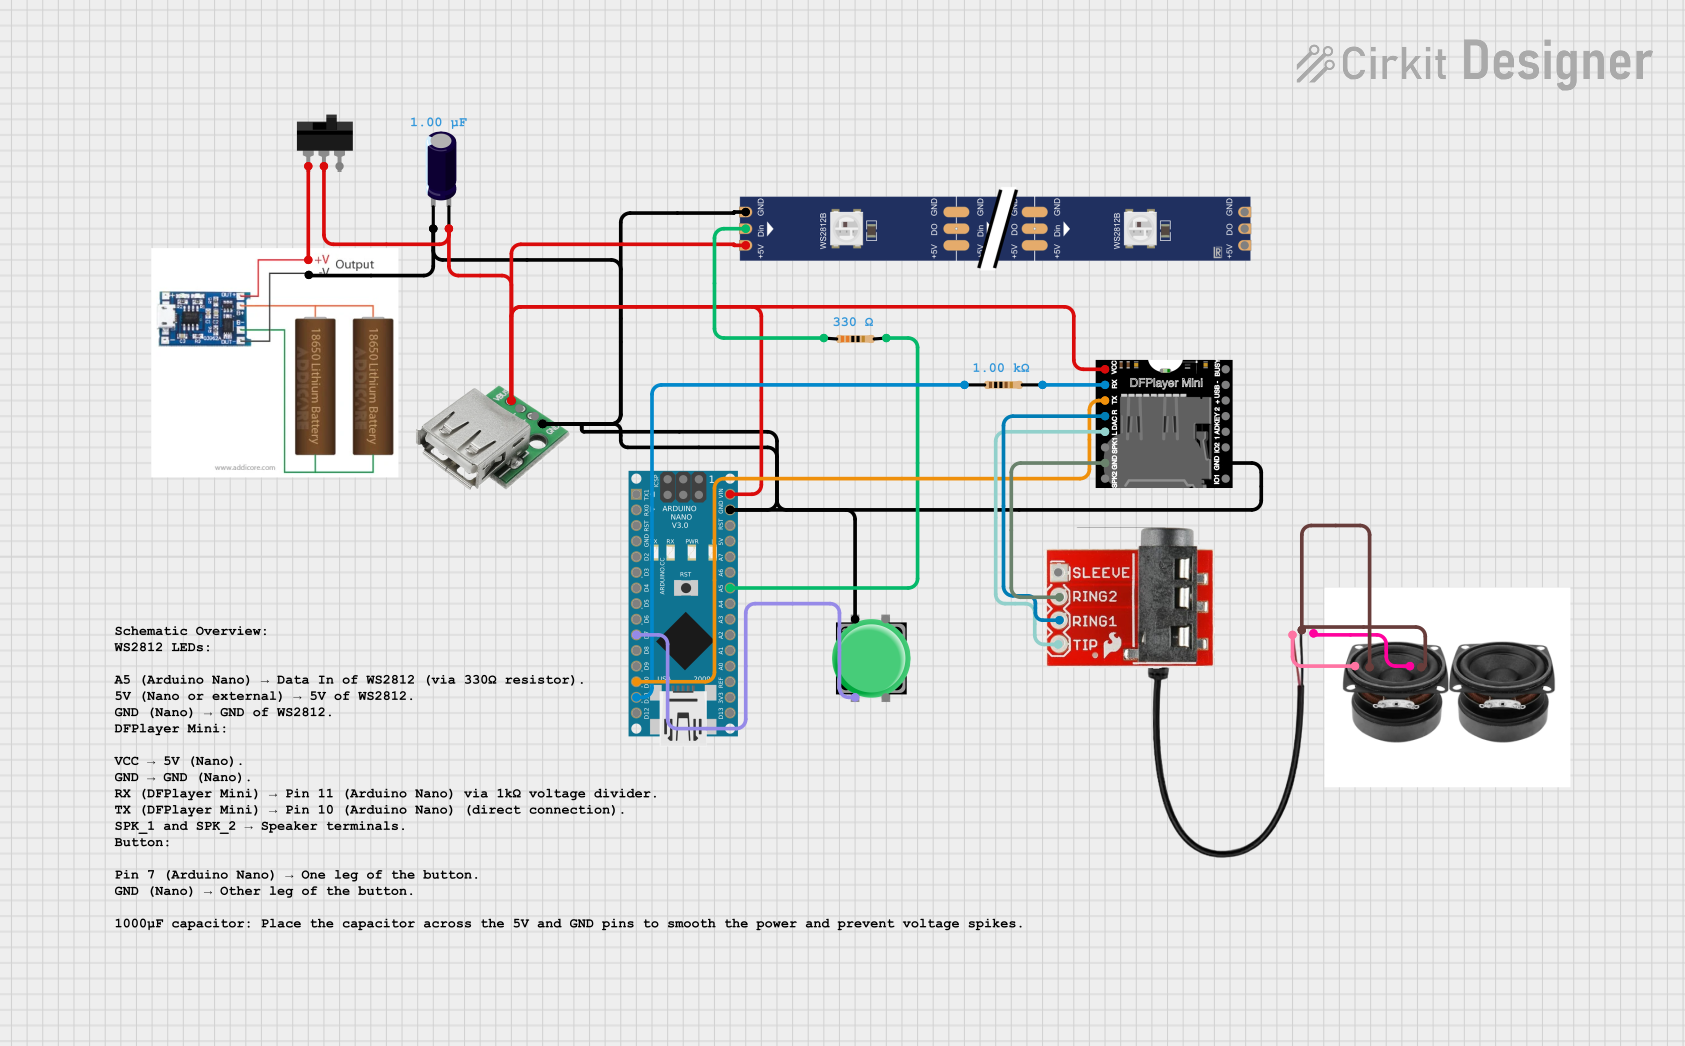
The circuit in question is designed to integrate an Arduino Nano with a DFPlayer Mini MP3 module, a WS2812 RGB LED strip, and various other components including resistors, a pushbutton, a USB female port, an electrolytic capacitor, a speaker, and a 3.5mm audio jack. The Arduino Nano serves as the central microcontroller, running embedded code to control the LED strip and handle audio playback through the DFPlayer Mini. The circuit is powered by a lithium battery with a charging circuit and includes a toggle switch for power control. The pushbutton is used to trigger audio playback, and the resistors are used for signal conditioning and current limiting.
Component List
Arduino Nano
- Microcontroller board based on the ATmega328P
- Features digital and analog I/O pins
- Includes communication interfaces such as UART
DFPlayer Mini
- Compact MP3 module for playing audio files from a microSD card
- Supports advanced audio features and can drive speakers directly
Resistor (1k Ohms)
- Passive component used to limit current or divide voltages
Resistor (330 Ohms)
- Another resistor with a lower resistance value for current limiting
3.5mm Audio Jack 3 Pin
- Audio connector for stereo audio output
USB Female Port
- Connector for USB devices, used for power input in this circuit
Pushbutton
- Momentary switch used to trigger actions when pressed
Electrolytic Capacitor (1uF)
- Passive component used for filtering and power smoothing
Speaker
- Electroacoustic transducer for audio output
TRRS 3.5mm Jack Breakout
- Breakout board for a 3.5mm TRRS jack, providing access to audio signals
WS2812 RGB LED Strip
- Addressable LED strip capable of displaying multiple colors
Lithium Battery with Charging Circuit (3.7V)
- Rechargeable power source for the circuit
Toggle Switch
- Switch used to control the power supply to the circuit
Wiring Details
Arduino Nano
D7connected to PushbuttonD10connected to DFPlayer Mini TXD11/MOSIconnected to 1k Ohm ResistorVINconnected to power supply net (USB Female VCC, Toggle Switch COM, WS2812 5V, DFPlayer Mini VCC, Electrolytic Capacitor +)GNDconnected to ground net (Lithium Battery V-, Pushbutton Pin 1, USB Female GND, WS2812 GND, DFPlayer Mini GND, Electrolytic Capacitor -)A5connected to 330 Ohm Resistor
DFPlayer Mini
VCCconnected to power supply netTXconnected to Arduino Nano D10RXconnected to 1k Ohm ResistorGNDconnected to ground netDAC_Rconnected to TRRS 3.5mm Jack Breakout Ring1DAC_Lconnected to TRRS 3.5mm Jack Breakout Tip
Resistor (1k Ohms)
- One pin connected to Arduino Nano D11/MOSI
- Other pin connected to DFPlayer Mini RX
Resistor (330 Ohms)
- One pin connected to Arduino Nano A5
- Other pin connected to WS2812 RGB LED Strip DIN
3.5mm Audio Jack 3 Pin
Lconnected to Speaker +Rconnected to Speaker +GNDconnected to Speaker -
USB Female Port
VCCconnected to power supply netGNDconnected to ground net
Pushbutton
Pin 2connected to Arduino Nano D7Pin 1connected to ground net
Electrolytic Capacitor (1uF)
+connected to power supply net-connected to ground net
Speaker
+connected to both 3.5mm Audio Jack L and R-connected to 3.5mm Audio Jack GND
TRRS 3.5mm Jack Breakout
Ring1connected to DFPlayer Mini DAC_RTipconnected to DFPlayer Mini DAC_LRing2connected to DFPlayer Mini GND
WS2812 RGB LED Strip
5Vconnected to power supply netGNDconnected to ground netDINconnected to 330 Ohm Resistor
Lithium Battery with Charging Circuit (3.7V)
V+connected to Toggle Switch L1V-connected to ground net
Toggle Switch
L1connected to Lithium Battery V+COMconnected to power supply net
Documented Code
#include <FastLED.h>
#include <SoftwareSerial.h>
#include <DFRobotDFPlayerMini.h>

// Pin Definitions
#define LED_PIN    19   // Pin for WS2812 (FastLED) Data line
#define NUM_LEDS   12   // Number of WS2812 (FastLED) LEDs
#define BRIGHTNESS 255  // LED brightness (0-255)
#define BUTTON_PIN 7    // Pin for the button

// FastLED Object Setup
CRGB leds[NUM_LEDS];    // Array to hold LED colors

// DFPlayer Mini setup
SoftwareSerial mySoftwareSerial(10, 11);  // RX (Pin 10), TX (Pin 11)
DFRobotDFPlayerMini myDFPlayer;

// Variables for controlling the coin lights
int coinCyclePosition = 0;
long coinTimer = 0;
static int coinTimeLimit = 780;
bool coinOneArray[] = {0, 1, 1, 0, 1, 1, 1, 1};
bool coinTwoArray[] = {1, 1, 0, 1, 1, 0, 1, 0};
bool coinThreeArray[] = {1, 1, 1, 0, 0, 0, 0, 1};

// Variables for controlling the sound
long breathingTimer = -4600;
static int breathingTimeLimit = 4600;
bool isRandomPlaying = false;   // To track if random audio is playing
bool buttonPressed = false;     // To track button press for debounce

void setup() {
  Serial.begin(9600);

  // Initialize DFPlayer Mini
  mySoftwareSerial.begin(9600);
  if (!myDFPlayer.begin(mySoftwareSerial)) {
    Serial.println("DFPlayer Mini not detected.");
    while (true);
  }

  // Set DFPlayer volume (0 to 30)
  myDFPlayer.volume(20);

  // Initialize FastLED
  FastLED.addLeds<WS2812, LED_PIN, GRB>(leds, NUM_LEDS);
  FastLED.setBrightness(BRIGHTNESS);

  // Initialize the button
  pinMode(BUTTON_PIN, INPUT_PULLUP);  // Button pin with internal pull-up

  // Light start-up sequence
  lightStartUp();

  delay(1000);

  // Play startup sound
  myDFPlayer.play(2);  // Play sound file 2 (assuming the file is named 0002.mp3 on the SD card)
  delay(2700);

  // Set initial state of some LEDs for the coin effect
  leds[0] = CRGB::Red;
  leds[4] = CRGB::Green;
  leds[5] = CRGB::Red;
  leds[6] = CRGB::Red;
  leds[7] = CRGB::Green;
  leds[8] = CRGB::Green;
  leds[9] = CRGB::Red;
  leds[10] = CRGB::Green;
  leds[11] = CRGB::Green;
  FastLED.show();
}

void lightStartUp() {
  // Flash LEDs in sequence as a startup animation
  for (int i = 0; i < NUM_LEDS; i++) {
    leds[i] = CRGB::Red;
    FastLED.show();
    delay(100);
    leds[i] = CRGB::Black;
    FastLED.show();
    delay(100);
  }
}

void loop() {
  // Check if the button is pressed and no sound is playing
  if (digitalRead(BUTTON_PIN) == LOW && !buttonPressed && !isRandomPlaying) {
    buttonPressed = true;  // Debounce to avoid multiple triggers
    playRandomSound();
  }

  // If random sound is not playing, handle breathing sound
  if (!isRandomPlaying && millis() - breathingTimer > breathingTimeLimit) {
    breathingSound();
  }

  // Coin light cycle logic
  if (millis() - coinTimer > coinTimeLimit) {
    coinLight();
  }

  // Check if random sound has finished playing
  checkForTrackEnd();

  // Reset button press after it is released
  if (digitalRead(BUTTON_PIN) == HIGH) {
    buttonPressed = false;
  }
}

void breathingSound() {
  Serial.println("Playing...Breathing sound");
  myDFPlayer.play(1);  // Play breathing sound file 1 (assuming the file is named 0001.mp3 on the SD card)