
Arduino UNO-Based Ultrasonic Distance Sensor with Servo Motor Control
View and Edit Project In Cirkit Designer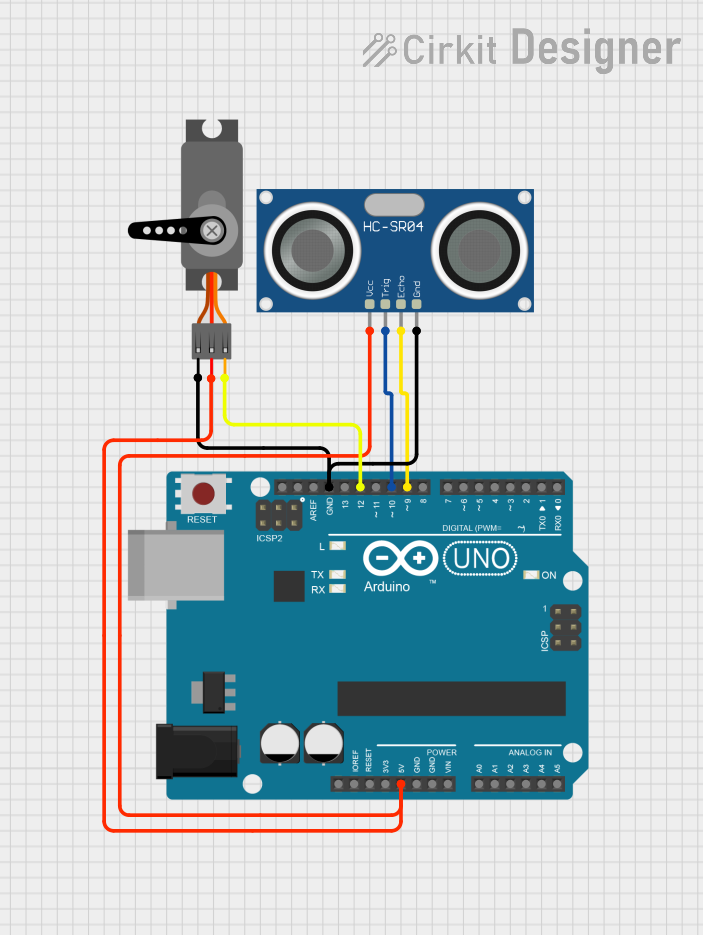
Circuit Documentation
Summary
This circuit consists of an Arduino UNO microcontroller, an HC-SR04 Ultrasonic Sensor, and a Servo motor. The Arduino UNO serves as the central controller, interfacing with the ultrasonic sensor to measure distance and controlling the servo motor based on the sensor's readings.
Component List
Arduino UNO
- Description: A microcontroller board based on the ATmega328P.
- Pins: UNUSED, IOREF, Reset, 3.3V, 5V, GND, Vin, A0, A1, A2, A3, A4, A5, SCL, SDA, AREF, D13, D12, D11, D10, D9, D8, D7, D6, D5, D4, D3, D2, D1, D0
HC-SR04 Ultrasonic Sensor
- Description: A sensor used to measure distance by using ultrasonic waves.
- Pins: VCC, TRIG, ECHO, GND
Servo
- Description: A motor that can be controlled to move to a specific position.
- Pins: GND, VCC, PWM
Wiring Details
Arduino UNO
- 5V: Connected to VCC of the Servo and HC-SR04 Ultrasonic Sensor
- GND: Connected to GND of the Servo and HC-SR04 Ultrasonic Sensor
- D12: Connected to PWM of the Servo
- D10: Connected to TRIG of the HC-SR04 Ultrasonic Sensor
- D9: Connected to ECHO of the HC-SR04 Ultrasonic Sensor
HC-SR04 Ultrasonic Sensor
- VCC: Connected to 5V of the Arduino UNO
- GND: Connected to GND of the Arduino UNO
- TRIG: Connected to D10 of the Arduino UNO
- ECHO: Connected to D9 of the Arduino UNO
Servo
- VCC: Connected to 5V of the Arduino UNO
- GND: Connected to GND of the Arduino UNO
- PWM: Connected to D12 of the Arduino UNO
Code Documentation
Arduino UNO Code
sketch.ino
void setup() {
  // put your setup code here, to run once:

}

void loop() {
  // put your main code here, to run repeatedly:

}
documentation.txt