
Circuit Documentation
Summary
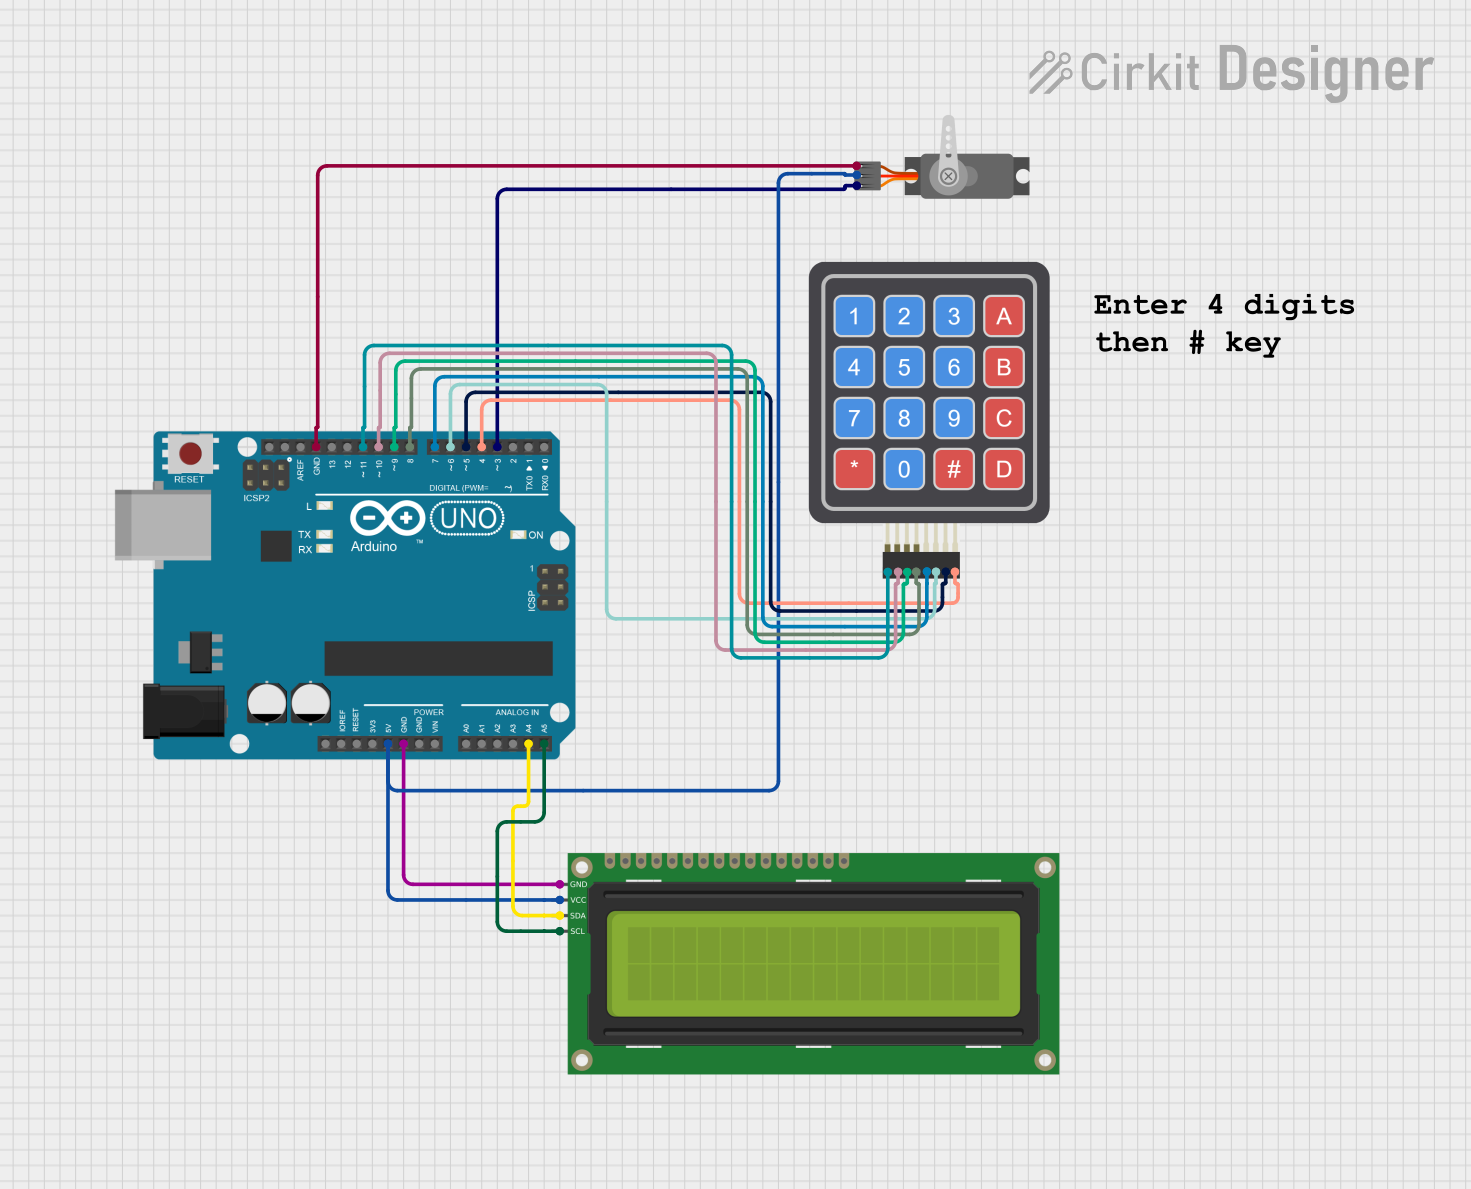
This circuit is designed for a hotel safe system that utilizes a 4x4 keypad for user input, a 16x2 I2C LCD for display, and a servo motor to control the locking mechanism. The system allows users to set a 4-digit code to lock the safe and requires the same code to unlock it. The LCD provides user feedback, and the servo transitions gradually between open and closed positions.
Component List
4x4 Keypad
- Description: A matrix keypad consisting of 4 rows and 4 columns, used for user input.
- Purpose: To allow users to enter a 4-digit code for locking and unlocking the safe.
16x2 I2C LCD
- Description: A liquid crystal display that can show 16 characters per line and has 2 lines.
- Purpose: To provide visual feedback to the user, displaying messages related to the locking and unlocking process.
Servo
- Description: A motor that can be controlled to rotate to specific angles.
- Purpose: To physically lock and unlock the safe by moving the locking mechanism.
Arduino UNO
- Description: A microcontroller board based on the ATmega328P.
- Purpose: To control the entire system, processing inputs from the keypad and controlling the LCD and servo.
Wiring Details
4x4 Keypad
- R1 connected to D11 on Arduino UNO
- C4 connected to D4 on Arduino UNO
- R2 connected to D10 on Arduino UNO
- C2 connected to D6 on Arduino UNO
- R3 connected to D9 on Arduino UNO
- R4 connected to D8 on Arduino UNO
- C1 connected to D7 on Arduino UNO
- C3 connected to D5 on Arduino UNO
16x2 I2C LCD
- GND connected to GND on Arduino UNO
- VCC connected to 5V on Arduino UNO
- SDA connected to A4 on Arduino UNO
- SCL connected to A5 on Arduino UNO
Servo
- GND connected to GND on Arduino UNO
- VCC connected to 5V on Arduino UNO
- PWM connected to D3 on Arduino UNO
Documented Code
/*
 * Arduino Sketch for a hotel safe system using a 4x4 Keypad, 16x2 I2C LCD,
 * and a Servo motor. The system allows the user to set a 4-digit code to
 * lock the safe and requires the same code to unlock it. The servo motor
 * controls the locking mechanism, and the LCD provides user feedback.
 * The servo transitions gradually between open and closed positions.
 */

#include <Wire.h>
#include <LiquidCrystal_I2C.h>
#include <Keypad.h>
#include <Servo.h>

// LCD setup
LiquidCrystal_I2C lcd(0x27, 16, 2);

// Keypad setup
const byte ROWS = 4;
const byte COLS = 4;
char keys[ROWS][COLS] = {
  {'1', '2', '3', 'A'},
  {'4', '5', '6', 'B'},
  {'7', '8', '9', 'C'},
  {'*', '0', '#', 'D'}
};
byte rowPins[ROWS] = {11, 10, 9, 8}; // Connect to the row pinouts of the keypad
byte colPins[COLS] = {7, 6, 5, 4};   // Connect to the column pinouts of the keypad
Keypad keypad = Keypad(makeKeymap(keys), rowPins, colPins, ROWS, COLS);

// Servo setup
Servo lockServo;
const int servoPin = 3;

// Variables
String enteredCode = "";
String storedCode = "";
bool isLocked = false;

void setup() {
  // Initialize LCD
  lcd.begin(16,2);
  lcd.backlight();

  // Initialize Servo
  lockServo.attach(servoPin);
  lockServo.write(0); // Initial position (unlocked)

  // Display initial message
  lcd.setCursor(0, 0);
  lcd.print("Code to Lock:");
}

void loop() {
  char key = keypad.getKey();

  if (key) {
    if (key == '#') {
      if (!isLocked) {
        if (enteredCode.length() == 4) {
          storedCode = enteredCode;
          lockSafe();
        } else {
          displayError("Enter 4 digits", 0);
        }
      } else {
        if (enteredCode == storedCode) {
          unlockSafe();
        } else {
          displayError("Wrong Code", 1);
        }
      }
      enteredCode = "";
    } else if (key >= '0' && key <= '9') {
      if (enteredCode.length() < 4) {
        enteredCode += key;
        lcd.setCursor(enteredCode.length() - 1, 1);
        lcd.print('*');
      }
    }
  }
}

void lockSafe() {
  isLocked = true;
  lcd.setCursor(0, 0);
  lcd.print("Locking Safe...");

  for (int pos = 0; pos <= 180; pos += 1) { // Gradually lock
    lockServo.write(pos);
    delay(15);
  }
  lcd.clear();
  lcd.setCursor(0, 0);
  lcd.print("Safe Locked");
  delay(2000);
  lcd.clear();
  lcd.setCursor(0, 0);
  lcd.print("Code to Unlock");
}

void unlockSafe() {
  isLocked = false;
  lcd.setCursor(0, 0);
  lcd.print("Unlocking Safe...");

  for (int pos = 180; pos >= 0; pos -= 1) { // Gradually unlock
    lockServo.write(pos);
    delay(15);
  }
  lcd.clear();
  lcd.setCursor(0, 0);
  lcd.print("Safe Unlocked");
  delay(2000);
  lcd.clear();
  lcd.setCursor(0, 0);
  lcd.print("Code to Lock");
}

void displayError(String message, int code) {
  lcd.clear();
  lcd.setCursor(0, 0);
  lcd.print(message);
  delay(3000);
  lcd.clear();
  lcd.setCursor(0, 0);
  if (code == 0)
    lcd.print("Code to Lock");
  else
    lcd.print("Code to Unlock");
}
This documentation provides a comprehensive overview of the circuit, detailing each component, its wiring, and the code that drives the system.