
Arduino UNO-Based Security System with SIM800L and CCTV Integration
View and Edit Project In Cirkit Designer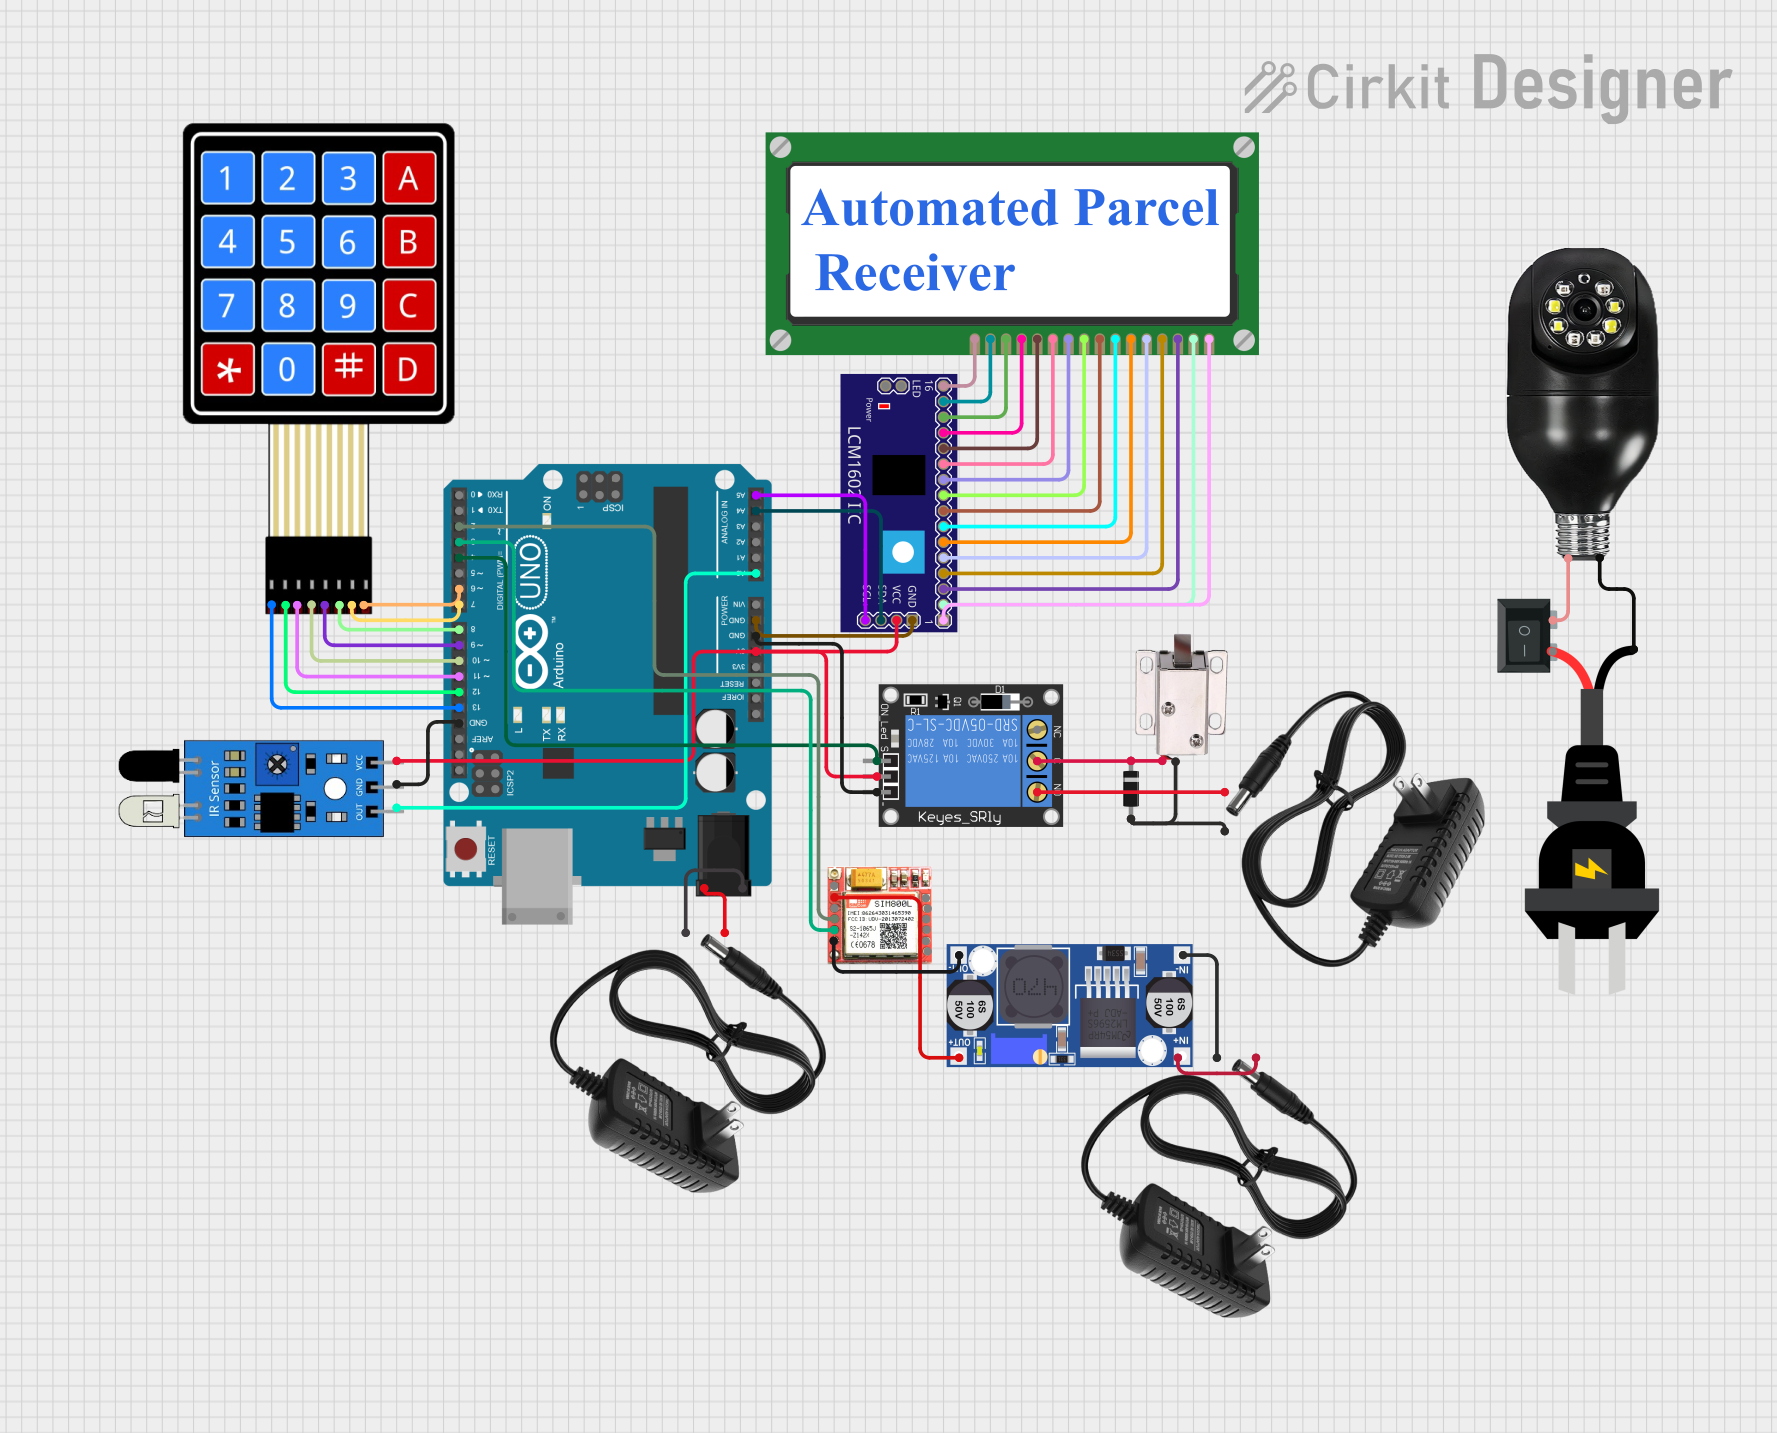
Circuit Documentation
Summary
This document provides a detailed overview of a circuit designed to interface various components with an Arduino UNO microcontroller. The circuit includes a 4x4 membrane matrix keypad for user input, a SIM800L module for GSM communication, a 12V solenoid lock for actuation, an IR sensor for object detection, a 1-channel relay to control high-power devices, a buck converter to step down voltage, an LCD display for user interface, and a CCTV camera for surveillance. Power is supplied by multiple 12V power supplies and regulated for different components as needed. A diode is used for protection, and a rocker switch controls the power to the CCTV camera.
Component List
4X4 Membrane Matrix Keypad
- A keypad with 16 buttons arranged in a 4x4 matrix used for user input.
12V Power Supply
- Provides a 12V voltage source for powering various components in the circuit.
SIM800L
- A GSM/GPRS module that allows the circuit to communicate over cellular networks.
12V Solenoid Lock
- An electromagnetic lock that can be actuated by applying 12V across its terminals.
IR Sensor
- A sensor that detects infrared light, commonly used for proximity or motion detection.
1-Channel Relay (5V 10A)
- An electromechanical switch that allows a low-power signal to control a higher power circuit.
Buck Converter
- A DC-DC converter that steps down voltage from a higher level to a lower level.
LCD Display (16 pin)
- A 16-pin liquid crystal display that can show text and numbers.
LCM1602 IIC
- An I2C interface module for the LCD display that simplifies the connection to a microcontroller.
Arduino UNO
- A microcontroller board based on the ATmega328P, widely used for building digital devices and interactive objects.
Diode
- A semiconductor device that allows current to flow in one direction only, used for protection against reverse polarity.
Rocker Switch (SPST)
- A single-pole single-throw switch used to control the power state of a circuit.
V380 CCTV Camera
- A surveillance camera that can be connected to a network for remote monitoring.
AC Source
- An alternating current power source for the CCTV camera.
Wiring Details
4X4 Membrane Matrix Keypad
- Rows connected to Arduino UNO digital pins D13, D12, D11, D10.
- Columns connected to Arduino UNO digital pins D9, D8, D7, D6.
SIM800L
- VCC connected to the output of the Buck Converter.
- RXD connected to Arduino UNO digital pin D2.
- TXD connected to Arduino UNO digital pin D3.
- GND connected to the output ground of the Buck Converter.
12V Solenoid Lock
- VCC connected through a diode to the common (C) terminal of the 1-Channel Relay.
- GND connected to the negative terminal of a 12V power supply.
IR Sensor
- OUT connected to Arduino UNO analog pin A0.
- GND connected to Arduino UNO ground.
- VCC connected to Arduino UNO 5V output.
1-Channel Relay (5V 10A)
- Signal connected to Arduino UNO digital pin D4.
- Power connected to Arduino UNO 5V output.
- Ground connected to Arduino UNO ground.
- Normally open (NO) terminal connected to the positive terminal of a 12V power supply.
Buck Converter
- IN+ connected to the positive terminal of a 12V power supply.
- IN- connected to the negative terminal of a 12V power supply.
- OUT+ and OUT- provide the reduced voltage output.
LCD Display (16 pin) & LCM1602 IIC
- Connections made between corresponding pins on the LCD Display and LCM1602 IIC module.
Arduino UNO
- Powered by a 12V power supply connected to Vin and ground.
- GND also connected to the ground of the LCM1602 IIC module.
- A4 connected to SDA of LCM1602 IIC.
- A5 connected to SCL of LCM1602 IIC.
Diode
- Cathode connected to the common (C) terminal of the 1-Channel Relay.
- Anode connected to the GND of the 12V solenoid lock.
Rocker Switch (SPST)
- One terminal connected to the negative terminal of the V380 CCTV camera.
- The other terminal connected to the negative terminal of the AC source.
V380 CCTV Camera
- Positive terminal connected to the positive terminal of the AC source.
Documented Code
Arduino UNO (Instance ID: 288ec111-9d84-4afd-aaac-e3edceff1d95)
void setup() {
  // put your setup code here, to run once:

}

void loop() {
  // put your main code here, to run repeatedly:

}
The provided code is a template with empty setup() and loop() functions, which are the entry points for Arduino sketches. The setup() function is called once when the sketch starts and is used for initializing settings, while the loop() function runs repeatedly, allowing the microcontroller to perform operations based on the circuit's design. Additional code would be required to control the components and implement the desired functionality.