
Arduino UNO Based Smart Elevator Control System with LCD Display
View and Edit Project In Cirkit Designer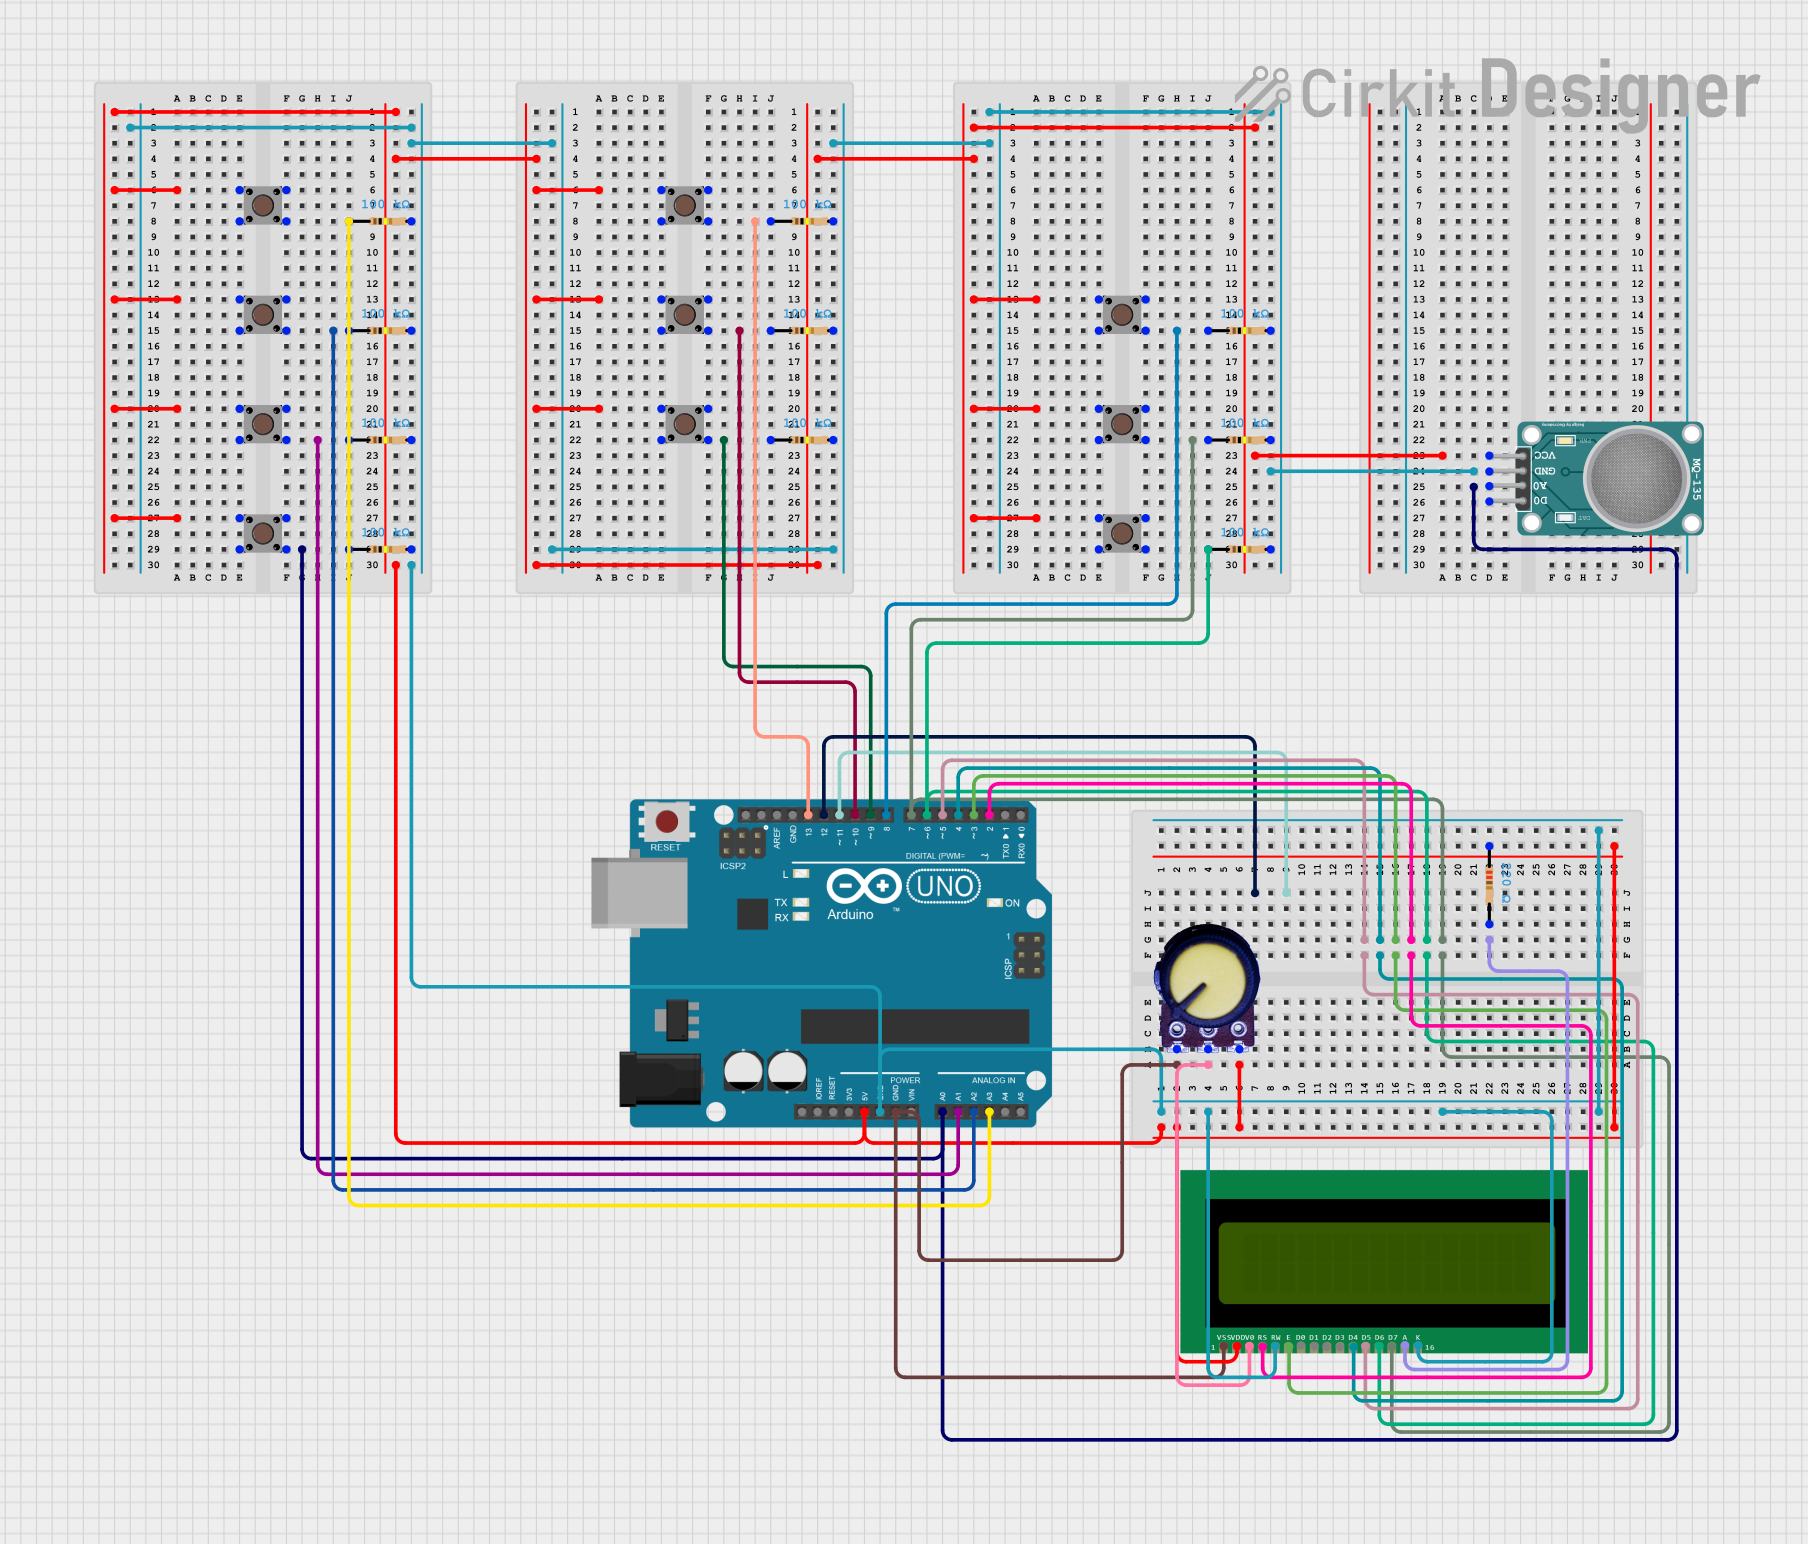
Smart Elevator Control System Circuit Documentation
Summary
The Smart Elevator Control System is designed to simulate an elevator's operation using an Arduino UNO microcontroller. The system utilizes multiple pushbuttons to represent floor requests and a 16x2 LCD to display the current floor. When a button is pressed, the system responds by "moving" the elevator to the requested floor and updating the display accordingly. The circuit includes an array of pushbuttons, resistors for pull-down configurations, a potentiometer for LCD contrast adjustment, and an MQ-135 air quality sensor for environmental monitoring.
Component List
Microcontroller
- Arduino UNO: The central processing unit of the circuit, responsible for controlling the elevator system, reading button states, and updating the LCD display.
Input Components
- Pushbuttons: Ten pushbuttons are used to simulate floor request buttons in an elevator.
Output Components
- 16X2 LCD: A liquid crystal display used to show the current floor and status of the elevator.
Sensors
- MQ-135 Sensor Air Quality: A sensor used to detect various gases in the air, potentially used for monitoring air quality within the elevator environment.
Passive Components
- Resistors: Eleven 100kΩ resistors are used as pull-down resistors for the pushbuttons, and one 220Ω resistor is used to limit current to the LCD backlight.
- Potentiometer: A variable resistor used to adjust the contrast of the LCD.
Wiring Details
Arduino UNO
- 5V: Connected to the common pin of all pushbuttons, VCC of the potentiometer, VDD of the 16x2 LCD, and VCC of the MQ-135 sensor.
- GND: Connected to the ground pins of the potentiometer, 16x2 LCD, MQ-135 sensor, and one side of all pull-down resistors.
- A0 - A3: Connected to one side of the pull-down resistors, which are connected to the input pins of the pushbuttons.
- D2 - D13: Connected to the control and data pins of the 16x2 LCD and input pins of some pushbuttons.
Pushbuttons
- Pin 3 (out): Connected to the 5V supply.
- Pin 2 (in): Connected to the Arduino UNO analog or digital pins through 100kΩ pull-down resistors.
16X2 LCD
- VSS: Connected to GND.
- VDD: Connected to 5V.
- V0: Connected to the output of the potentiometer for contrast adjustment.
- RS, E, D4 - D7: Connected to digital pins D2, D3, D4, D5, D6, and D7 on the Arduino UNO.
- RW: Connected to GND.
- A: Connected to 5V through a 220Ω current-limiting resistor.
- K: Connected to GND.
Potentiometer
- GND: Connected to GND.
- Output: Connected to V0 (contrast adjustment) of the 16x2 LCD.
- VCC: Connected to 5V.
MQ-135 Sensor Air Quality
- VCC: Connected to 5V.
- GND: Connected to GND.
- A0: Connected to A0 on the Arduino UNO.
Resistors
- 100kΩ: Connected between GND and the input pins of the pushbuttons to form pull-down resistors.
- 220Ω: Connected between 5V and the anode of the LCD backlight.
Documented Code
/*
 * Smart Elevator Control System
 * This code controls an elevator system using an Arduino UNO. It reads the
 * state of multiple pushbuttons representing floor requests and displays the
 * current floor on a 16x2 LCD. The elevator moves to the requested floor and
 * updates the display accordingly.
 */

#include <LiquidCrystal.h>

// Initialize the LCD with the numbers of the interface pins
LiquidCrystal lcd(2, 3, 4, 5, 6, 7);

// Define pushbutton pins
const int buttonPins[] = {A0, A1, A2, A3, 8, 9, 10, 13};
const int numButtons = sizeof(buttonPins) / sizeof(buttonPins[0]);

// Variables to store button states
int buttonStates[numButtons];

void setup() {
  // Set up the LCD's number of columns and rows
  lcd.begin(16, 2);
  lcd.print("Floor: 0");

  // Initialize button pins as input
  for (int i = 0; i < numButtons; i++) {
    pinMode(buttonPins[i], INPUT);
  }
}

void loop() {
  // Read the state of each button
  for (int i = 0; i < numButtons; i++) {
    buttonStates[i] = digitalRead(buttonPins[i]);
  }

  // Check if any button is pressed
  for (int i = 0; i < numButtons; i++) {
    if (buttonStates[i] == HIGH) {
      // Move to the requested floor
      moveToFloor(i);
      break;
    }
  }
}

void moveToFloor(int floor) {
  // Simulate elevator movement delay
  delay(2000);

  // Update the LCD display
  lcd.clear();
  lcd.print("Floor: ");
  lcd.print(floor);
}
This code is responsible for the operation of the Smart Elevator Control System. It initializes the LCD and sets up the pushbutton inputs. In the main loop, it reads the state of each button and, upon detecting a press, simulates moving to the requested floor and updates the LCD display accordingly.