
Arduino-Controlled Robotics Platform with Ultrasonic Sensors and LCD Interface
View and Edit Project In Cirkit Designer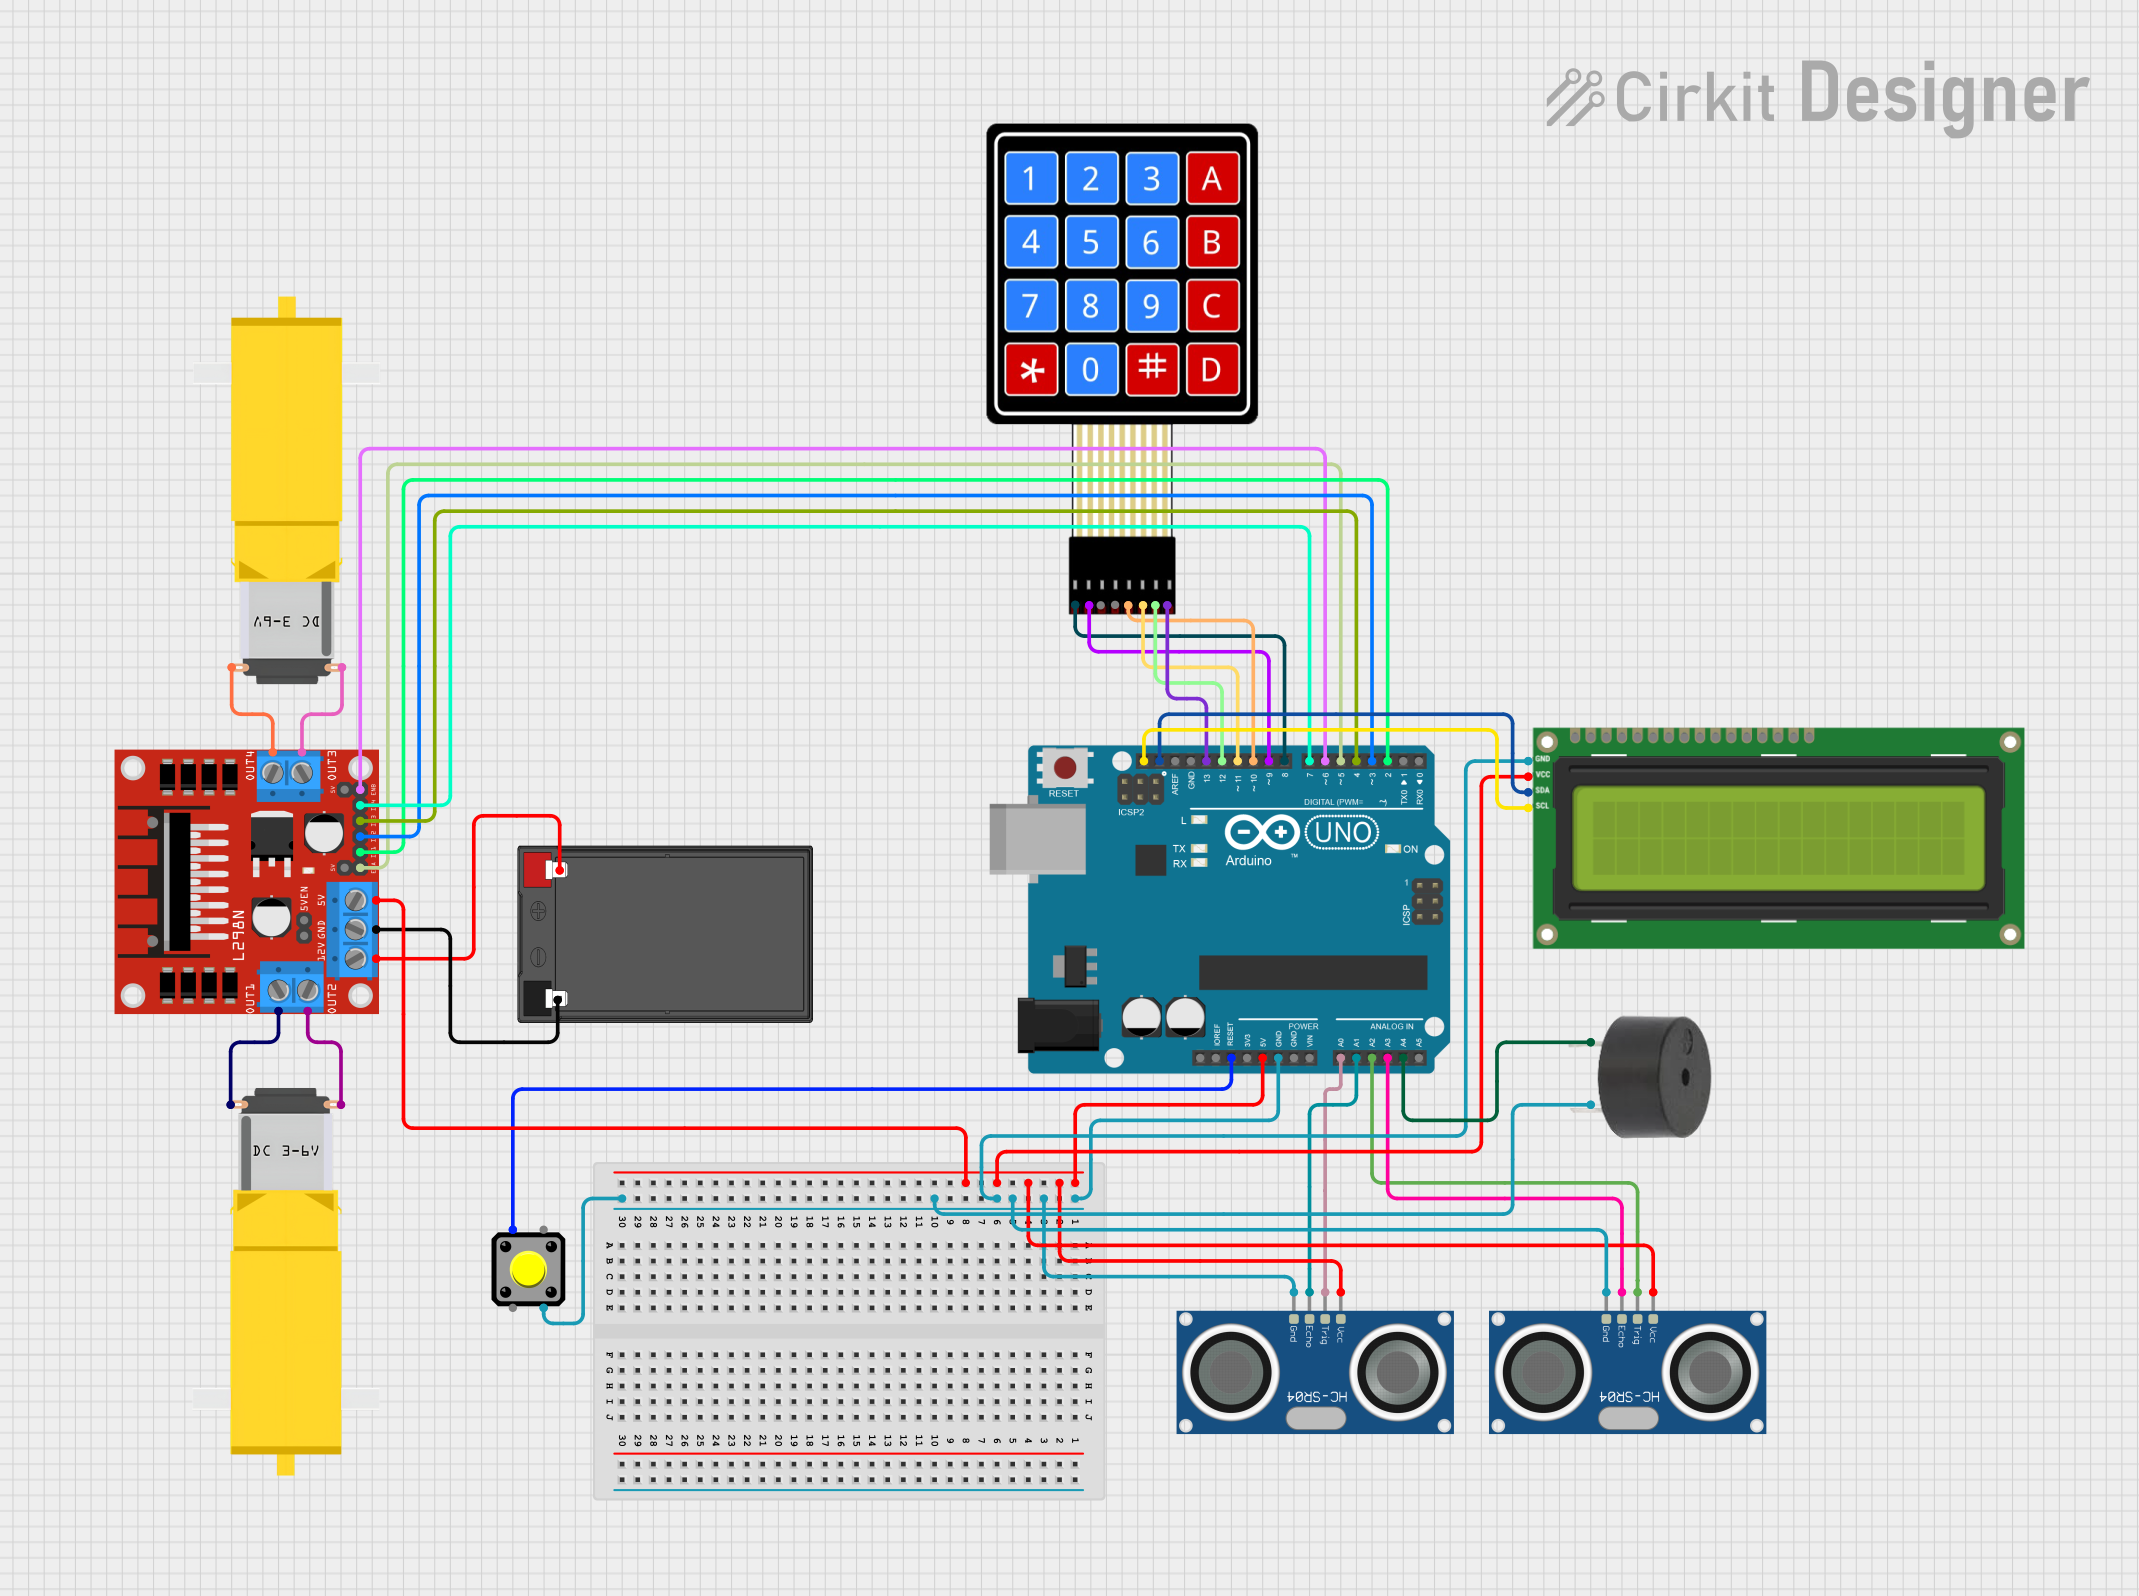
Circuit Documentation
Summary
This circuit integrates various components controlled by an Arduino UNO microcontroller to perform a range of functions. The circuit includes ultrasonic sensors (HC-SR04) for distance measurement, an I2C LCD screen for data display, a pushbutton for user input, a DC motor driver (L298N) to control gearmotors, a 4x4 membrane matrix keypad for additional input, a buzzer for audio feedback, and a 12V battery for power supply. The Arduino UNO serves as the central processing unit, interfacing with the sensors, actuators, and display, and managing the overall operation of the circuit.
Component List
HC-SR04 Ultrasonic Sensor
- Description: Ultrasonic distance measuring module
- Pins: VCC, TRIG, ECHO, GND
I2C LCD 16x2 Screen
- Description: Alphanumeric liquid crystal display with I2C interface
- Pins: SCL, SDA, VCC (5V), GND, VDD, VO, RS, RW, E, D0-D7, BLA, BLK
Pushbutton
- Description: Standard tactile pushbutton
- Pins: Pin 1, Pin 2, Pin 3, Pin 4
Arduino UNO
- Description: Microcontroller board based on the ATmega328P
- Pins: IOREF, Reset, 3.3V, 5V, GND, Vin, A0-A5, SCL, SDA, AREF, D0-D13
L298N DC Motor Driver
- Description: Dual H-bridge motor driver for DC or stepper motors
- Pins: OUT1-OUT4, 12V, GND, 5V, ENA, IN1-IN4, ENB
4X4 Membrane Matrix Keypad
- Description: 16-button keypad with 8-pin connector
- Pins: R1-R4, C1-C4
Gearmotor DC / Motorreductor
- Description: DC gearmotor for driving mechanical loads
- Pins: Pin1, Pin2
Buzzer
- Description: Piezoelectric buzzer for sound generation
- Pins: PIN, GND
12V 7Ah Battery
- Description: Rechargeable battery for power supply
- Pins: 12V +, 12V -
Wiring Details
HC-SR04 Ultrasonic Sensor
- VCC connected to Arduino UNO 5V
- GND connected to Arduino UNO GND
- TRIG connected to Arduino UNO A0 (Sensor 1) and A2 (Sensor 2)
- ECHO connected to Arduino UNO A1 (Sensor 1) and A3 (Sensor 2)
I2C LCD 16x2 Screen
- SCL connected to Arduino UNO SCL
- SDA connected to Arduino UNO SDA
- VCC (5V) connected to Arduino UNO 5V
- GND connected to Arduino UNO GND
Pushbutton
- Pin 1 connected to Arduino UNO Reset
- Pin 3 connected to Arduino UNO GND
L298N DC Motor Driver
- OUT1/OUT2 connected to Gearmotor 1
- OUT3/OUT4 connected to Gearmotor 2
- 12V connected to 12V 7Ah Battery 12V +
- GND connected to 12V 7Ah Battery 12V -
- 5V connected to Arduino UNO 5V
- ENA/ENB connected to Arduino UNO D5/D6
- IN1-IN4 connected to Arduino UNO D2, D3, D4, D7
4X4 Membrane Matrix Keypad
- R1-R4 connected to Arduino UNO D8-D9
- C1-C4 connected to Arduino UNO D10-D13
Gearmotor DC / Motorreductor
- Pin1/Pin2 connected to L298N DC Motor Driver OUT1/OUT2 and OUT3/OUT4
Buzzer
- PIN connected to Arduino UNO A4
- GND connected to Arduino UNO GND
12V 7Ah Battery
- 12V + connected to L298N DC Motor Driver 12V
- 12V - connected to L298N DC Motor Driver GND
Documented Code
void setup() {
  // put your setup code here, to run once:

}

void loop() {
  // put your main code here, to run repeatedly:

}
Note: The provided code is a template and does not contain any functional implementation. It is expected that the user will fill in the setup() and loop() functions with the necessary initialization and operational code to control the circuit components as per the requirements of the application.