
Arduino UNO WiFi-Based Environmental Monitoring System with I2C LCD Display
View and Edit Project In Cirkit Designer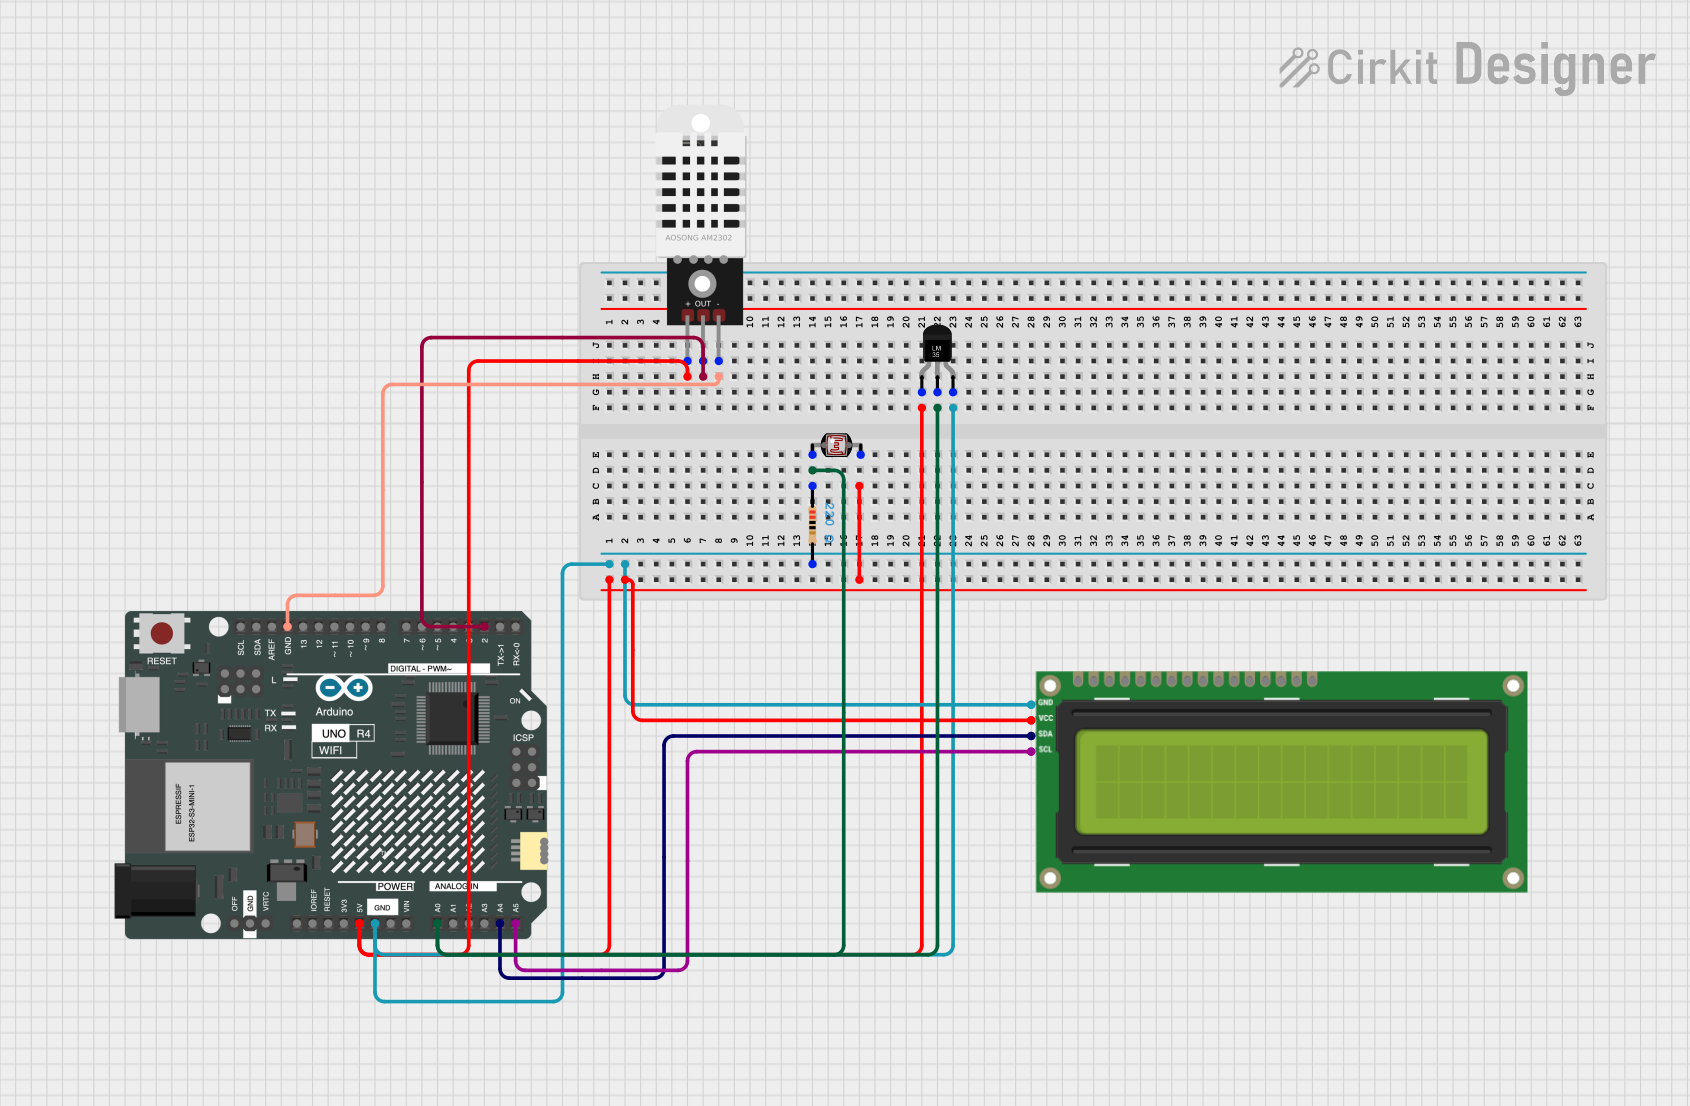
Circuit Documentation
Summary
This circuit is designed to measure environmental parameters such as light intensity and temperature. It uses an Arduino UNO R4 WiFi as the main microcontroller, interfaced with a 16x2 I2C LCD screen for display, a DHT22 sensor for temperature and humidity, an LM35 temperature sensor, and a photocell (LDR) for light intensity measurement. The data from the sensors is processed by the Arduino and displayed on the LCD screen.
Component List
I2C LCD 16x2 Screen
- Description: A 16x2 character LCD display with I2C interface.
- Pins: SCL, SDA, VCC (5V), GND, VDD, VO, RS, RW, E, D0, D1, D2, D3, D4, D5, D6, D7, BLA, BLK
Arduino UNO R4 WiFi
- Description: A microcontroller board based on the ATmega4809, featuring built-in WiFi.
- Pins: OFF, GND, VRTC, IIC0_SCL, IIC0_SDA, 3V3, GPIO 41, GPIO 0, GPIO 42, GPIO 43, GPIO 44, BOOT, IOREF, RESET, 5V, VIN, A0, A1, A2, A3, A4, A5, RSPCKA, CIPO, COPI, D0/RX, D1/TX, D2, D3, D4, D5, D6, D7, D8, D9, D10, D11, D12, D13, AREF, SDA, SCL
Photocell (LDR)
- Description: A light-dependent resistor used to measure light intensity.
- Pins: pin 0, pin 1
Resistor
- Description: A 220 Ohm resistor used in series with the LDR.
- Pins: pin1, pin2
- Properties: Resistance: 220 Ohms
DHT22
- Description: A digital temperature and humidity sensor.
- Pins: +, Out, -
Temperature Sensor (LM35)
- Description: An analog temperature sensor.
- Pins: +Vs, Vout, GND
Wiring Details
I2C LCD 16x2 Screen
- SCL: Connected to Arduino pin A5
- SDA: Connected to Arduino pin A4
- VCC (5V): Connected to Arduino 5V
- GND: Connected to Arduino GND
Arduino UNO R4 WiFi
- 5V: Connected to VCC (5V) of I2C LCD, +Vs of LM35, + of DHT22, and pin 1 of LDR
- GND: Connected to GND of I2C LCD, GND of LM35, - of DHT22, and pin2 of Resistor
- A0: Connected to Vout of LM35, pin 0 of LDR, and pin1 of Resistor
- A4: Connected to SDA of I2C LCD
- A5: Connected to SCL of I2C LCD
- D2: Connected to Out of DHT22
Photocell (LDR)
- pin 0: Connected to Arduino A0 and pin1 of Resistor
- pin 1: Connected to Arduino 5V
Resistor
- pin1: Connected to pin 0 of LDR and Arduino A0
- pin2: Connected to Arduino GND
DHT22
- +: Connected to Arduino 5V
- Out: Connected to Arduino D2
- -: Connected to Arduino GND
Temperature Sensor (LM35)
- +Vs: Connected to Arduino 5V
- Vout: Connected to Arduino A0
- GND: Connected to Arduino GND
Code Documentation
#include <Wire.h>
#include <LiquidCrystal_I2C.h>

// Define the I2C address for the 16x2 LCD (often 0x27 or 0x3F for I2C LCDs)
LiquidCrystal_I2C lcd(0x27, 16, 2);

int sensorPin = A0;  // Pin where LDR is connected
int sensorValue = 0; // Variable to store the value coming from the sensor

void setup() {
  // Initialize the LCD
  lcd.init();
  lcd.backlight();

  // Start serial communication
  Serial.begin(9600);
  lcd.setCursor(0, 0);
  lcd.print("Light Level: ");
}

void loop() {
  // Read the value from the photoresistor
  sensorValue = analogRead(sensorPin);

  // Print the sensor value to the Serial Monitor
  Serial.print("Photoresistor Value: ");
  Serial.println(sensorValue);

  // Determine the light level based on the sensor value
  String lightLevel;
  if (sensorValue < 200) {
    lightLevel = "Dark";
  } else if (sensorValue < 400) {
    lightLevel = "Partially Dark";
  } else if (sensorValue < 600) {
    lightLevel = "Medium";
  } else if (sensorValue < 800) {
    lightLevel = "Fully Lit";
  } else {
    lightLevel = "Brightly Lit";
  }

  // Display the light level on the LCD
  lcd.setCursor(0, 1);  // Set the cursor to the second line
  lcd.print("                "); // Clear the second line
  lcd.setCursor(0, 1);  // Reset cursor
  lcd.print(lightLevel); // Display the light level

  // Wait 1 second before the next reading (for ease of testing)
  delay(1000);
}
This code initializes the I2C LCD and reads the light intensity from the LDR connected to the Arduino. The light level is then displayed on the LCD screen and printed to the Serial Monitor. The light level is categorized into different levels based on the sensor value.