
Arduino Nano-Based Heart Rate Monitor with LCD Display and Rechargeable Battery
View and Edit Project In Cirkit Designer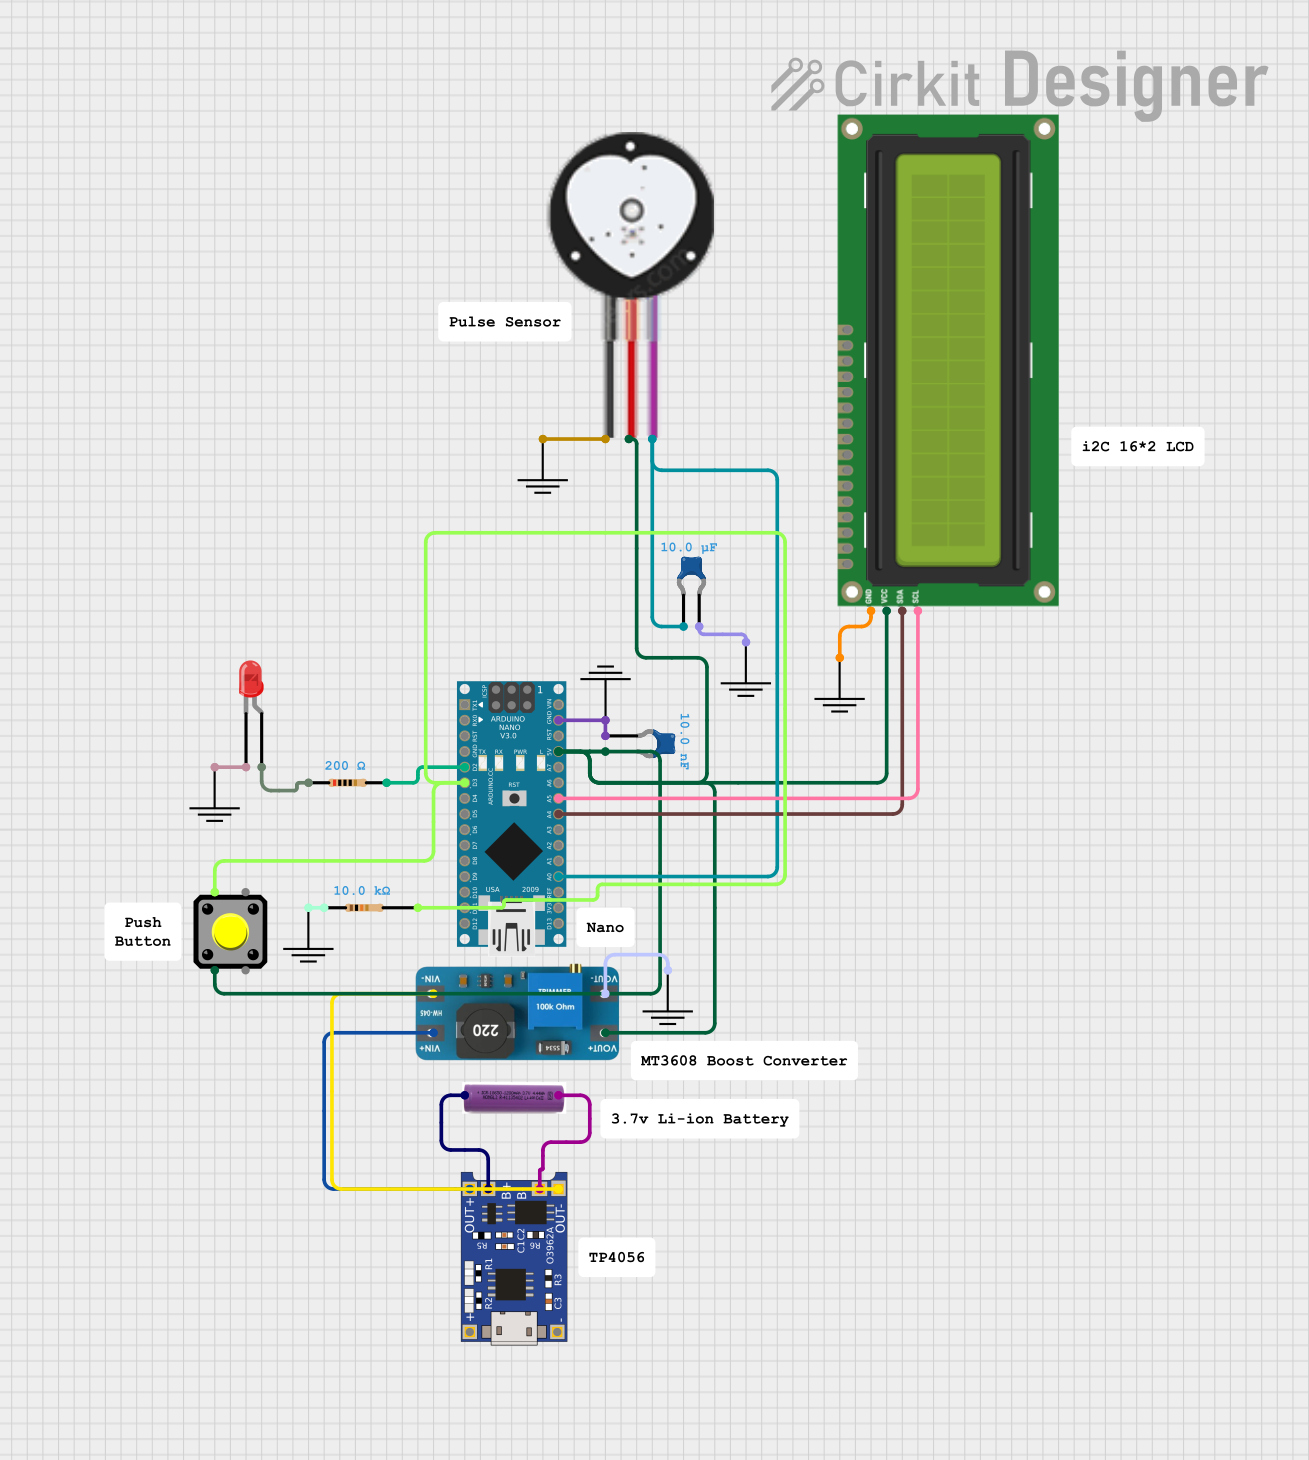
Circuit Documentation
Summary
This circuit integrates various components to create a system that can display messages on an I2C LCD screen and read signals from a heart pulse sensor. The system is powered by a 3.7V battery, which is charged by a TP4056 charger module. A boost converter (MT3608) steps up the voltage to power the components that require a higher voltage. The Arduino Nano acts as the central processing unit, controlling the LCD and reading the pulse sensor data. The circuit also includes a pushbutton for user input, resistors for current limiting and pull-up/down configurations, and capacitors for noise reduction and voltage smoothing.
Component List
Arduino Nano
A compact microcontroller board based on the ATmega328P, featuring digital and analog I/O pins.
TP4056
A lithium battery charger module with a micro USB input for charging single-cell lithium batteries.
Boost Converter MT3608
A DC-DC step-up power converter module used to increase the voltage from the battery to the required levels for other components.
3.7V Battery
A single-cell lithium battery providing the power source for the circuit.
I2C LCD 16x2 Screen
A 16x2 character LCD display with an I2C communication interface for displaying text and numbers.
Heart Pulse Sensor
A sensor used to detect the heartbeat rate from a fingertip or earlobe.
Resistors
Two resistors with different resistance values (10kΩ and 200Ω) used for current limiting and voltage division.
LED: Two Pin (red)
A red LED used as an indicator light.
GND
Ground reference points used to complete the electrical circuit.
Ceramic Capacitors
Two ceramic capacitors with different capacitance values (10nF and 100nF) used for noise reduction and voltage smoothing.
Pushbutton
A momentary pushbutton switch used for user input.
Comments
Placeholder components for additional notes or comments in the circuit design, not physically present in the circuit.
Wiring Details
Arduino Nano
- D2 connected to a 200Ω resistor.
- D3 connected to a pushbutton and a 10kΩ resistor.
- GND connected to a ceramic capacitor (100nF) and various ground points in the circuit.
- 5V connected to the VCC of the I2C LCD screen, pushbutton, heart pulse sensor, and the OUTPUT + of the boost converter.
- A5 connected to the SCL pin of the I2C LCD screen.
- A4 connected to the SDA pin of the I2C LCD screen.
- A0 connected to the SIGNAL pin of the heart pulse sensor and a ceramic capacitor (10nF).
TP4056
- OUT- connected to the INPUT - of the boost converter.
- B- connected to the negative terminal of the 3.7V battery.
- B+ connected to the positive terminal of the 3.7V battery.
- OUT+ connected to the INPUT + of the boost converter.
Boost Converter MT3608
- OUTPUT + connected to the 5V line of the circuit.
- OUTPUT - connected to the ground points in the circuit.
- INPUT + connected to the OUT+ of the TP4056.
- INPUT - connected to the OUT- of the TP4056.
3.7V Battery
-
- connected to the B+ of the TP4056.
-
- connected to the B- of the TP4056.
I2C LCD 16x2 Screen
- VCC (5V) connected to the 5V line of the circuit.
- GND connected to the ground points in the circuit.
- SCL connected to the A5 pin of the Arduino Nano.
- SDA connected to the A4 pin of the Arduino Nano.
Heart Pulse Sensor
- VCC connected to the 5V line of the circuit.
- GND connected to the ground points in the circuit.
- SIGNAL connected to the A0 pin of the Arduino Nano and a ceramic capacitor (10nF).
Resistors
- 10kΩ resistor connected between D3 of the Arduino Nano and a pushbutton.
- 200Ω resistor connected between D2 of the Arduino Nano and the anode of the red LED.
LED: Two Pin (red)
- Anode connected to a 200Ω resistor.
- Cathode connected to the ground points in the circuit.
Ceramic Capacitors
- 10nF capacitor connected between the SIGNAL pin of the heart pulse sensor and A0 of the Arduino Nano.
- 100nF capacitor connected between the GND pin of the Arduino Nano and ground points in the circuit.
Pushbutton
- Pin 1 connected to D3 of the Arduino Nano and a 10kΩ resistor.
- Pin 2 connected to the 5V line of the circuit.
Documented Code
#include <Wire.h>
#include <LiquidCrystal_I2C.h>

// Replace 0x27 with your LCD's I2C address if different
LiquidCrystal_I2C lcd(0x27, 16, 2);  // (I2C address, columns, rows)

void setup() {
  // Initialize the LCD
  lcd.init();
  lcd.backlight();                 // Turn on the backlight

  // Display a welcome message
  lcd.setCursor(0, 0);             // Set cursor to first column, first row
  lcd.print("Hello, World!");

  lcd.setCursor(0, 1);             // Set cursor to first column, second row
  lcd.print("LCD Test Success");
}

void loop() {
  // No need to repeat anything in the loop for this test
}
This code is designed to run on the Arduino Nano and demonstrates the initialization of an I2C LCD screen, setting the cursor position, and printing a welcome message. The setup() function is called once when the program starts and is used to set up the LCD. The loop() function runs continuously after setup() finishes but is not used in this example.