
ESP32-Based Smart Energy Monitoring and Relay Control System
View and Edit Project In Cirkit Designer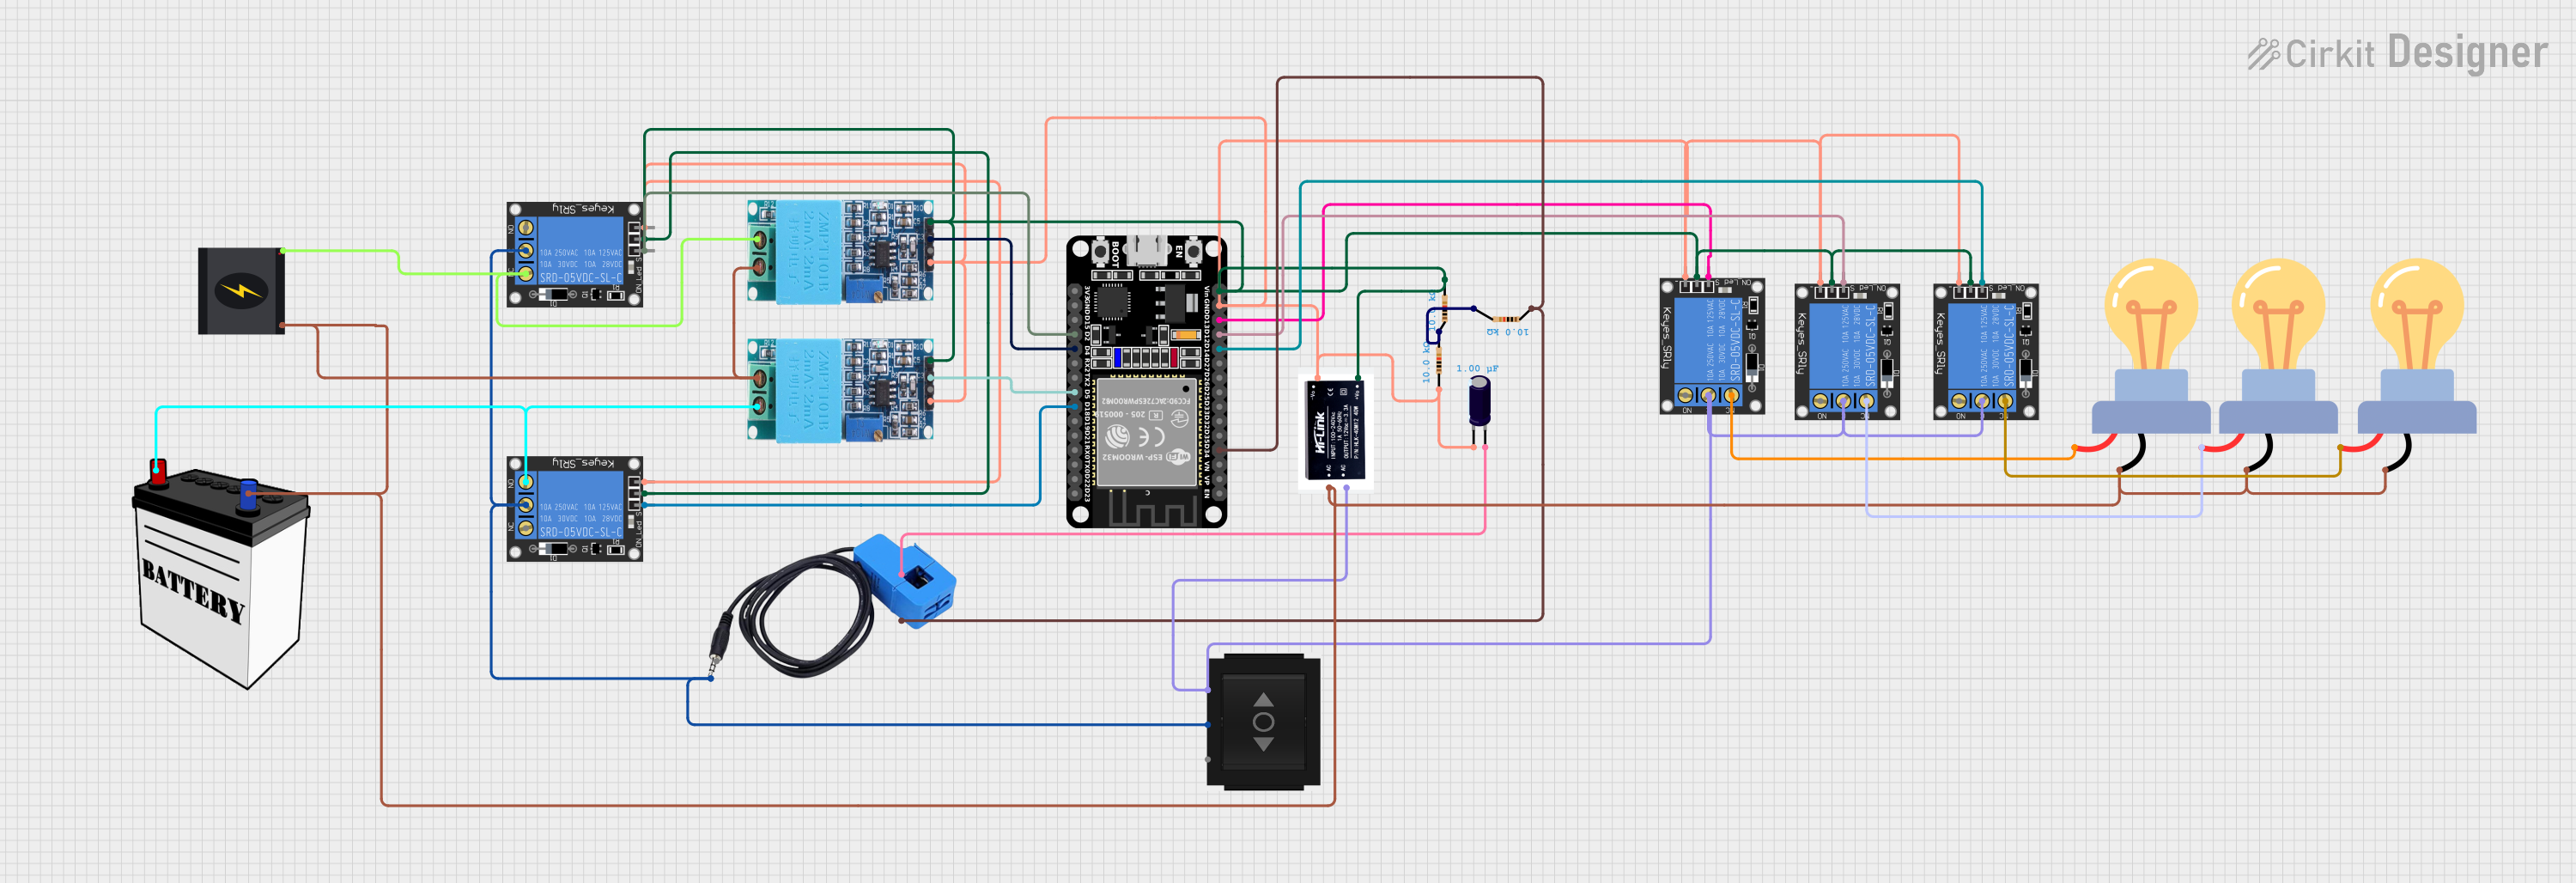
Circuit Documentation
Summary
This circuit is designed to monitor voltage and current using sensors and control a series of relays based on the sensor readings. An ESP32 microcontroller is used to read sensor data and control the relays. The circuit includes voltage sensors (ZMPT101B modules), a current sensor, multiple 1-Channel 5V 10A relays, a directional switch, an electrolytic capacitor, a 12V SMPS module, resistors, a 240V power source, a 12V battery, and LED bulbs for AC.
Component List
Microcontroller
- ESP32 (30 pin): A microcontroller with WiFi and Bluetooth capabilities, featuring a variety of digital and analog pins for interfacing with other components.
Sensors
- ZMPT101B: Voltage sensor modules used to measure AC voltage in the circuit.
- Current Sensor: A sensor used to measure the current flowing through a part of the circuit.
Relays
- 1-Channel Relay (5V 10A): Relays used to control high power devices with low voltage signals from the microcontroller.
Switches
- Directional Switch: A switch used to direct the current flow between two different paths.
Passive Components
- Electrolytic Capacitor: A capacitor used for filtering and stabilizing the voltage in the circuit.
- Resistor: A component used to limit current or divide voltages in the circuit.
Power Sources
- 12v SMPS Module: A power supply module that converts AC to 12V DC.
- 240v Power Source: The main AC power source for the circuit.
- 12V Battery: A battery providing DC power to certain components in the circuit.
Load
- LED bulb AC / Bombillo AC: Light bulbs that are controlled by the relays and powered by the AC power source.
Wiring Details
ESP32 (30 pin)
- EN, VP, VN, D25, D26, D27, TX0, RX0, D21, D19, D23, D22, TX2, RX2, D15, 3V3: Not connected.
- D34: Connected to the current sensor output through a 10kΩ resistor.
- D14, D12, D13, D18, D2: Connected to the signal pins of different relays for control.
- D4, D5: Connected to the output pins of the ZMPT101B voltage sensors.
- GND: Common ground with other components.
- Vin: Connected to the 12V output from the SMPS module and the VCC of the relays.
ZMPT101B (Voltage Sensor)
- OUT: Connected to the ESP32 for voltage sensing.
- GND: Common ground with other components.
- VCC: Connected to the 12V output from the SMPS module.
- NEUTRO, FASE: Connected to the 240V power source for voltage measurement.
Current Sensor
- Out: Connected to the ESP32 through a 10kΩ resistor.
- Burden: Not connected.
- In_current: Connected to the positive terminal of the electrolytic capacitor.
- Out_current: Connected to the ESP32 through a 10kΩ resistor.
1-Channel Relay (5V 10A)
- NC (Normally Closed): Connected to the positive terminal of LED bulbs.
- NO (Normally Open): Connected to the 12V battery.
- C (Common): Connected to the current sensor output and the directional switch.
- Signal: Controlled by the ESP32.
- Power: Connected to the 12V output from the SMPS module.
- Ground: Common ground with other components.
Directional Switch
- IN: Connected to the current sensor output.
- Out 1, Out 2: Connected to the common pins of the relays.
Electrolytic Capacitor
- +: Connected to the current sensor input.
- -: Common ground with other components.
Resistor
- Pin1, Pin2: Used in series with the current sensor and the ESP32, and also for pull-down on the relay signal lines.
12v SMPS Module
- Vout+: Connected to the VCC of the relays and the ESP32.
- Vout-: Common ground with other components.
- AC-, AC+: Connected to the 240V power source and the LED bulbs.
240v Power Source
- Live: Connected to the NEUTRO pin of one ZMPT101B and the NC pin of a relay.
- Neutral: Connected to the FASE pin of the ZMPT101Bs and the negative terminal of the LED bulbs.
12V Battery
- VCC: Connected to the NO pin of a relay.
- GND: Common ground with other components.
LED bulb AC / Bombillo AC
- +: Connected to the NC or NO pins of the relays.
- -: Connected to the Neutral of the 240V power source.
Documented Code
/*
 * This Arduino Sketch is for an ESP32 microcontroller.
 * It reads current and voltage values from sensors and controls relays.
 * The sensors are connected to specific GPIO pins of the ESP32.
 * The relays are also controlled via specific GPIO pins.
 */

// Pin definitions
#define VOLTAGE_SENSOR_PIN_1 4
#define VOLTAGE_SENSOR_PIN_2 5
#define CURRENT_SENSOR_PIN 34
#define RELAY_PIN_1 13
#define RELAY_PIN_2 18
#define RELAY_PIN_3 2
#define RELAY_PIN_4 12
#define RELAY_PIN_5 14

void setup() {
  // Initialize serial communication
  Serial.begin(115200);

  // Initialize sensor pins
  pinMode(VOLTAGE_SENSOR_PIN_1, INPUT);
  pinMode(VOLTAGE_SENSOR_PIN_2, INPUT);
  pinMode(CURRENT_SENSOR_PIN, INPUT);

  // Initialize relay pins
  pinMode(RELAY_PIN_1, OUTPUT);
  pinMode(RELAY_PIN_2, OUTPUT);
  pinMode(RELAY_PIN_3, OUTPUT);
  pinMode(RELAY_PIN_4, OUTPUT);
  pinMode(RELAY_PIN_5, OUTPUT);

  // Set initial state of relays to LOW
  digitalWrite(RELAY_PIN_1, LOW);
  digitalWrite(RELAY_PIN_2, LOW);
  digitalWrite(RELAY_PIN_3, LOW);
  digitalWrite(RELAY_PIN_4, LOW);
  digitalWrite(RELAY_PIN_5, LOW);
}

void loop() {
  // Read voltage sensor values
  int voltage1 = analogRead(VOLTAGE_SENSOR_PIN_1);
  int voltage2 = analogRead(VOLTAGE_SENSOR_PIN_2);

  // Read current sensor value
  int current = analogRead(CURRENT_SENSOR_PIN);

  // Print sensor values to serial monitor
  Serial.print("Voltage 1: ");
  Serial.println(voltage1);
  Serial.print("Voltage 2: ");
  Serial.println(voltage2);
  Serial.print("Current: ");
  Serial.println(current);

  // Control relays based on sensor values
  if (voltage1 > 1000) {
    digitalWrite(RELAY_PIN_1, HIGH);
  } else {
    digitalWrite(RELAY_PIN_1, LOW);
  }

  if (voltage2 > 1000) {
    digitalWrite(RELAY_PIN_2, HIGH);
  } else {
    digitalWrite(RELAY_PIN_2, LOW);
  }

  if (current > 1000) {
    digitalWrite(RELAY_PIN_3, HIGH);
  } else {
    digitalWrite(RELAY_PIN_3, LOW);
  }

  // Add more control logic as needed

  // Delay for a short period
  delay(1000);
}
This code is responsible for initializing the GPIO pins on the ESP32, reading sensor values, and controlling the state of the relays based on the sensor readings. The serial communication is used for debugging purposes to output the sensor values to the serial monitor. The relays are initially set to a LOW state, and their state is updated in the loop function based on the conditions specified.