Cirkit Designer
Your all-in-one circuit design IDE
Home /
Project Documentation
Arduino UNO Controlled BLDC Motor with Electronic Speed Controller (ESC) and Battery Power
Circuit Documentation
Summary
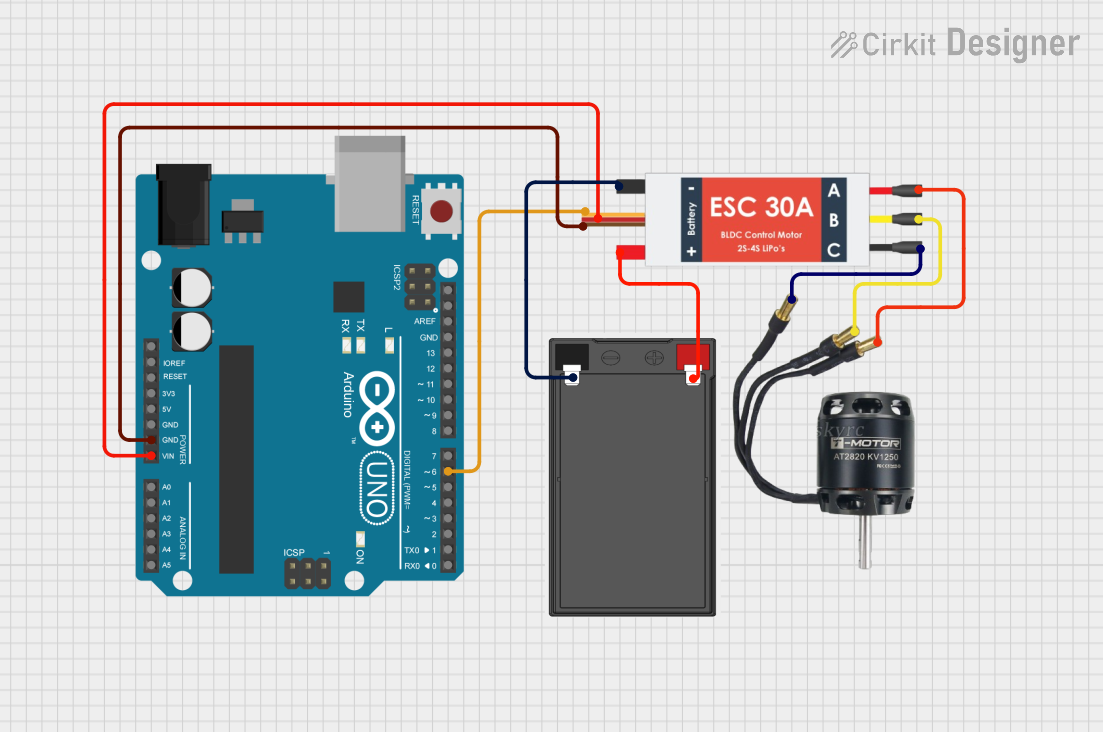
This document provides a detailed overview of a circuit that includes an Arduino UNO microcontroller, a BLDC motor, an Electronic Speed Controller (ESC), and a battery. The Arduino UNO is used to control the BLDC motor via the ESC. The ESC is powered by the battery and provides the necessary signals to drive the motor.
Component List
Arduino UNO
- Description: A microcontroller board based on the ATmega328P.
- Pins: UNUSED, IOREF, Reset, 3.3V, 5V, GND, Vin, A0, A1, A2, A3, A4, A5, SCL, SDA, AREF, D13, D12, D11, D10, D9, D8, D7, D6, D5, D4, D3, D2, D1, D0
BLDC Motor
- Description: A Brushless DC motor.
- Pins: Wire A, Wire B, Wire C
Electronic Speed Controller (ESC)
- Description: A device used to control the speed of the BLDC motor.
- Pins: Battery VCC, Battery GND, Signal, 5v out, GND out, M1, M2, M3
Battery
- Description: A power source for the ESC.
- Pins: -, +
Wiring Details
Arduino UNO
- GND: Connected to GND out of the ESC.
- Vin: Connected to 5v out of the ESC.
- D6: Connected to Signal of the ESC.
BLDC Motor
- Wire A: Connected to M3 of the ESC.
- Wire B: Connected to M2 of the ESC.
- Wire C: Connected to M1 of the ESC.
Electronic Speed Controller (ESC)
- GND out: Connected to GND of the Arduino UNO.
- 5v out: Connected to Vin of the Arduino UNO.
- Signal: Connected to D6 of the Arduino UNO.
- M1: Connected to Wire C of the BLDC Motor.
- M2: Connected to Wire B of the BLDC Motor.
- M3: Connected to Wire A of the BLDC Motor.
- Battery VCC: Connected to + of the Battery.
- Battery GND: Connected to - of the Battery.
Battery
- +: Connected to Battery VCC of the ESC.
- -: Connected to Battery GND of the ESC.
Documented Code
Arduino UNO Code (sketch.ino)
void setup() {
  // put your setup code here, to run once:

}

void loop() {
  // put your main code here, to run repeatedly:

}
Additional Documentation (documentation.txt)
This document provides a comprehensive overview of the circuit, including the components used, their connections, and the code running on the Arduino UNO.