Cirkit Designer
Your all-in-one circuit design IDE
Home /
Project Documentation
Automated Plant Watering System with Arduino and ESP32
Circuit Documentation
Summary
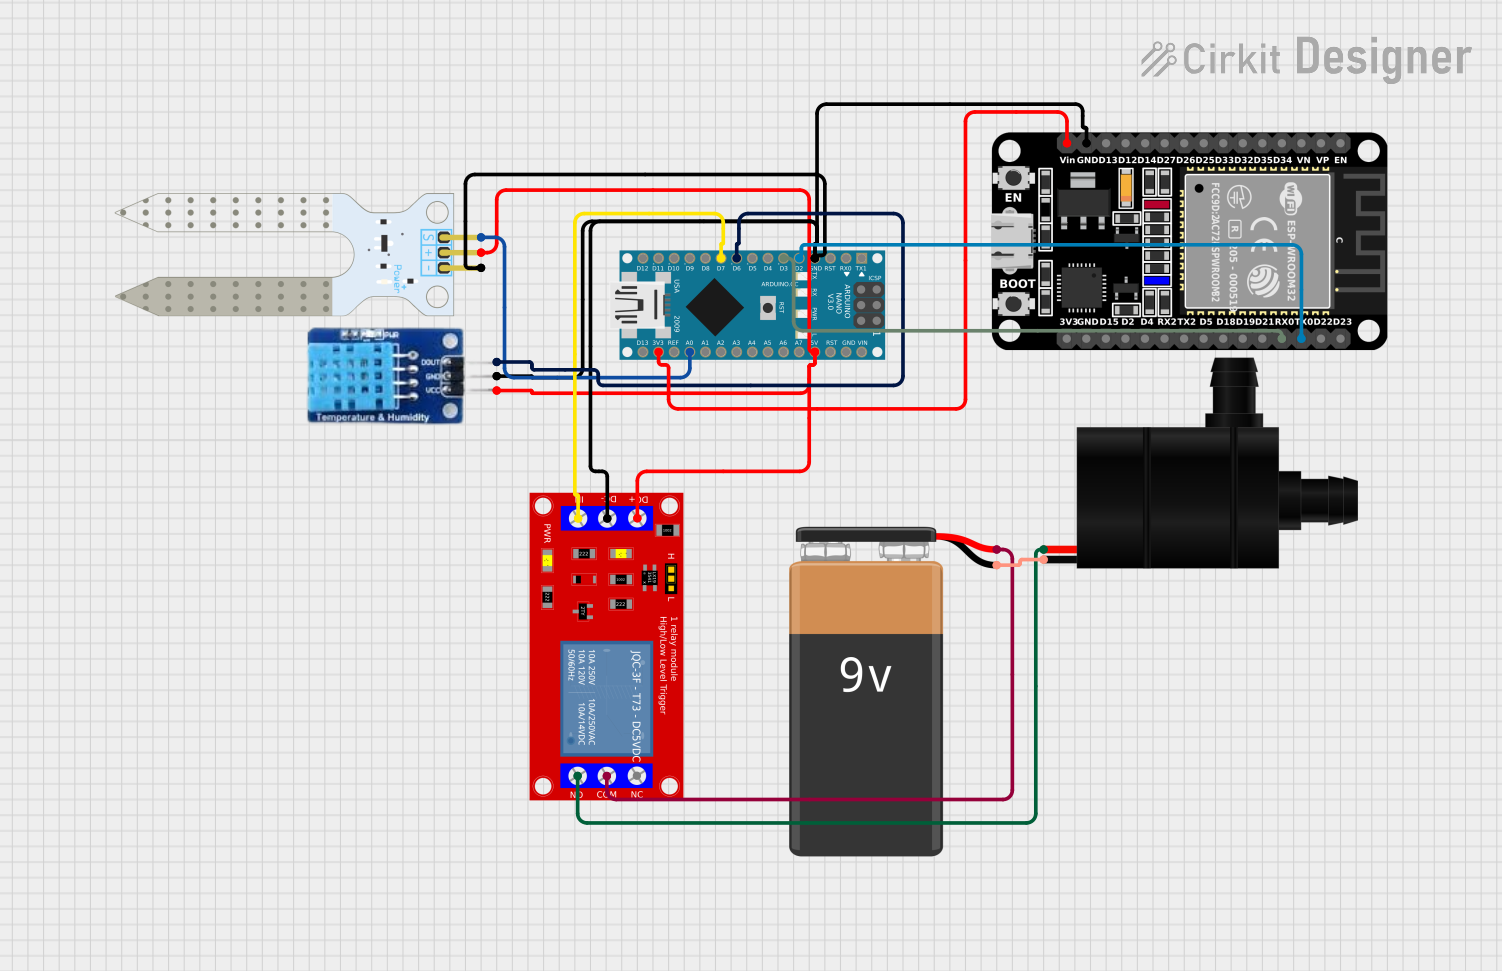
This circuit is designed to monitor soil moisture levels and control a water pump based on the moisture readings. It utilizes an Arduino Nano microcontroller to read data from a soil moisture sensor and a DHT11 sensor for humidity and temperature measurements. A relay module is used to control the water pump, which is activated when the soil moisture level falls below a specified threshold. The circuit also includes an ESP32 microcontroller for additional functionalities, such as wireless communication.
Component List
Arduino Nano
- Description: A compact microcontroller board based on the ATmega328P.
- Purpose: Acts as the main controller for reading sensor data and controlling the relay.
Soil Moisture Sensor
- Description: A sensor that measures the moisture level in the soil.
- Purpose: Provides analog readings of soil moisture to the Arduino.
1 Channel 5V Relay Module
- Description: A relay module that allows the control of high-power devices with a low-power signal.
- Purpose: Controls the water pump based on the signals from the Arduino.
Water Pump
- Description: A small electric pump used to water plants.
- Purpose: Activated by the relay to water the plants when the soil moisture is low.
DHT11
- Description: A basic, low-cost digital temperature and humidity sensor.
- Purpose: Measures the ambient humidity and temperature.
9V Battery
- Description: A battery providing power to the circuit.
- Purpose: Supplies power to the relay module and water pump.
ESP32 (30 pin)
- Description: A powerful microcontroller with built-in Wi-Fi and Bluetooth capabilities.
- Purpose: Can be used for additional functionalities such as remote monitoring or control.
Wiring Details
Arduino Nano
- GND: Connected to GND of Soil Moisture Sensor, DHT11, Relay Module, and ESP32.
- 5V: Connected to VCC of Soil Moisture Sensor, DHT11, and Relay Module.
- D2: Connected to TX0 of ESP32.
- D3: Connected to RX0 of ESP32.
- D6: Connected to DATA pin of DHT11.
- D7: Connected to IN pin of Relay Module.
- A0: Connected to SIG pin of Soil Moisture Sensor.
- 3V3: Connected to Vin of ESP32.
Soil Moisture Sensor
- VCC: Connected to 5V of Arduino Nano.
- GND: Connected to GND of Arduino Nano.
- SIG: Connected to A0 of Arduino Nano.
1 Channel 5V Relay Module
- VCC+: Connected to 5V of Arduino Nano.
- VCC- (GND): Connected to GND of Arduino Nano.
- IN: Connected to D7 of Arduino Nano.
- N.O.: Connected to VCC of Water Pump.
- COM: Connected to + of 9V Battery.
Water Pump
- VCC: Connected to N.O. of Relay Module.
- GND: Connected to - of 9V Battery.
DHT11
- VCC: Connected to 5V of Arduino Nano.
- GND: Connected to GND of Arduino Nano.
- DATA: Connected to D6 of Arduino Nano.
9V Battery
- +: Connected to COM of Relay Module.
- -: Connected to GND of Water Pump.
ESP32 (30 pin)
- GND: Connected to GND of Arduino Nano.
- Vin: Connected to 3V3 of Arduino Nano.
- TX0: Connected to D2 of Arduino Nano.
- RX0: Connected to D3 of Arduino Nano.
Documented Code
#include <DHT.h>

#define DHTPIN 6           // DHT11 data pin connected to pin D6
#define DHTTYPE DHT11      // DHT11 sensor
#define RELAY_PIN 7        // Relay control pin
#define MOISTURE_SENSOR A0 // Soil moisture sensor analog pin

DHT dht(DHTPIN, DHTTYPE);

void setup() {
  pinMode(RELAY_PIN, OUTPUT);
  pinMode(MOISTURE_SENSOR, INPUT);

  Serial.begin(9600);
  dht.begin();
}

void loop() {
  int moistureLevel = analogRead(MOISTURE_SENSOR);  // Read soil moisture level
  float humidity = dht.readHumidity();              // Read humidity
  float temperature = dht.readTemperature();        // Read temperature

  int threshold = 500;  // Moisture threshold

  // Print sensor data to Serial Monitor
  Serial.print("Soil Moisture Level: ");
  Serial.println(moistureLevel);
  Serial.print("Humidity: ");
  Serial.print(humidity);
  Serial.println("%");
  Serial.print("Temperature: ");
  Serial.print(temperature);
  Serial.println("°C");

  // Check if soil is dry, activate water pump
  if (moistureLevel < threshold) {
    digitalWrite(RELAY_PIN, HIGH);  // Turn on water pump
    Serial.println("Watering the plants...");
  } else {
    digitalWrite(RELAY_PIN, LOW);   // Turn off water pump
    Serial.println("Soil moisture is sufficient.");
  }

  delay(2000);  // Wait before taking next reading
}
This documentation provides a comprehensive overview of the circuit, its components, wiring details, and the code used for operation.