
Circuit Documentation
Summary
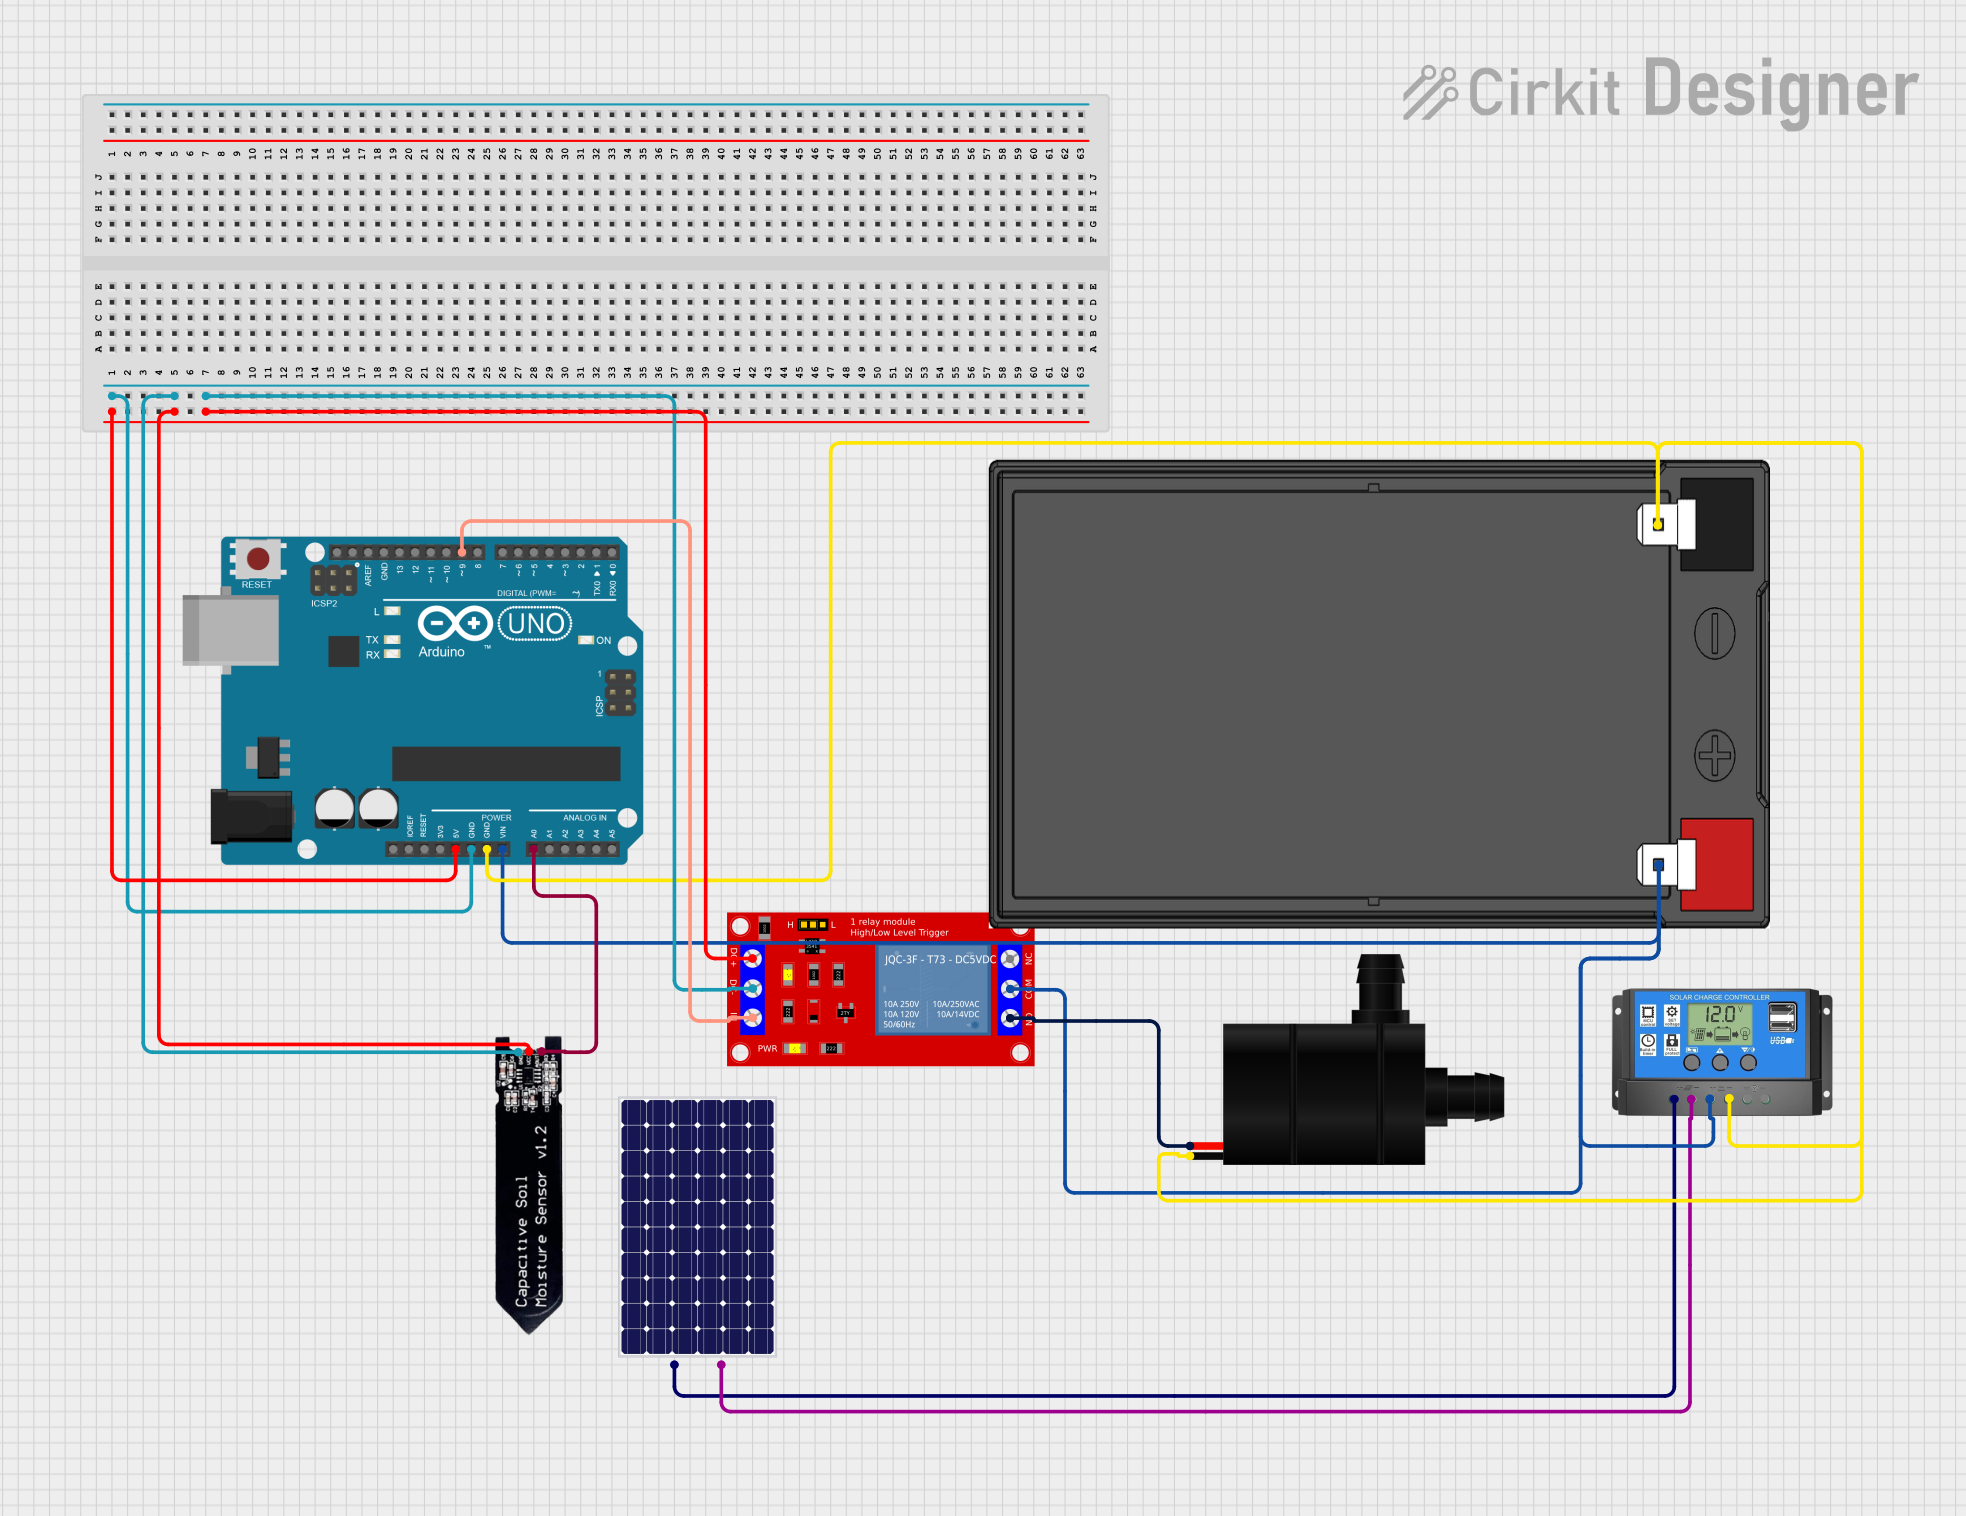
This circuit is designed to automate the watering of plants based on soil moisture levels. It uses an Arduino UNO to read the soil moisture sensor and control a water pump via a relay module. The system is powered by a 12V 7Ah battery, which is charged by a solar panel through a solar charge controller.
Component List
Arduino UNO
- Description: A microcontroller board based on the ATmega328P.
- Pins: UNUSED, IOREF, Reset, 3.3V, 5V, GND, Vin, A0, A1, A2, A3, A4, A5, SCL, SDA, AREF, D13, D12, D11, D10, D9, D8, D7, D6, D5, D4, D3, D2, D1, D0
1 Channel 5V Relay Module
- Description: A relay module used to control high voltage devices with a low voltage signal.
- Pins: VCC+, VCC- (GND), IN, N.O., COM, N.C.
Soil Moisture Sensor
- Description: A sensor used to measure the moisture level in the soil.
- Pins: gnd, vcc, aout
12V 7Ah Battery
- Description: A rechargeable battery used to power the circuit.
- Pins: 12v +, 12v -
Solar Charge Controller
- Description: A device used to manage the power from the solar panel to charge the battery.
- Pins: Solar Cell +, Solar Cell -, Battery +, Battery -, Load +, Load -
Solar Panel
- Description: A panel that converts sunlight into electrical energy.
- Pins: +, -
Water Pump
- Description: A pump used to water the plants.
- Pins: VCC, GND
Wiring Details
Arduino UNO
5V connected to:
- Soil Moisture Sensor (vcc)
- 1 Channel 5V Relay Module (VCC+)
GND connected to:
- Soil Moisture Sensor (gnd)
- 1 Channel 5V Relay Module (VCC- (GND))
- 12V 7Ah Battery (12v -)
- Solar Charge Controller (Battery -)
Vin connected to:
- 1 Channel 5V Relay Module (COM)
- 12V 7Ah Battery (12v +)
- Solar Charge Controller (Battery +)
A0 connected to:
- Soil Moisture Sensor (aout)
D9 connected to:
- 1 Channel 5V Relay Module (IN)
1 Channel 5V Relay Module
VCC+ connected to:
- Arduino UNO (5V)
VCC- (GND) connected to:
- Arduino UNO (GND)
IN connected to:
- Arduino UNO (D9)
COM connected to:
- Arduino UNO (Vin)
- 12V 7Ah Battery (12v +)
- Solar Charge Controller (Battery +)
N.O. connected to:
- Water Pump (VCC)
Soil Moisture Sensor
gnd connected to:
- Arduino UNO (GND)
vcc connected to:
- Arduino UNO (5V)
aout connected to:
- Arduino UNO (A0)
12V 7Ah Battery
12v + connected to:
- 1 Channel 5V Relay Module (COM)
- Arduino UNO (Vin)
- Solar Charge Controller (Battery +)
12v - connected to:
- Water Pump (GND)
- Arduino UNO (GND)
- Solar Charge Controller (Battery -)
Solar Charge Controller
Solar Cell + connected to:
- Solar Panel (+)
Solar Cell - connected to:
- Solar Panel (-)
Battery + connected to:
- 12V 7Ah Battery (12v +)
- Arduino UNO (Vin)
- 1 Channel 5V Relay Module (COM)
Battery - connected to:
- 12V 7Ah Battery (12v -)
- Arduino UNO (GND)
Solar Panel
+ connected to:
- Solar Charge Controller (Solar Cell +)
- connected to:
- Solar Charge Controller (Solar Cell -)
Water Pump
VCC connected to:
- 1 Channel 5V Relay Module (N.O.)
GND connected to:
- 12V 7Ah Battery (12v -)
- Arduino UNO (GND)
Code Documentation
Arduino UNO Code
// Pin definitions
const int soilMoisturePin = A0; // Analog pin connected to soil moisture sensor
const int relayPin = 9;         // Digital pin connected to relay module

// Threshold for soil moisture level
const int moistureThreshold = 300;

void setup() {
  // Initialize serial communication
  Serial.begin(9600);
  // Initialize the relay pin as an output
  pinMode(relayPin, OUTPUT);
  // Ensure the relay is off initially
  digitalWrite(relayPin, LOW);
}

void loop() {
  // Read the soil moisture level
  int soilMoistureValue = analogRead(soilMoisturePin);
  // Print the soil moisture level to the serial monitor
  Serial.print("Soil Moisture Level: ");
  Serial.println(soilMoistureValue);
  // Check if the soil moisture level is below the threshold
  if (soilMoistureValue < moistureThreshold) {
    // If the soil is dry, turn on the water pump
    digitalWrite(relayPin, HIGH);
    Serial.println("Water pump activated.");
  } else {
    // If the soil is wet, turn off the water pump
    digitalWrite(relayPin, LOW);
    Serial.println("Water pump deactivated.");
  }
  // Wait for a second before taking another reading
  delay(1000);
}
1 Channel 5V Relay Module Code
void setup() {
  // put your setup code here, to run once:

}

void loop() {
  // put your main code here, to run repeatedly:

}
Soil Moisture Sensor Code
void setup() {
  // put your setup code here, to run once:

}

void loop() {
  // put your main code here, to run repeatedly:

}
This documentation provides a comprehensive overview of the circuit, including a summary, detailed component list, wiring details, and the code used in the microcontrollers.