
Arduino Nano Controlled Rocket Thruster with Load Cell Feedback and SD Data Logging
View and Edit Project In Cirkit Designer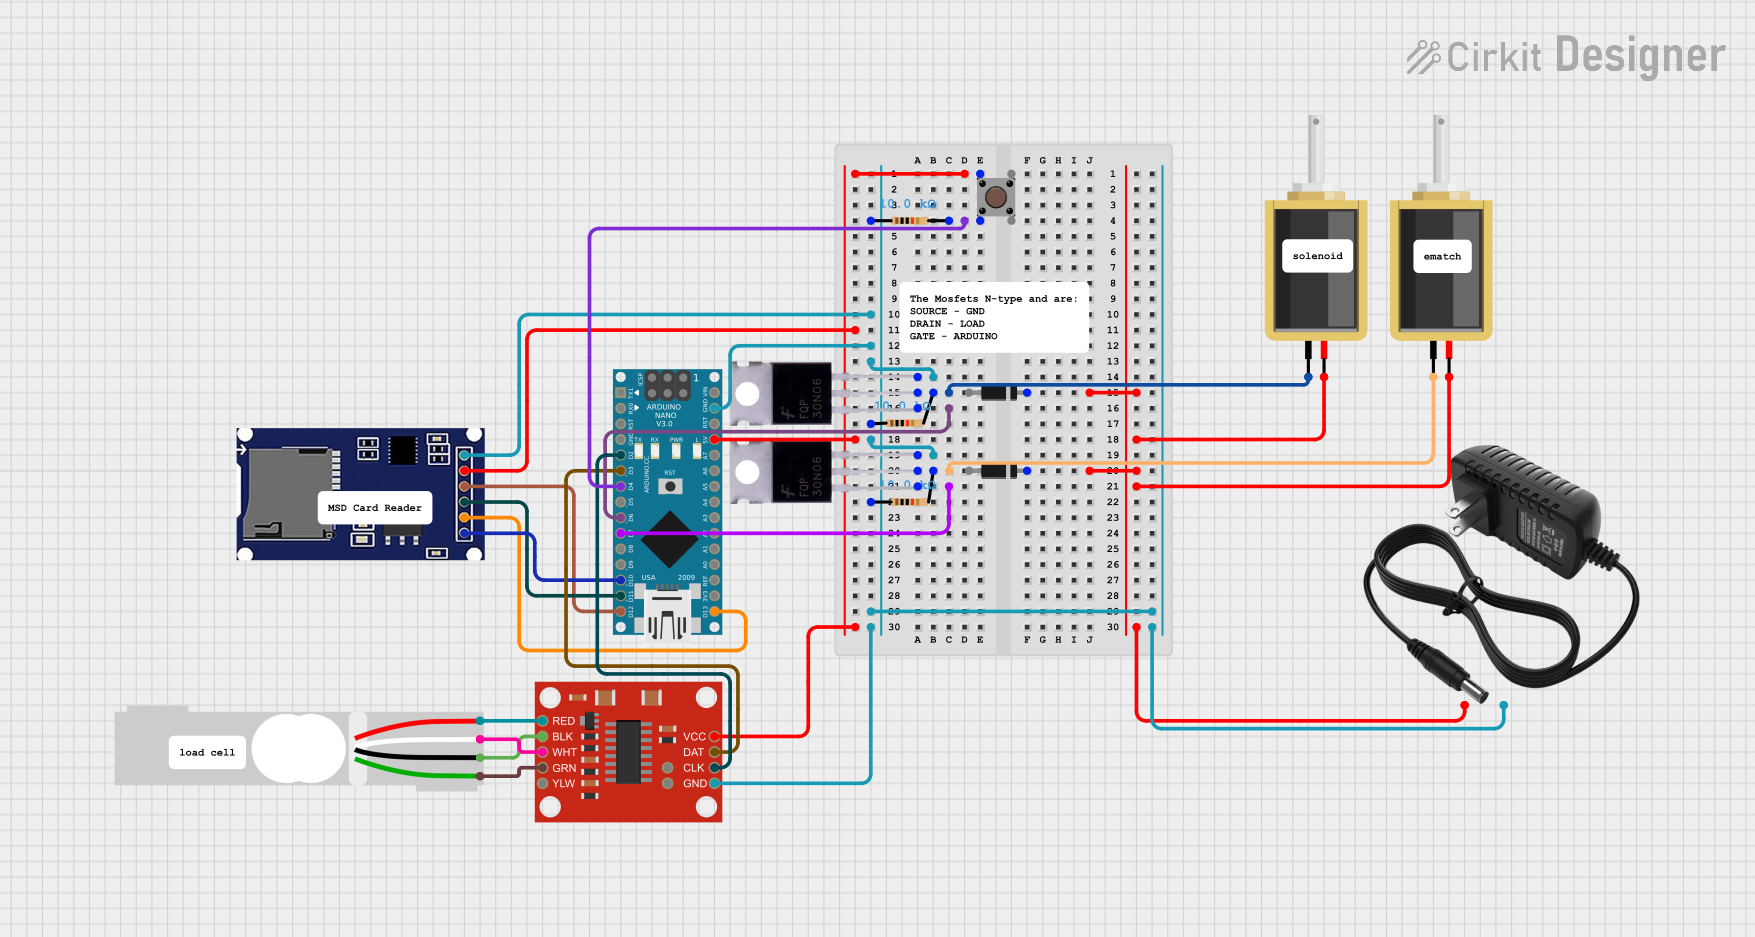
Circuit Documentation
Summary
This circuit is designed to control a rocket thruster using an Arduino Nano as the central microcontroller. The circuit includes a solenoid for controlling the thruster, a load cell with an HX711 amplifier for measuring force, an SD module for data logging, and a pushbutton for user interaction. The circuit is powered by a 12V power supply, and it includes diodes for protection, MOSFETs for controlling high-current loads, and resistors for current limiting and pull-down purposes.
Component List
Solenoid
- Description: An electromechanical device used for controlling the rocket thruster.
- Pins: pin1, pin2
12V Power Supply
- Description: Provides the necessary power for the circuit.
- Pins: +, -
Arduino Nano
- Description: The main microcontroller that controls the circuit logic.
- Pins: D1/TX, D0/RX, RESET, GND, D2, D3, D4, D5, D6, D7, D8, D9, D10, D11/MOSI, D12/MISO, VIN, 5V, A7, A6, A5, A4, A3, A2, A1, A0, AREF, 3V3, D13/SCK
SD Module
- Description: Used for data logging onto an SD card.
- Pins: CS, SCK, MOSI, MISO, VCC, GND
SparkFun Load Cell Amplifier - HX711
- Description: Amplifies the signal from the load cell for the Arduino to read.
- Pins: GND, CLK, DAT, VCC, YLW, GRN, WHT, BLK, RED, B-, B+
Diode
- Description: Used for protection against reverse current.
- Pins: cathode, anode
Resistor (10k Ohms)
- Description: Used for current limiting and pull-down purposes.
- Pins: pin1, pin2
MOSFET
- Description: Controls high-current loads such as the solenoid.
- Pins: Gate, Drain, Source
Pushbutton
- Description: Allows user interaction to start the rocket thruster sequence.
- Pins: Pin 3 (out), Pin 4 (out), Pin 1 (in), Pin 2 (in)
Load Cell - Red/white/black/green
- Description: Measures the force exerted by the rocket thruster.
- Pins: E+, A-, E-, A+
Wiring Details
Solenoid
- pin1: Connected to the Drain of a MOSFET.
- pin2: Connected to the + of the 12V power supply through a diode.
12V Power Supply
- +: Connected to the cathode of diodes and pin2 of solenoids.
- -: Connected to the GND net, which includes GND pins of various components.
Arduino Nano
- 5V: Connected to VCC of the SD module and HX711, and Pin 1 (in) of the Pushbutton.
- GND: Connected to the Source of MOSFETs, GND of the SD module and HX711, and the - of the 12V power supply.
- D2: Connected to CLK of HX711.
- D3: Connected to DAT of HX711.
- D4: Connected to Pin 2 (in) of the Pushbutton through a 10k Ohm resistor.
- D6: Connected to the Gate of a MOSFET controlling a solenoid.
- D7: Connected to the Gate of another MOSFET controlling a solenoid.
- D10: Connected to CS of the SD module.
- D11/MOSI: Connected to MOSI of the SD module.
- D12/MISO: Connected to MISO of the SD module.
- D13/SCK: Connected to SCK of the SD module.
SD Module
- VCC: Connected to 5V of the Arduino Nano.
- GND: Connected to the GND net.
- CS: Connected to D10 of the Arduino Nano.
- SCK: Connected to D13/SCK of the Arduino Nano.
- MOSI: Connected to D11/MOSI of the Arduino Nano.
- MISO: Connected to D12/MISO of the Arduino Nano.
SparkFun Load Cell Amplifier - HX711
- VCC: Connected to 5V of the Arduino Nano.
- GND: Connected to the GND net.
- CLK: Connected to D2 of the Arduino Nano.
- DAT: Connected to D3 of the Arduino Nano.
- GRN: Connected to A+ of the Load Cell.
- WHT: Connected to A- of the Load Cell.
- BLK: Connected to E- of the Load Cell.
- RED: Connected to E+ of the Load Cell.
Diode
- cathode: Connected to the + of the 12V power supply.
- anode: Connected to pin2 of solenoids.
Resistor (10k Ohms)
- pin1: Connected to the Source of MOSFETs and GND net.
- pin2: Connected to the Drain of MOSFETs or Pin 2 (in) of the Pushbutton.
MOSFET
- Gate: Connected to D6 or D7 of the Arduino Nano.
- Drain: Connected to pin1 of solenoids and pin2 of a 10k Ohm resistor.
- Source: Connected to the GND net.
Pushbutton
- Pin 1 (in): Connected to 5V of the Arduino Nano.
- Pin 2 (in): Connected to D4 of the Arduino Nano through a 10k Ohm resistor.
- Pin 3 (out) and Pin 4 (out): Not connected in the provided net list.
Load Cell - Red/white/black/green
- E+: Connected to RED of HX711.
- A-: Connected to WHT of HX711.
- E-: Connected to BLK of HX711.
- A+: Connected to GRN of HX711.
Documented Code
/*
 * This Arduino Nano controls a rocket thruster.
 */

#include <SD.h>
#include <SPI.h>
#include "HX711.h"

// Pin definitions
const int LOADCELL_DOUT_PIN = 3;
const int LOADCELL_SCK_PIN = 2;
const int SD_CS_PIN = 10;
const int SOLENOID_PIN = 6;
const int EMATCH_PIN = 7;
const int BUTTON_PIN = 4;

// HX711 Load Cell Amplifier
HX711 loadcell;

// SD card file
File dataFile;

// Timing variables
unsigned long lastMillis = 0;
const unsigned long interval = 100; // Interval for reading and logging (100 ms)
const unsigned long match_wait = 500;

bool started = false;

void setup() {
    // Initialize serial communication
    Serial.begin(9600);

    // Initialize the load cell
    loadcell.begin(LOADCELL_DOUT_PIN, LOADCELL_SCK_PIN);

    // Initialize the SD card
    if (!SD.begin(SD_CS_PIN)) {
        Serial.println("SD card initialization failed!");
        return;
    }
    Serial.println("SD card initialized.");

    // Open the file for writing
    dataFile = SD.open("datalog.txt", FILE_WRITE);
    if (!dataFile) {
        Serial.println("Error opening datalog.txt");
        return;
    }
    dataFile.println("Time(ms),LoadCellReading");  // Adding headers for clarity

    // Initialize pins
    pinMode(SOLENOID_PIN, OUTPUT);
    pinMode(EMATCH_PIN, OUTPUT);
    pinMode(BUTTON_PIN, INPUT);
}

void loop() {
    if (digitalRead(BUTTON_PIN) == HIGH) {
        if (!started) {
            started = true;
            digitalWrite(EMATCH_PIN, HIGH);
            if (millis() - lastMillis >= match_wait) {
                digitalWrite(SOLENOID_PIN, HIGH);
            }
        } else {
            started = false;
            digitalWrite(SOLENOID_PIN, LOW);
            digitalWrite(EMATCH_PIN, LOW);
            exit();
        }
    }
    // Check if the interval has passed
    if (millis() - lastMillis >= interval) {
        lastMillis = millis(); // Update the lastMillis variable

        // Read the load cell data
        if (loadcell.is_ready()) {
            long reading = loadcell.read();

            // Log the data to the SD card
            dataFile.println(String(millis()) + "," + String(reading));
            dataFile.flush();
        } else {
            Serial.println("HX711 not found.");
        }
    }
}

void exit() {
    dataFile.close();
    Serial.println("Data logging finished.");
}
This code is responsible for controlling the rocket thruster sequence, reading data from the load cell, and logging the data to an SD card. The pushbutton starts the sequence, which first ignites the