
ESP32-Based Flex Sensor Array and Heart Pulse Monitor with LCD Display
View and Edit Project In Cirkit Designer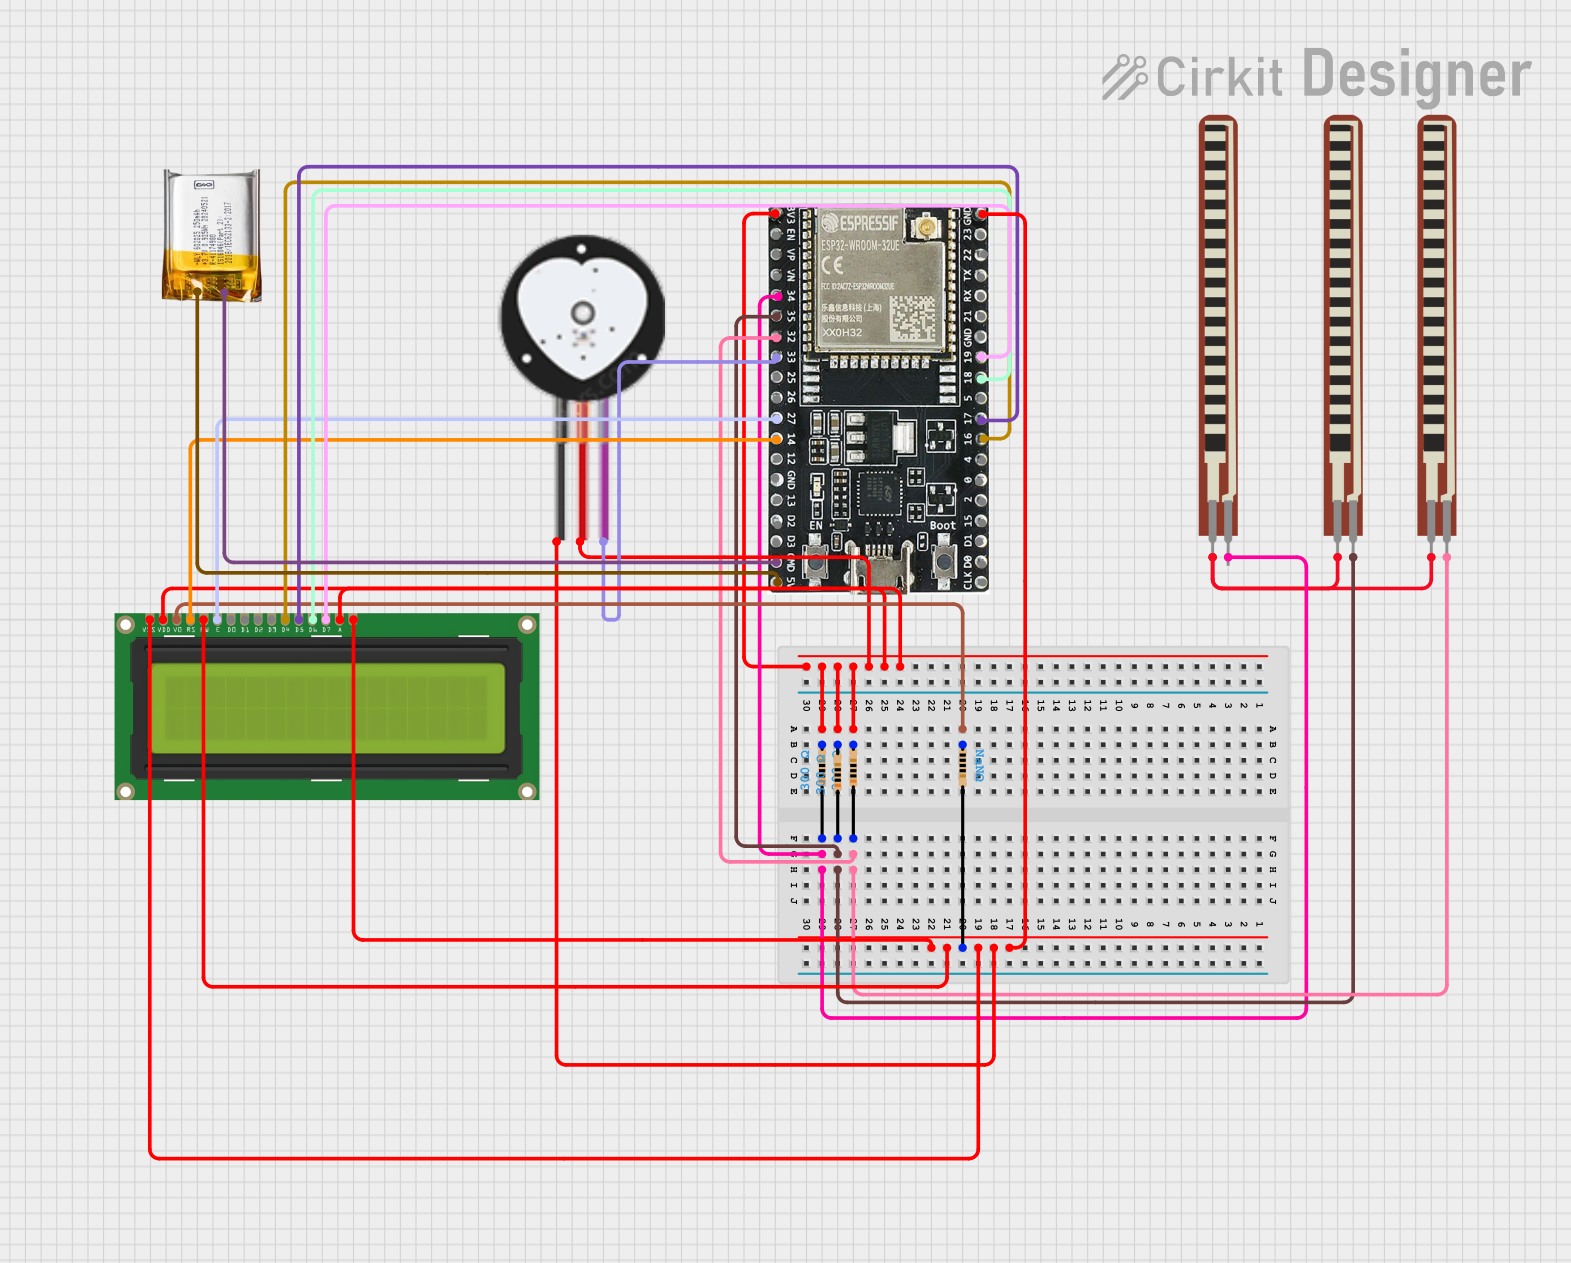
Circuit Documentation
Summary
This circuit is designed to read values from five flex sensors and a heart pulse sensor, then display the first flex sensor value and the heart pulse value on a 16x2 LCD display. The values are also printed to the Serial Monitor. The circuit utilizes an ESP32-WROOM-32UE microcontroller to process the sensor data and control the LCD display. The circuit is powered by a 3.7v LiPo battery.
Component List
2.2 inch Basic Flex Resistor
- Description: A flexible resistor used to measure bending or flexing.
- Pins: Pin 2, pin 1
ESP32-WROOM-32UE
- Description: A powerful microcontroller with Wi-Fi and Bluetooth capabilities.
- Pins: 3v3, EN, VP, VN, 34, 35, 32, 33, 25, 26, 27, 14, 12, GND, 13, D2, D3, 5V, 23, 22, TX, RX, 21, 19, 18, 5, 17, 16, 4, 0, 2, 15, D1, D0, CKL
Resistor
- Description: A passive two-terminal electrical component that implements electrical resistance as a circuit element.
- Pins: pin1, pin2
- Properties: Resistance (specified in Ohms)
LCD Display 16x2
- Description: A liquid crystal display capable of displaying 16 characters per line across 2 lines.
- Pins: LEDK, LEDA, DB7, DB6, DB5, DB4, DB3, DB2, DB1, DB0, E, RW, RS, VO, VDD, VSS
Heart Pulse Sensor
- Description: A sensor used to detect the heartbeat of an individual.
- Pins: GND, VCC, SIGNAL
3.7v LiPo
- Description: A lithium polymer battery that provides a 3.7-volt power source.
- Pins: +Ve, GND
Wiring Details
2.2 inch Basic Flex Resistor
- Pin 1: Connected to ESP32-WROOM-32UE pin 32, 35, or 34 (depending on the instance).
- Pin 2: All flex resistors' Pin 2 are interconnected.
ESP32-WROOM-32UE
- 3v3: Connected to the VCC of the Heart Pulse Sensor and VDD of the LCD Display.
- GND: Connected to the GND of the Heart Pulse Sensor, LCD Display, and 3.7v LiPo battery.
- 5V: Connected to the +Ve of the 3.7v LiPo battery.
- Pins 32, 35, 34: Connected to the pin 1 of the corresponding Basic Flex Resistor.
- Pin 33: Connected to the SIGNAL of the Heart Pulse Sensor.
- Pins 27, 14, 19, 18, 17, 16: Connected to the E, RS, DB7, DB6, DB5, DB4 of the LCD Display respectively.
Resistor
- One end (pin1 or pin2 depending on the instance): Connected to various components such as the VO of the LCD Display or the pin 1 of a Basic Flex Resistor.
- The other end (pin2 or pin1 depending on the instance): Connected to the LEDA of the LCD Display and the 3v3 of the ESP32-WROOM-32UE.
LCD Display 16x2
- VO: Connected to a Resistor.
- LEDA: Connected to a network of Resistors and the 3v3 of the ESP32-WROOM-32UE.
- VDD: Connected to the 3v3 of the ESP32-WROOM-32UE.
- VSS, RW, LEDK: Connected to GND.
- E, RS, DB7, DB6, DB5, DB4: Connected to the ESP32-WROOM-32UE pins 27, 14, 19, 18, 17, 16 respectively.
Heart Pulse Sensor
- VCC: Connected to the 3v3 of the ESP32-WROOM-32UE.
- GND: Connected to GND.
- SIGNAL: Connected to the ESP32-WROOM-32UE pin 33.
3.7v LiPo
- +Ve: Connected to the 5V of the ESP32-WROOM-32UE.
- GND: Connected to GND.
Documented Code
/*
 * This Arduino sketch reads values from five flex sensors and a heart pulse
 * sensor, then displays the first flex sensor value and the heart pulse value
 * on a 16x2 LCD display. The values are also printed to the Serial Monitor.
 */

#include <LiquidCrystal.h>

// Flex Sensors
const int flexSensorPins[5] = {34, 35, 26, 32, 25};
int flexSensorValues[5] = {0, 0, 0, 0, 0};

// Heart Pulse Sensor
const int heartPulsePin = 33;
int heartPulseValue = 0;

// LCD Display
const int rs = 14, en = 27, d4 = 16, d5 = 17, d6 = 18, d7 = 19;
LiquidCrystal lcd(rs, en, d4, d5, d6, d7);

void setup() {
  Serial.begin(115200);
  for (int i = 0; i < 5; i++) {
    pinMode(flexSensorPins[i], INPUT);
  }
  pinMode(heartPulsePin, INPUT);

  // Initialize LCD
  lcd.begin(16, 2);
  lcd.print("Initializing...");
  delay(2000);
}

void loop() {
  // Read Flex Sensors
  for (int i = 0; i < 5; i++) {
    flexSensorValues[i] = analogRead(flexSensorPins[i]);
    Serial.print("Flex Sensor ");
    Serial.print(i + 1);
    Serial.print(": ");
    Serial.println(flexSensorValues[i]);
  }

  // Read Heart Pulse Sensor
  heartPulseValue = analogRead(heartPulsePin);
  Serial.print("Heart Pulse: ");
  Serial.println(heartPulseValue);

  // Display values on LCD
  lcd.clear();
  lcd.setCursor(0, 0);
  lcd.print("Flex1:");
  lcd.print(flexSensorValues[0]);
  lcd.setCursor(0, 1);
  lcd.print("Pulse:");
  lcd.print(heartPulseValue);

  delay(1000); // Delay for 1 second
}
This code is designed to run on the ESP32-WROOM-32UE microcontroller. It initializes the serial communication, configures the input pins for the flex and heart pulse sensors, and sets up the LCD display. In the main loop, it reads the sensor values, prints them to the Serial Monitor, and displays them on the LCD.