
Arduino Nano Based Angle Measurement with MPU-6050 and OLED Display
View and Edit Project In Cirkit Designer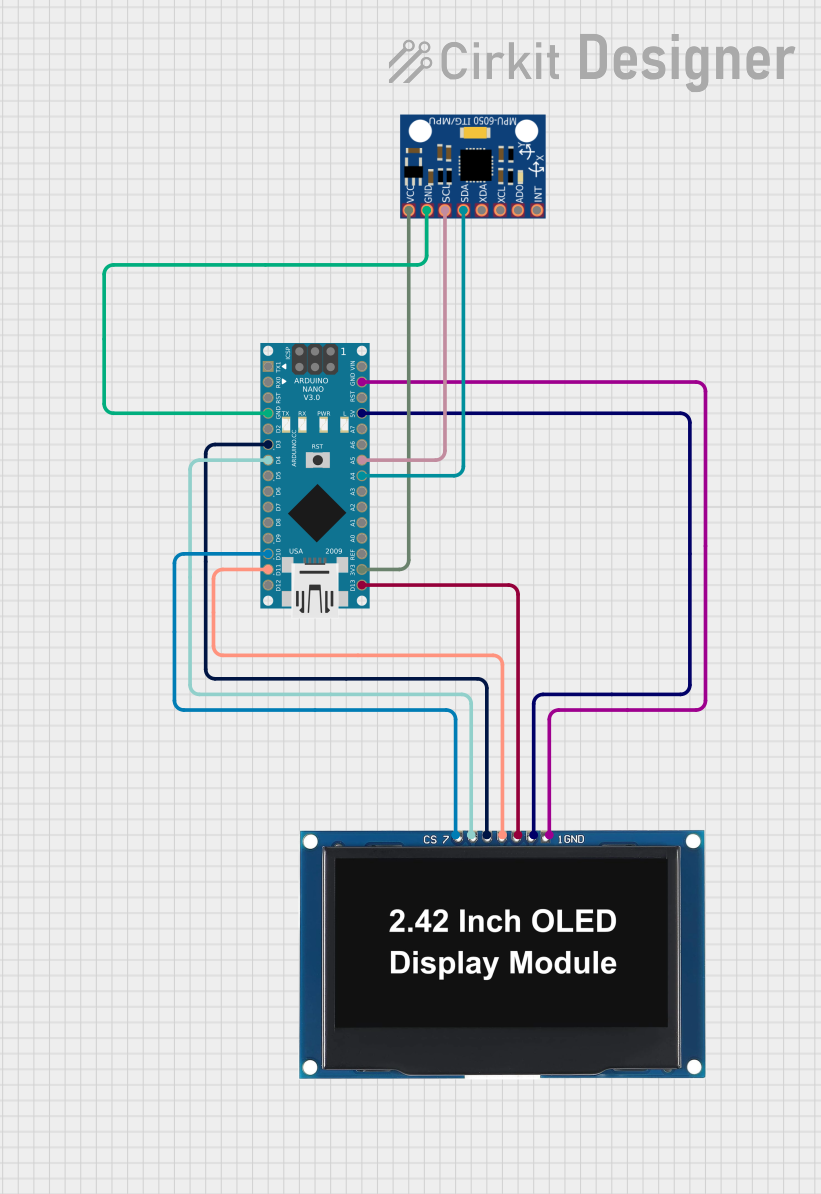
Circuit Documentation
Summary
This circuit integrates an Arduino Nano microcontroller with an MPU-6050 accelerometer/gyroscope module and an OLED display. The purpose of the circuit is to read angular data from the MPU-6050 sensor and display the angle on the OLED screen. The angle is displayed within a range of -60.0 to 60.0 degrees. The Arduino Nano serves as the central processing unit, interfacing with the MPU-6050 sensor over I2C and controlling the OLED display through SPI communication.
Component List
Arduino Nano
- Description: A compact microcontroller board based on the ATmega328P.
- Pins: D1/TX, D0/RX, RESET, GND, D2, D3, D4, D5, D6, D7, D8, D9, D10, D11/MOSI, D12/MISO, VIN, 5V, A7, A6, A5, A4, A3, A2, A1, A0, AREF, 3V3, D13/SCK.
OLED Display 2.42"
- Description: A 2.42-inch OLED display module for visual output.
- Pins: GND, VCC, SCK, SDA, RES, DC, CS.
MPU-6050
- Description: A motion tracking device that combines a 3-axis gyroscope and a 3-axis accelerometer.
- Pins: VCC, GND, SCL, SDA, XDA, XCL, AD0, INT.
Wiring Details
Arduino Nano
- GND connected to:
- MPU-6050 GND
- OLED Display GND
- D3 connected to OLED Display RES
- D4 connected to OLED Display DC
- D10 connected to OLED Display CS
- D11/MOSI connected to OLED Display SDA
- D13/SCK connected to OLED Display SCK
- 5V connected to OLED Display VCC
- 3V3 connected to MPU-6050 VCC
- A5 connected to MPU-6050 SCL
- A4 connected to MPU-6050 SDA
OLED Display 2.42"
- GND connected to Arduino Nano GND
- VCC connected to Arduino Nano 5V
- SCK connected to Arduino Nano D13/SCK
- SDA connected to Arduino Nano D11/MOSI
- RES connected to Arduino Nano D3
- DC connected to Arduino Nano D4
- CS connected to Arduino Nano D10
MPU-6050
- GND connected to Arduino Nano GND
- VCC connected to Arduino Nano 3V3
- SCL connected to Arduino Nano A5
- SDA connected to Arduino Nano A4
Documented Code
/*
 * This Arduino sketch reads the angle data from an MPU-6050 sensor and displays
 * the angle on an OLED display. The angle range is from -60.0 to 60.0 degrees.
 */

#include <Wire.h>
#include <Adafruit_GFX.h>
#include <Adafruit_SSD1306.h>
#include <MPU6050.h>

#define SCREEN_WIDTH 128
#define SCREEN_HEIGHT 64
#define OLED_RESET 3
#define OLED_DC 4
#define OLED_CS 10

Adafruit_SSD1306 display(SCREEN_WIDTH, SCREEN_HEIGHT, &Wire, OLED_RESET);
MPU6050 mpu;

void setup() {
  // Initialize serial communication
  Serial.begin(9600);

  // Initialize I2C communication
  Wire.begin();

  // Initialize MPU-6050
  mpu.initialize();
  if (!mpu.testConnection()) {
    Serial.println("MPU6050 connection failed");
    while (1);
  }

  // Initialize OLED display
  if (!display.begin(SSD1306_SWITCHCAPVCC, 0x3C)) {
    Serial.println("SSD1306 allocation failed");
    while (1);
  }
  display.display();
  delay(2000);
  display.clearDisplay();
}

void loop() {
  // Read angle from MPU-6050
  int16_t ax, ay, az;
  mpu.getAcceleration(&ax, &ay, &az);
  float angle = atan2(ay, az) * 180 / PI;

  // Constrain angle to -60.0 to 60.0 degrees
  angle = constrain(angle, -60.0, 60.0);

  // Display angle on OLED
  display.clearDisplay();
  display.setTextSize(2);
  display.setTextColor(SSD1306_WHITE);
  display.setCursor(0, 10);
  display.print("Angle: ");
  display.print(angle);
  display.print(" deg");
  display.display();

  delay(500);
}
This code is responsible for initializing the MPU-6050 sensor and the OLED display, reading the angle from the sensor, and displaying it on the screen. The setup() function is called once when the program starts and is used to initialize the components. The loop() function runs continuously, updating the angle display every 500 milliseconds.