Cirkit Designer
Your all-in-one circuit design IDE
Home /
Project Documentation
Arduino-Controlled Stepper and DC Motor with Relay Switching
Circuit Documentation
Summary of the Circuit
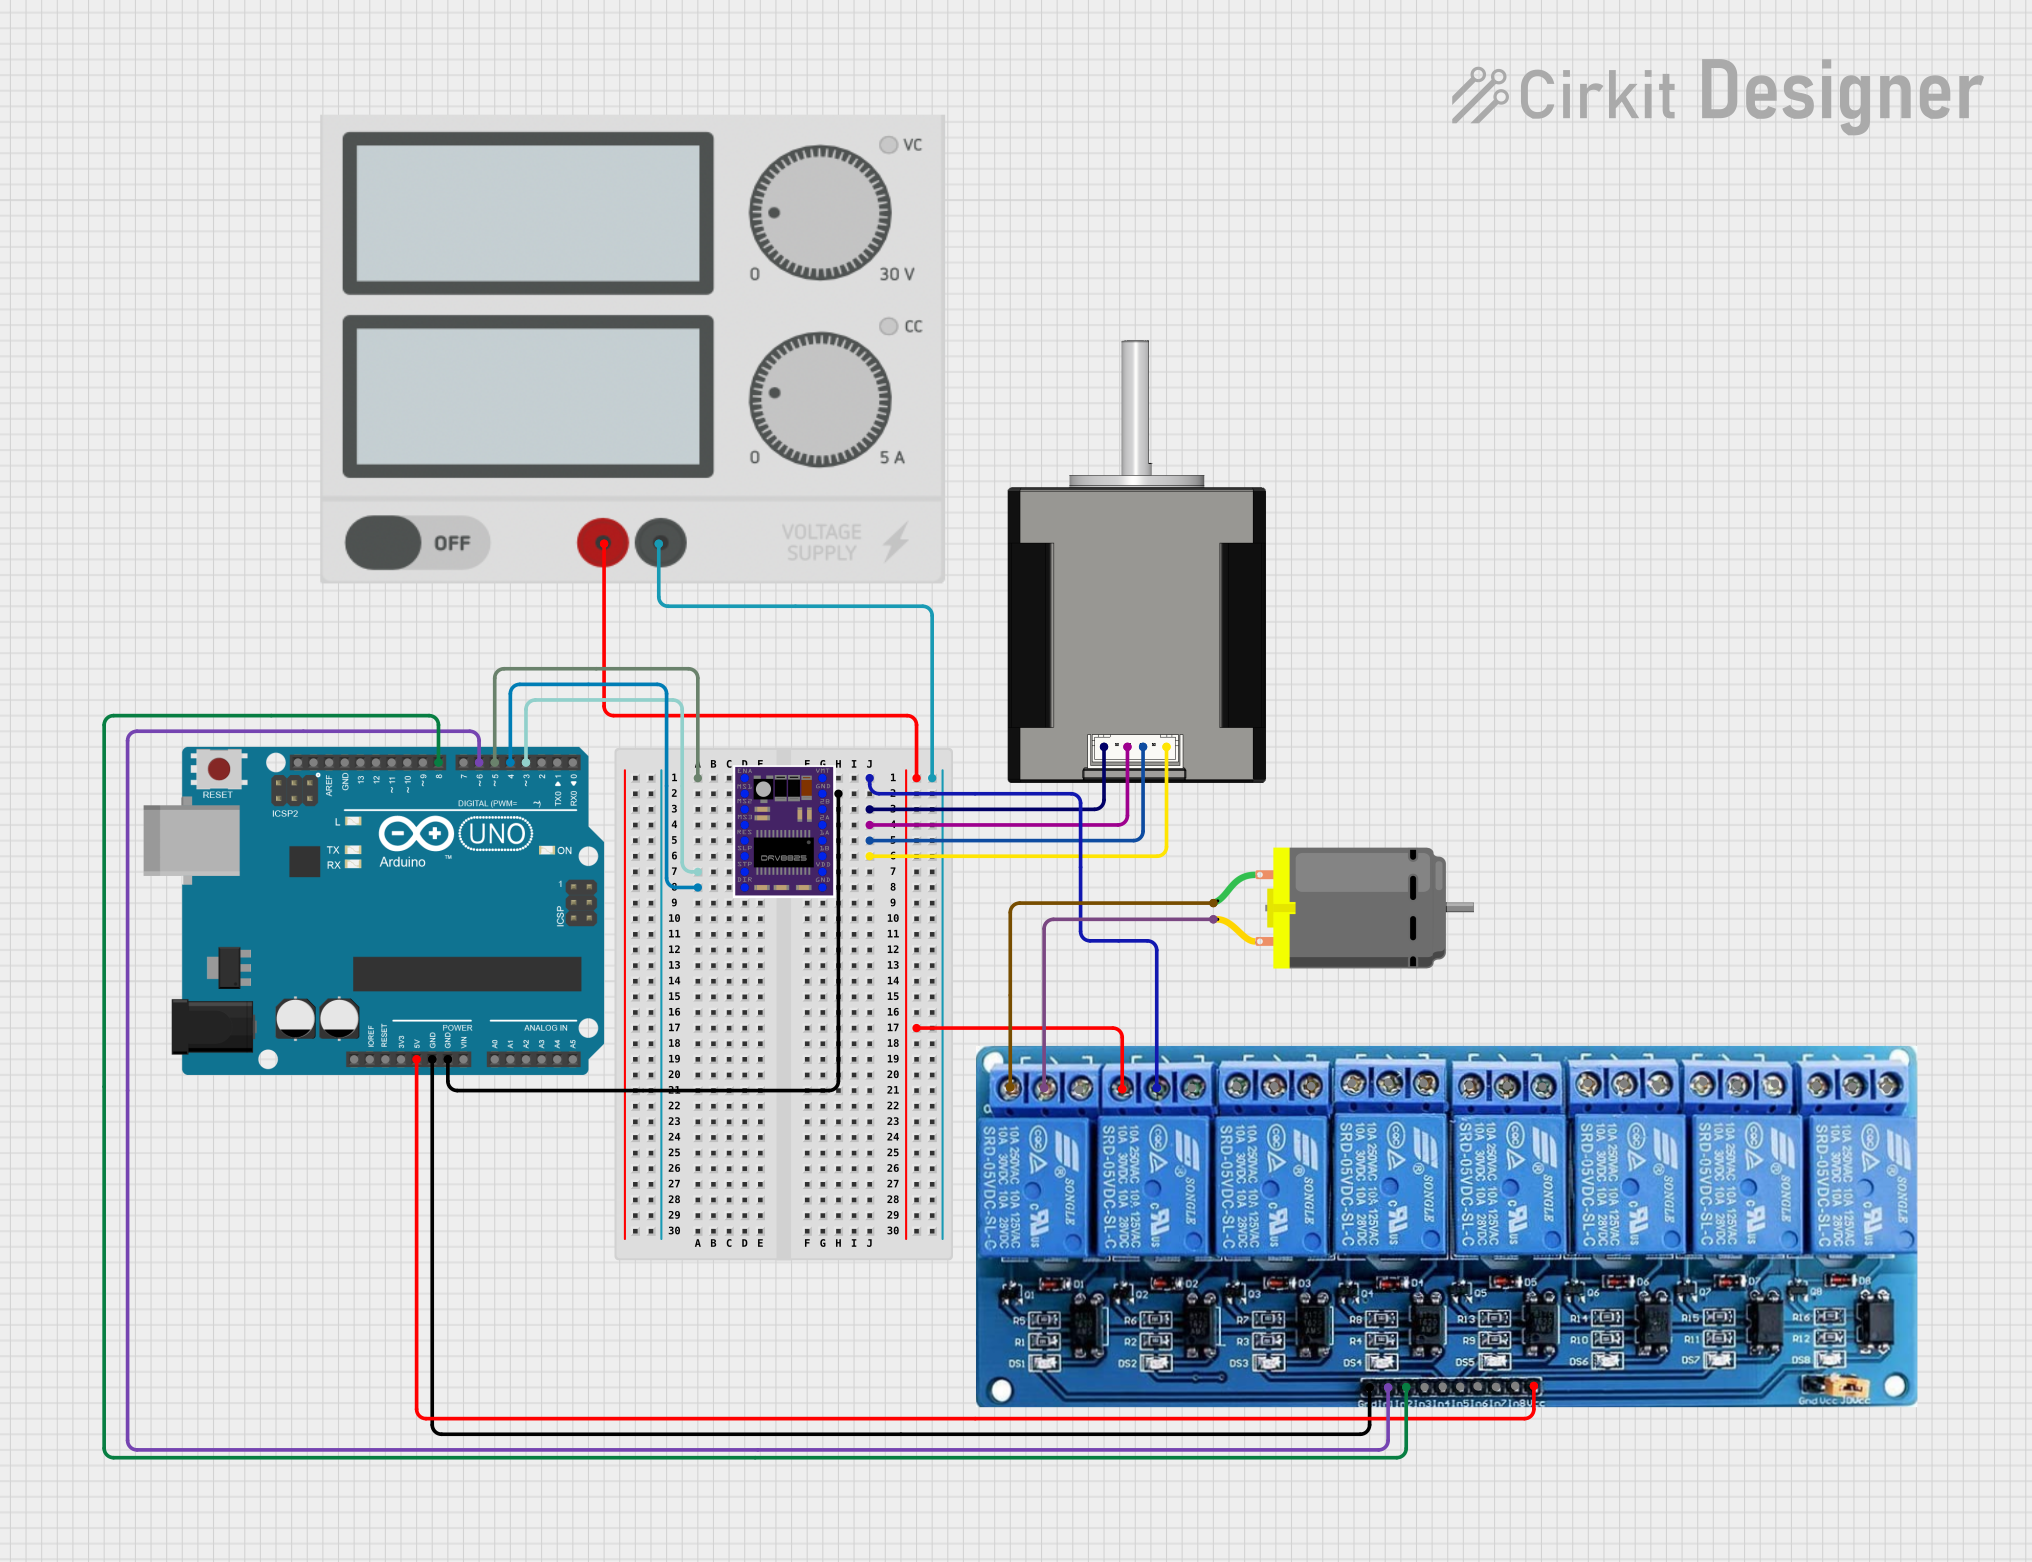
This circuit is designed to control a Nema 17 stepper motor using a DRV8825 stepper motor driver, with an Arduino UNO as the controlling microcontroller. Additionally, the circuit includes a DC motor controlled via a 5V 8-channel relay module, which is also interfaced with the Arduino UNO. A power supply unit provides the necessary power to the components.
Component List
Nema 17 Stepper Motor (42-STH48)
- A stepper motor used for precise control of angular or linear position, velocity, and acceleration.
DRV8825 Stepper Motor Driver
- A module that allows control of stepper motors through simple step and direction inputs.
Arduino UNO
- A microcontroller board based on the ATmega328P, used for controlling the logic of the circuit.
DC Motor
- A motor that converts electrical energy into mechanical energy.
5V 8-Channel Relay Module
- An electrically operated switch that allows control of higher power devices by the Arduino's low-power outputs.
Power Supply
- Provides the required electrical power to the circuit components.
Wiring Details
Nema 17 Stepper Motor
- A2 (black) connected to DRV8825 2B
- A1 (Green) connected to DRV8825 2A
- B2 (Red) connected to DRV8825 1A
- B1 (Blue) connected to DRV8825 1B
DRV8825 Stepper Motor Driver
- ENABLE connected to Arduino UNO D5
- VMOT connected to 5V 8-Channel Relay C
- GND connected to Arduino UNO GND
- STEP connected to Arduino UNO D3
- DIR connected to Arduino UNO D4
Arduino UNO
- D5 connected to DRV8825 ENABLE
- GND connected to DRV8825 GND and 5V 8-Channel Relay GND
- D3 connected to DRV8825 STEP
- D4 connected to DRV8825 DIR
- 5V connected to 5V 8-Channel Relay VCC
- D8 connected to 5V 8-Channel Relay IN2
- D6 connected to 5V 8-Channel Relay IN1
DC Motor
- Pin 1 connected to 5V 8-Channel Relay NC
- Pin 2 connected to 5V 8-Channel Relay C
5V 8-Channel Relay Module
- GND connected to Arduino UNO GND
- IN1 connected to Arduino UNO D6
- IN2 connected to Arduino UNO D8
- VCC connected to Arduino UNO 5V
- NC connected to Power Supply + and DC Motor Pin 1
- C connected to DRV8825 VMOT and DC Motor Pin 2
Power Supply
- connected to 5V 8-Channel Relay NC
- connected to 5V 8-Channel Relay Module (no specific connection point mentioned)
Documented Code
// Pin assignments
const int stepPin = 3;  // Stepper motor step
const int dirPin = 4;   // Stepper motor direction
const int relayPin = 6; // Relay for DC motor

void setup() {
  // Initialize stepper motor pins
  pinMode(stepPin, OUTPUT);
  pinMode(dirPin, OUTPUT);

  // Initialize relay pin
  pinMode(relayPin, OUTPUT);

  // Set initial direction for the stepper
  digitalWrite(dirPin, HIGH);
}

void loop() {
  // Stepper motor control
  for (int i = 0; i < 200; i++) {  // 200 steps for one revolution (depends on your motor/driver)
    digitalWrite(stepPin, HIGH);
    delayMicroseconds(1000);  // Control speed by changing delay
    digitalWrite(stepPin, LOW);
    delayMicroseconds(1000);
  }

  delay(1000);  // Wait between revolutions

  // DC motor control via relay
  digitalWrite(relayPin, HIGH);  // Turn on DC motor
  delay(5000);  // Run for 5 seconds
  digitalWrite(relayPin, LOW);   // Turn off DC motor
  delay(1000);  // Wait before next cycle
}
This code is designed to control the stepper motor and DC motor using the Arduino UNO. The stepPin and dirPin control the stepper motor's steps and direction, while the relayPin controls the on/off state of the DC motor through the relay. The stepper motor makes one revolution by stepping 200 times, and the DC motor is turned on for 5 seconds and then turned off.