
Arduino UNO Controlled Ultrasonic Sensor with Servo and Buzzer Feedback
View and Edit Project In Cirkit Designer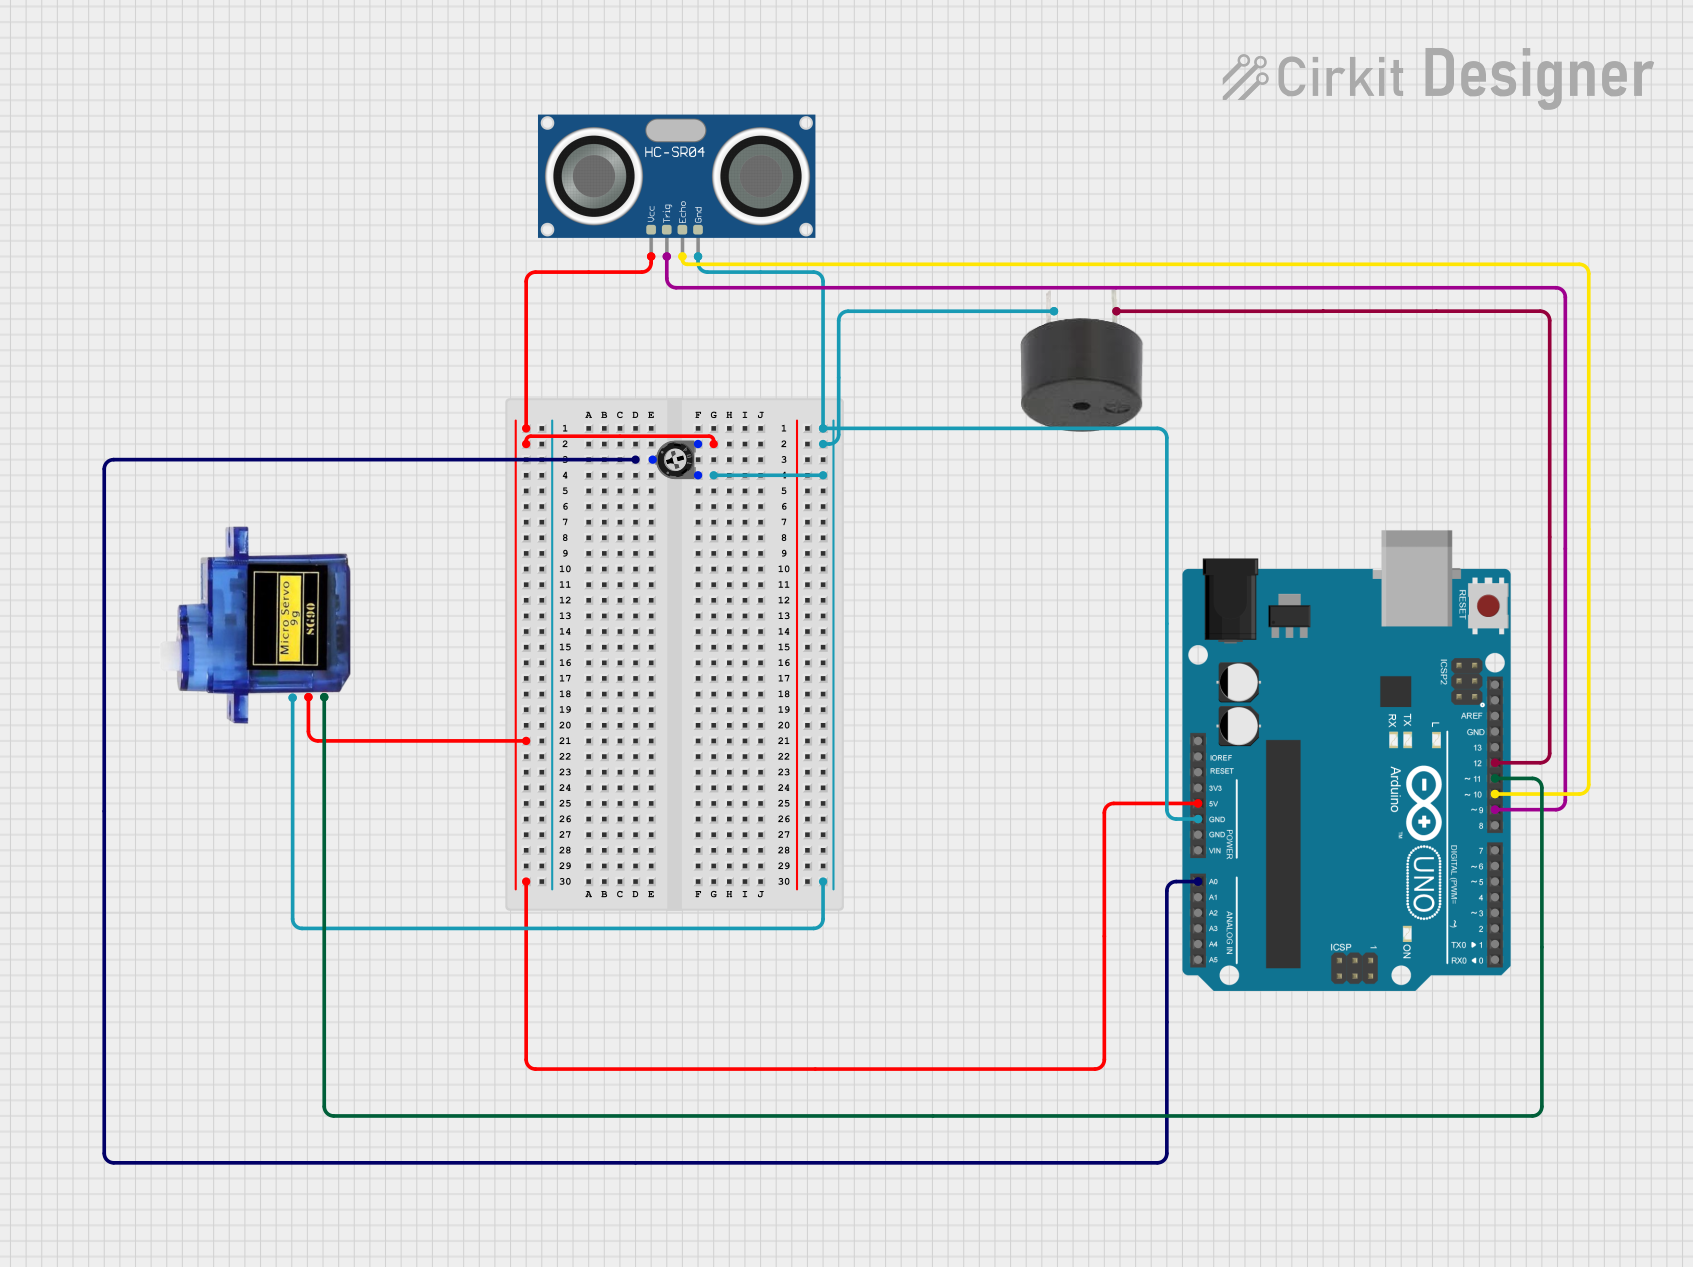
Circuit Documentation
Summary of the Circuit
This circuit appears to be designed for a project that involves an Arduino UNO microcontroller interfacing with a variety of components including a trimmer potentiometer, an HC-SR04 ultrasonic sensor, a micro servo 9G, and a buzzer. The Arduino UNO is used to control and interact with these components, likely for sensing distances (using the ultrasonic sensor), adjusting settings (using the potentiometer), providing audio feedback (using the buzzer), and actuating a mechanism (using the servo).
Component List
Trimmer Potentiometer
- Description: A variable resistor with three terminals, used to adjust circuit elements.
- Properties: 10,000 Ohms resistance.
Arduino UNO
- Description: A microcontroller board based on the ATmega328P, with digital and analog I/O pins.
HC-SR04 Ultrasonic Sensor
- Description: A sensor that measures distance by emitting ultrasonic waves and measuring the time taken for the echo to return.
Micro servo 9G
- Description: A small servo motor capable of precise control, used for applications requiring limited rotation.
Buzzer
- Description: An electronic buzzer that can produce a tone when powered.
Wiring Details
Trimmer Potentiometer
- Leg 2 (Power): Connected to the 5V supply from the Arduino UNO.
- Wiper (Signal): Connected to the A0 analog input on the Arduino UNO.
- Leg 1 (Ground): Connected to the ground (GND) on the Arduino UNO.
Arduino UNO
- 5V: Provides power to the trimmer potentiometer, HC-SR04 ultrasonic sensor, and micro servo 9G.
- GND: Common ground for the trimmer potentiometer, HC-SR04 ultrasonic sensor, buzzer, and micro servo 9G.
- A0: Receives the variable voltage from the wiper of the trimmer potentiometer.
- D12: Connected to the buzzer's signal pin.
- D11: Connected to the PWM input of the micro servo 9G.
- D10: Connected to the ECHO pin of the HC-SR04 ultrasonic sensor.
- D9: Connected to the TRIG pin of the HC-SR04 ultrasonic sensor.
HC-SR04 Ultrasonic Sensor
- VCC: Powered by the 5V supply from the Arduino UNO.
- TRIG: Trigger pin connected to D9 on the Arduino UNO.
- ECHO: Echo pin connected to D10 on the Arduino UNO.
- GND: Ground connected to the Arduino UNO.
Micro servo 9G
- +5V: Powered by the 5V supply from the Arduino UNO.
- PWM: Pulse Width Modulation input connected to D11 on the Arduino UNO.
- GND: Ground connected to the Arduino UNO.
Buzzer
- PIN: Signal pin connected to D12 on the Arduino UNO.
- GND: Ground connected to the Arduino UNO.
Documented Code
void setup() {
  // put your setup code here, to run once:

}

void loop() {
  // put your main code here, to run repeatedly:

}
The provided code is a template with the standard setup() and loop() functions for an Arduino sketch. The setup() function is intended to contain initialization code that runs once when the microcontroller is powered on or reset. The loop() function contains the main code that will run repeatedly, allowing the microcontroller to interact with the connected components based on the logic defined within.
The actual implementation details are not provided in the code snippet, and as such, further development is required to control and manage the interactions between the Arduino UNO and the connected components as per the circuit's intended functionality.