
Arduino UNO-Based Smart Fan Control System with Temperature and Presence Detection
View and Edit Project In Cirkit Designer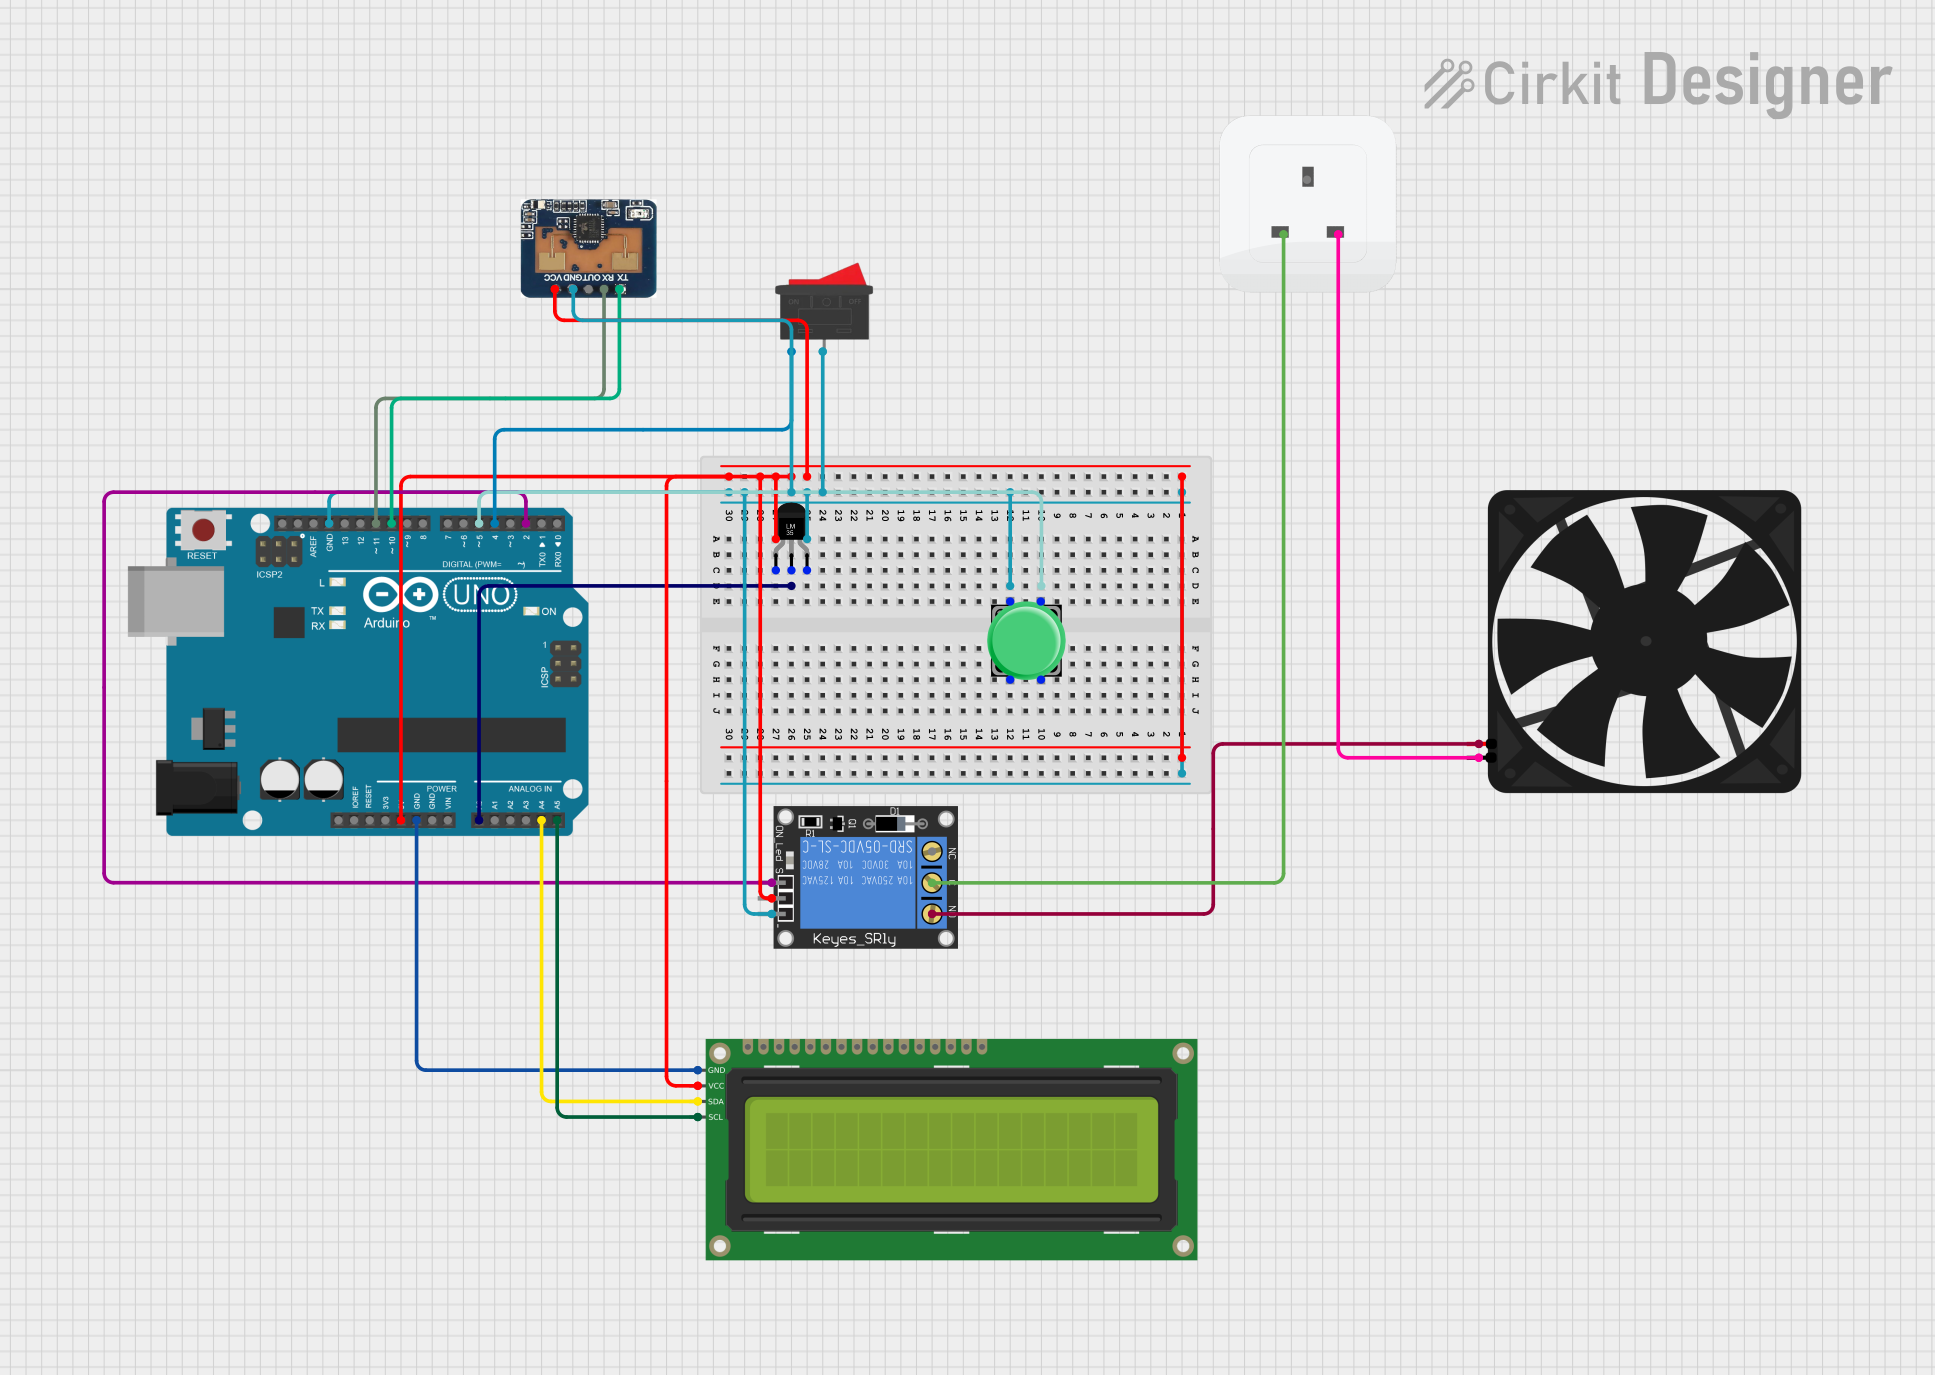
Circuit Documentation
Summary
This circuit is designed to control a fan based on temperature readings and presence detection. The system uses an Arduino UNO microcontroller to read temperature data from an LM35 sensor, detect presence using an LD2410C sensor, and control a fan through a relay. The system also includes a 16x2 I2C LCD for displaying the current temperature threshold and system status, a pushbutton to cycle through temperature thresholds, and a rocker switch for manual fan control.
Component List
Arduino UNO
- Description: Microcontroller board based on the ATmega328P.
- Pins: UNUSED, IOREF, Reset, 3.3V, 5V, GND, Vin, A0, A1, A2, A3, A4, A5, SCL, SDA, AREF, D13, D12, D11, D10, D9, D8, D7, D6, D5, D4, D3, D2, D1, D0
Temperature Sensor (LM35)
- Description: Analog temperature sensor that outputs a voltage proportional to the temperature.
- Pins: +Vs, Vout, GND
1-Channel Relay (5V 10A)
- Description: Relay module for controlling high-power devices.
- Pins: NC, signal, C, power, NO, ground
16x2 I2C LCD
- Description: LCD display with I2C interface.
- Pins: GND, VCC, SDA, SCL
Fan
- Description: 5V fan for cooling purposes.
- Pins: GND, 5V
Pushbutton
- Description: Button for user input.
- Pins: Pin 2, Pin 1, Pin 3, Pin 4
Rocker Switch
- Description: Switch for manual control.
- Pins: 1, 2
LD2410C
- Description: Presence detection sensor.
- Pins: RX, OUT, GND, VCC, TX
Socket
- Description: Power socket.
- Pins: earth, life, neutral
Wiring Details
Arduino UNO
GND connected to:
- Pushbutton (Pin 1)
- Temperature Sensor (LM35) (GND)
- Rocker Switch (Pin 2)
- LD2410C (GND)
- 1-Channel Relay (ground)
- 16x2 I2C LCD (GND)
5V connected to:
- Temperature Sensor (LM35) (+Vs)
- LD2410C (VCC)
- 16x2 I2C LCD (VCC)
- 1-Channel Relay (power)
A0 connected to:
- Temperature Sensor (LM35) (Vout)
A4 connected to:
- 16x2 I2C LCD (SDA)
A5 connected to:
- 16x2 I2C LCD (SCL)
D2 connected to:
- 1-Channel Relay (signal)
D4 connected to:
- Rocker Switch (Pin 1)
D5 connected to:
- Pushbutton (Pin 3)
D10 connected to:
- LD2410C (TX)
D11 connected to:
- LD2410C (RX)
Temperature Sensor (LM35)
GND connected to:
- Arduino UNO (GND)
- Pushbutton (Pin 1)
- Rocker Switch (Pin 2)
- LD2410C (GND)
- 1-Channel Relay (ground)
+Vs connected to:
- Arduino UNO (5V)
- LD2410C (VCC)
- 16x2 I2C LCD (VCC)
- 1-Channel Relay (power)
Vout connected to:
- Arduino UNO (A0)
1-Channel Relay (5V 10A)
ground connected to:
- Arduino UNO (GND)
- Pushbutton (Pin 1)
- Temperature Sensor (LM35) (GND)
- Rocker Switch (Pin 2)
- LD2410C (GND)
power connected to:
- Arduino UNO (5V)
- Temperature Sensor (LM35) (+Vs)
- LD2410C (VCC)
- 16x2 I2C LCD (VCC)
signal connected to:
- Arduino UNO (D2)
C connected to:
- Socket (life)
NO connected to:
- Fan (5V)
16x2 I2C LCD
GND connected to:
- Arduino UNO (GND)
VCC connected to:
- Arduino UNO (5V)
SDA connected to:
- Arduino UNO (A4)
SCL connected to:
- Arduino UNO (A5)
Fan
GND connected to:
- Socket (neutral)
5V connected to:
- 1-Channel Relay (NO)
Pushbutton
Pin 1 connected to:
- Arduino UNO (GND)
- Temperature Sensor (LM35) (GND)
- Rocker Switch (Pin 2)
- LD2410C (GND)
- 1-Channel Relay (ground)
Pin 3 connected to:
- Arduino UNO (D5)
Rocker Switch
Pin 1 connected to:
- Arduino UNO (D4)
Pin 2 connected to:
- Arduino UNO (GND)
- Pushbutton (Pin 1)
- Temperature Sensor (LM35) (GND)
- LD2410C (GND)
- 1-Channel Relay (ground)
LD2410C
GND connected to:
- Arduino UNO (GND)
- Pushbutton (Pin 1)
- Temperature Sensor (LM35) (GND)
- Rocker Switch (Pin 2)
- 1-Channel Relay (ground)
VCC connected to:
- Arduino UNO (5V)
- Temperature Sensor (LM35) (+Vs)
- 16x2 I2C LCD (VCC)
- 1-Channel Relay (power)
RX connected to:
- Arduino UNO (D11)
TX connected to:
- Arduino UNO (D10)
Socket
life connected to:
- 1-Channel Relay (C)
neutral connected to:
- Fan (GND)
Code Documentation
#include <Wire.h>
#include <LiquidCrystal_I2C.h>
#include <SoftwareSerial.h>

// Define pins for LD2410C (connect TX to RX on Arduino and RX to TX)
#define LD2410_TX 10
#define LD2410_RX 11

// Initialize SoftwareSerial for LD2410C communication
SoftwareSerial ld2410Serial(LD2410_RX, LD2410_TX);

// Other component pins
const int lm35_pin = A0;            // LM35 temperature sensor pin
const int relay_pin = 2;            // Relay control pin
const int switch_pin = 4;           // Manual mode switch pin
const int threshold_button_pin = 5; // Button to cycle through thresholds

// Initialize the LCD (e.g., address 0x27, 16 columns, 2 rows)
LiquidCrystal_I2C lcd(0x27, 16, 2);

float temp_threshold = 60.0;         // Default temperature threshold
int threshold_state = 0;             // Tracks the threshold state
bool buttonPressed = false;          // Tracks button press state
bool personDetected = false;         // Tracks person detection status

void setup() {
  Serial.begin(9600);               // For debugging
  ld2410Serial.begin(115200);       // LD2410C operates at 115200 baud rate

  lcd.init();                       // Initialize the LCD
  lcd.backlight();                  // Turn on the LCD backlight
  lcd.setCursor(0, 0);
  lcd.print("Temp Threshold:");
  updateLCD();                      // Display initial threshold

  pinMode(relay_pin, OUTPUT);       // Set relay pin as output
  pinMode(switch_pin, INPUT_PULLUP);// Manual switch pin with internal pull-up
  pinMode(threshold_button_pin, INPUT_PULLUP); // Threshold button with internal pull-up

  digitalWrite(relay_pin, LOW);     // Turn off relay (fan) initially
}

void loop() {
  // Read temperature
  int temp_adc_val = analogRead(lm35_pin);
  float temp_val = (temp_adc_val * 4.88) / 10;  // Convert ADC value to °C

  // Debug temperature
  Serial.print("Temperature: ");