
Arduino UNO Based LoRa Receiver with MQ-4 Gas Sensor and OLED Display
View and Edit Project In Cirkit Designer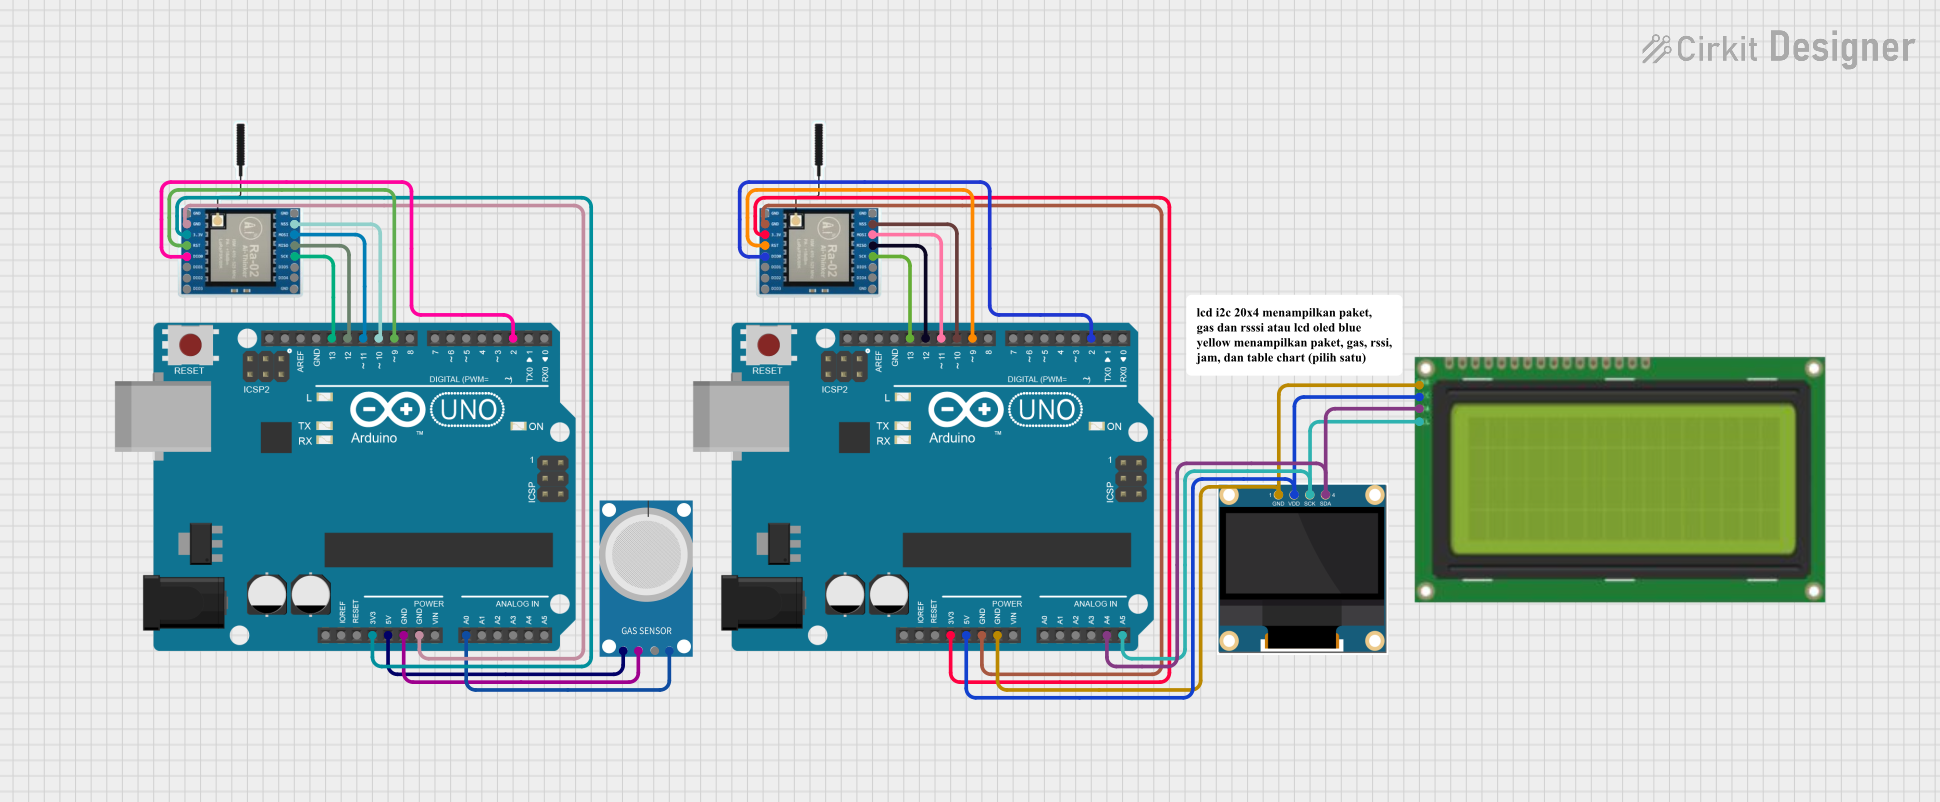
Circuit Documentation
Summary
This circuit is designed to utilize LoRa communication technology for wireless data transmission, along with gas detection capabilities and display outputs. It incorporates two Arduino UNO microcontrollers, two LoRa Ra-02 SX1278 modules for long-range communication, an MQ-4 gas sensor for detecting methane and natural gas, a 0.96" OLED display for visual data output, and a 20x4 LCD with I2C interface for an alternative display option.
Component List
LoRa Ra-02 SX1278
- Description: A wireless communication module based on the SX1278 chip, capable of long-range communication.
- Pins: GND, NSS, MOSI, MISO, SCK, DIO5, DIO4, 3.3V, RST, DIO0, DIO1, DIO2, DIO3
MQ-4 Gas Sensor
- Description: A sensor for detecting methane and natural gas in the air.
- Pins: A0, D0, GND, VCC
0.96" OLED Display
- Description: A small display for showing graphical and textual data.
- Pins: GND, VDD, SCK, SDA
Arduino UNO
- Description: A microcontroller board based on the ATmega328P.
- Pins: UNUSED, IOREF, Reset, 3.3V, 5V, GND, Vin, A0-A5, SCL, SDA, AREF, D0-D13
Lcd 20x4 i2c
- Description: A 20x4 character LCD display with an I2C interface.
- Pins: GND, 5V, SCA, SCL
Comment
- Description: A placeholder for additional comments or notes in the circuit.
Wiring Details
LoRa Ra-02 SX1278
- GND to Arduino UNO GND
- NSS to Arduino UNO D10
- MOSI to Arduino UNO D11
- MISO to Arduino UNO D12
- SCK to Arduino UNO D13
- 3.3V to Arduino UNO 3.3V
- RST to Arduino UNO D9
- DIO0 to Arduino UNO D2
MQ-4 Gas Sensor
- A0 to Arduino UNO A0
- GND to Arduino UNO GND
- VCC to Arduino UNO 5V
0.96" OLED Display
- GND to Arduino UNO GND
- VDD to Arduino UNO 5V
- SCK to Arduino UNO A5
- SDA to Arduino UNO A4
Lcd 20x4 i2c
- GND to Arduino UNO GND
- 5V to Arduino UNO 5V
- SCA to Arduino UNO A4
- SCL to Arduino UNO A5
Documented Code
Arduino UNO (Primary Microcontroller)
#include <Wire.h>
#include <Adafruit_GFX.h>
#include <Adafruit_SSD1306.h>
#include <SPI.h>
#include <LoRa.h>

#define SCREEN_WIDTH 128
#define SCREEN_HEIGHT 64
#define OLED_RESET -1
Adafruit_SSD1306 display(SCREEN_WIDTH, SCREEN_HEIGHT, &Wire, OLED_RESET);

#define ss 10
#define rst 9
#define dio0 2

unsigned long previousMillis = 0;
const long interval = 30000; // 30 detik dalam milidetik

int packetNumber = 0;
String gasValue = "0";
int rssiValue = 0;
int chartData[20];  // Array untuk menyimpan 20 nilai gas

void setup() {
  Serial.begin(115200);

  if (!display.begin(SSD1306_SWITCHCAPVCC, 0x3C)) {
    Serial.println(F("SSD1306 allocation failed"));
    for (;;);
  }
  display.display();
  delay(2000);
  display.clearDisplay();

  // Setup LoRa
  Serial.println("LoRa Receiver");
  LoRa.setPins(ss, rst, dio0);
  if (!LoRa.begin(433E6)) {
    Serial.println("Starting LoRa failed!");
    while (1);
  }

  // Initialize chart data to 0
  for (int i = 0; i < 20; i++) {
    chartData[i] = 0;
  }
}

void loop() {
  // Cek data dari LoRa
  int packetSize = LoRa.parsePacket();
  if (packetSize) {
    String LoRaData = LoRa.readString();
    int separator1 = LoRaData.indexOf('@');
    int separator2 = LoRaData.indexOf('$');

    packetNumber = LoRaData.substring(0, separator1).toInt();
    gasValue = LoRaData.substring(separator1 + 1, separator2);
    rssiValue = LoRa.packetRssi();

    // Tampilkan data di OLED
    displayData();
  }

  // Update chart setiap 30 detik
  unsigned long currentMillis = millis();
  if (currentMillis - previousMillis >= interval) {
    previousMillis = currentMillis;
    updateChart(gasValue.toInt());
  }
}

void displayData() {
  display.clearDisplay();
  display.setTextSize(1);
  display.setTextColor(SSD1306_WHITE);

  // Menampilkan waktu
  unsigned long currentMillis = millis();
  unsigned long hours = (currentMillis / 3600000) % 24;
  unsigned long minutes = (currentMillis / 60000) % 60;
  unsigned long seconds = (currentMillis / 1000) % 60;

  display.setCursor(0, 0);
  display.print("Time: ");
  display.print(hours);
  display.print(":");
  display.print(minutes);
  display.print(":");
  display.println(seconds);

  // Menampilkan nomor paket
  display.setCursor(0, 10);
  display.print("Packet: ");
  display.println(packetNumber);

  // Menampilkan nilai sensor gas
  display.setCursor(0, 20);
  display.print("Gas: ");
  display.println(gasValue);

  // Menampilkan nilai RSSI
  display.setCursor(0, 30);
  display.print("RSSI: ");
  display.println(rssiValue);

  // Tampilkan bagian biru di bawah
  drawChart();

  display.display();
}

void drawChart() {
  int chartHeight = 30;  // Tinggi maksimum grafik yang ditampilkan
  int startX = 0;  // Posisi awal sumbu X

  // Menggambar garis sumbu
  display.drawLine(0, SCREEN_HEIGHT - 1, SCREEN_WIDTH, SCREEN_HEIGHT - 1, SSD1306_WHITE);

  // Menggambar data chart
  for (int i = 0; i < 19; i++) {
    int barHeight = map(chartData[i], 0, 1000, 0, chartHeight);  // Ubah rentang dari 0-1000 untuk akurasi
    display.fillRect(startX + i * 6, SCREEN_HEIGHT - 1 - barHeight, 4, barHeight, SSD1306_WHITE);
  }
}

void updateChart(int gas) {
  // Geser data lama dan tambahkan data baru
  for (int i = 0; i < 19; i++) {
    chartData[i] = chartData[i + 1];
  }
  chartData[19] = gas;  // Tambahkan nilai gas terbaru
}
Arduino UNO (Secondary Microcontroller)
void setup() {
  // put your setup code here, to run once:

}

void loop() {
  // put your main code here, to run repeatedly:

}
This secondary Arduino UNO does not have any specific code associated with it in the provided documentation. It is likely used for additional functionality or as a backup system.