
Arduino UNO-Based Smart Door with Ultrasonic Sensor and Charging Station
View and Edit Project In Cirkit Designer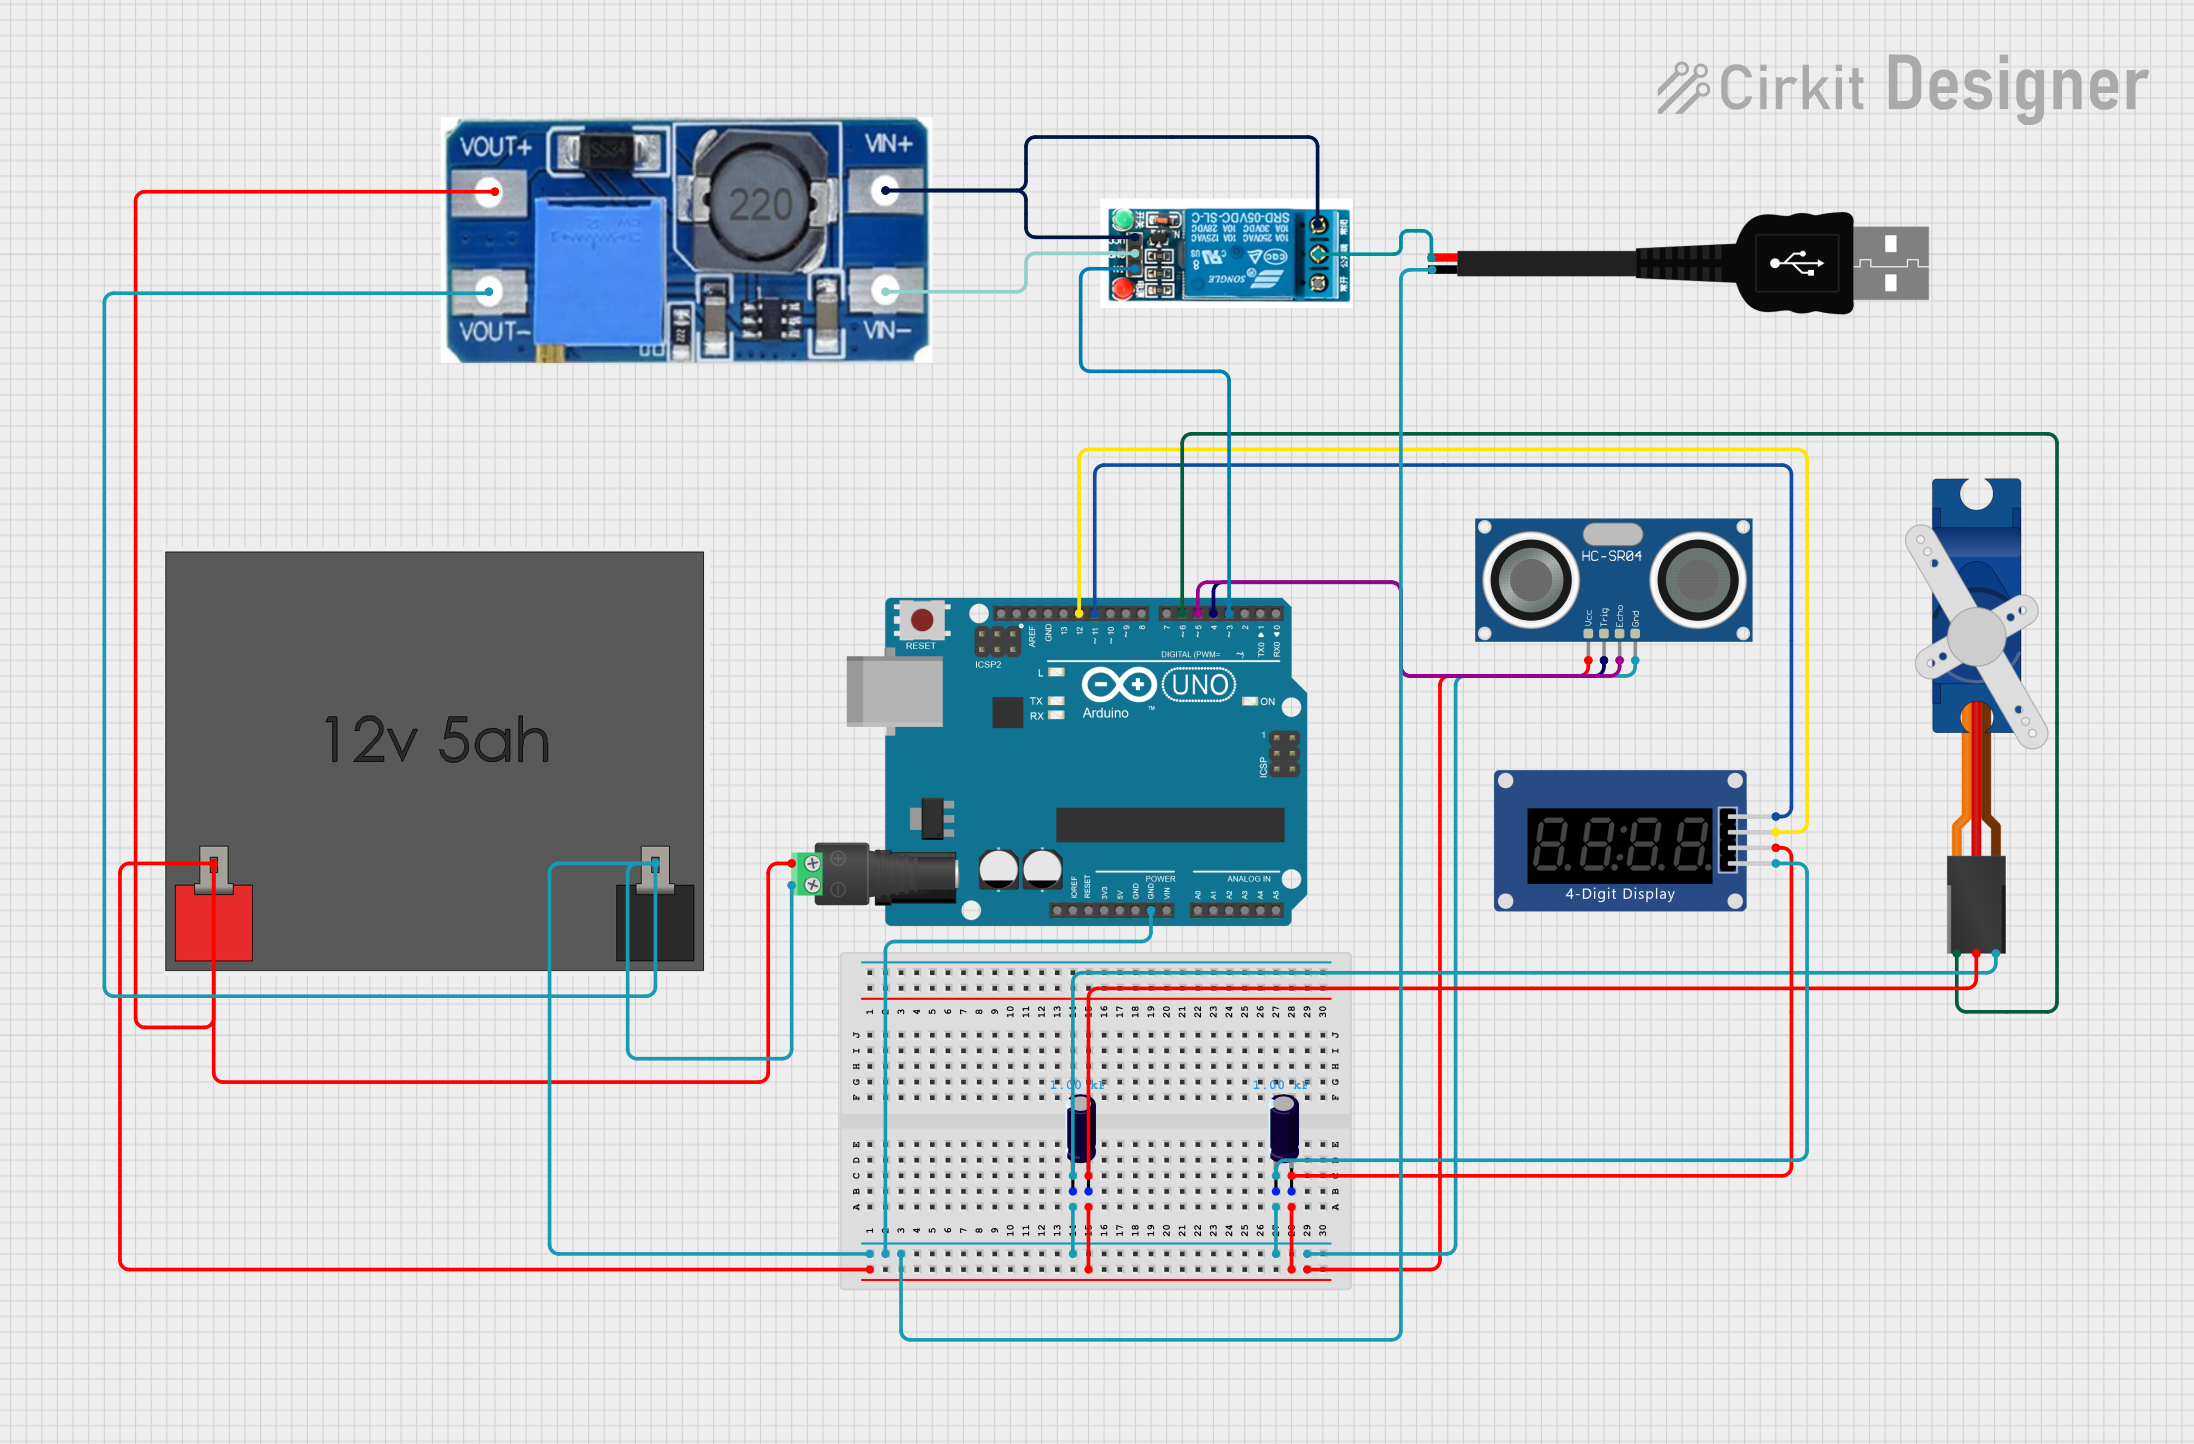
Circuit Documentation
Summary
This circuit is designed to control a door using an ultrasonic sensor and a servo motor, and it includes a charging station for a device. The system uses an Arduino UNO microcontroller to manage the operations, a seven-segment display to show the charging time, and a relay to control the charging station. The circuit also includes a step-up boost power converter, an ultrasonic sensor, a servo motor, and a 12V battery for power.
Component List
Arduino UNO
- Description: Microcontroller board based on the ATmega328P.
- Pins: UNUSED, IOREF, Reset, 3.3V, 5V, GND, Vin, A0, A1, A2, A3, A4, A5, SCL, SDA, AREF, D13, D12, D11, D10, D9, D8, D7, D6, D5, D4, D3, D2, D1, D0
5V Relay
- Description: Relay module for switching high voltage devices.
- Pins: Normally Open, Common terminal, Normally Closed, In, GND, VCC
Step Up Boost Power Converter, Adjustable Voltage Regulator
- Description: Boost converter to step up voltage.
- Pins: VOUT+, VOUT-, VIN+, VIN-
HC-SR04 Ultrasonic Sensor
- Description: Ultrasonic distance sensor.
- Pins: VCC, TRIG, ECHO, GND
USB Male 2 Pin Connection
- Description: USB connector for power.
- Pins: Negative -, Positive +
Seven Segment Display (TM1637) (Wokwi Compatible)
- Description: Seven-segment display module.
- Pins: CLK, DIO, VCC, GND
Electrolytic Capacitor
- Description: Capacitor with 1000 Farads capacitance.
- Pins: -, +
2.1mm Barrel Jack with Terminal Block
- Description: Power connector.
- Pins: POS, NEG
Tower Pro SG90 Servo
- Description: Servo motor for precise control.
- Pins: Signal, +5V, GND
12V 5Ah Battery
- Description: Battery for power supply.
- Pins: 12v +, 12v -
Wiring Details
Arduino UNO
- GND: Connected to GND of the following components:
- Tower Pro SG90 servo
- Seven Segment Display (TM1637)
- 2.1mm Barrel Jack with Terminal Block
- 12V 5Ah Battery
- Step Up Boost Power Converter (VOUT-)
- USB Male 2 Pin Connection (Negative -)
- HC-SR04 Ultrasonic Sensor
- Electrolytic Capacitors (-)
- D12: Connected to DIO of Seven Segment Display (TM1637)
- D11: Connected to CLK of Seven Segment Display (TM1637)
- D6: Connected to Signal of Tower Pro SG90 servo
- D5: Connected to ECHO of HC-SR04 Ultrasonic Sensor
- D4: Connected to TRIG of HC-SR04 Ultrasonic Sensor
- D3: Connected to In of 5V Relay
5V Relay
- In: Connected to D3 of Arduino UNO
- GND: Connected to VIN- of Step Up Boost Power Converter
- VCC: Connected to Normally Closed of 5V Relay
- Common terminal: Connected to Positive + of USB Male 2 Pin Connection
Step Up Boost Power Converter, Adjustable Voltage Regulator
- VOUT+: Connected to VCC of HC-SR04 Ultrasonic Sensor
- VOUT-: Connected to GND of the following components:
- Tower Pro SG90 servo
- Seven Segment Display (TM1637)
- 2.1mm Barrel Jack with Terminal Block
- 12V 5Ah Battery
- USB Male 2 Pin Connection
- HC-SR04 Ultrasonic Sensor
- Electrolytic Capacitors (-)
- VIN+: Connected to VCC of 5V Relay
- VIN-: Connected to GND of 5V Relay
HC-SR04 Ultrasonic Sensor
- VCC: Connected to VOUT+ of Step Up Boost Power Converter
- TRIG: Connected to D4 of Arduino UNO
- ECHO: Connected to D5 of Arduino UNO
- GND: Connected to GND of the following components:
- Tower Pro SG90 servo
- Seven Segment Display (TM1637)
- 2.1mm Barrel Jack with Terminal Block
- 12V 5Ah Battery
- Step Up Boost Power Converter (VOUT-)
- USB Male 2 Pin Connection
- Electrolytic Capacitors (-)
USB Male 2 Pin Connection
- Negative -: Connected to GND of the following components:
- Tower Pro SG90 servo
- Seven Segment Display (TM1637)
- 2.1mm Barrel Jack with Terminal Block
- 12V 5Ah Battery
- Step Up Boost Power Converter (VOUT-)
- HC-SR04 Ultrasonic Sensor
- Electrolytic Capacitors (-)
- Positive +: Connected to Common terminal of 5V Relay
Seven Segment Display (TM1637)
- CLK: Connected to D11 of Arduino UNO
- DIO: Connected to D12 of Arduino UNO
- VCC: Connected to VOUT+ of Step Up Boost Power Converter
- GND: Connected to GND of the following components:
- Tower Pro SG90 servo
- 2.1mm Barrel Jack with Terminal Block
- 12V 5Ah Battery
- Step Up Boost Power Converter (VOUT-)
- USB Male 2 Pin Connection
- HC-SR04 Ultrasonic Sensor
- Electrolytic Capacitors (-)
Electrolytic Capacitor
- -: Connected to GND of the following components:
- Tower Pro SG90 servo
- Seven Segment Display (TM1637)
- 2.1mm Barrel Jack with Terminal Block
- 12V 5Ah Battery
- Step Up Boost Power Converter (VOUT-)
- USB Male 2 Pin Connection
- HC-SR04 Ultrasonic Sensor
- +: Connected to +5V of Tower Pro SG90 servo and VCC of Seven Segment Display (TM1637)
2.1mm Barrel Jack with Terminal Block
- POS: Connected to VOUT+ of Step Up Boost Power Converter
- NEG: Connected to GND of the following components:
- Tower Pro SG90 servo
- Seven Segment Display (TM1637)
- 12V 5Ah Battery
- Step Up Boost Power Converter (VOUT-)
- USB Male 2 Pin Connection
- HC-SR04 Ultrasonic Sensor
- Electrolytic Capacitors (-)
Tower Pro SG90 Servo
- Signal: Connected to D6 of Arduino UNO
- +5V: Connected to + of Electrolytic Capacitors
- GND: Connected to GND of the following components:
- Seven Segment Display (TM1637)
- 2.1mm Barrel Jack with Terminal Block
- 12V 5Ah Battery
- Step Up Boost Power Converter (VOUT-)
- USB Male 2 Pin Connection
- HC-SR04 Ultrasonic Sensor
- Electrolytic Capacitors (-)
12V 5Ah Battery
- 12v +: Connected to POS of 2.1mm Barrel Jack with Terminal Block
- 12v -: Connected to GND of the following components:
- Tower Pro SG90 servo
- Seven Segment Display (TM1637)
- 2.1mm Barrel Jack with Terminal Block
- Step Up Boost Power Converter (VOUT-)
- USB Male 2 Pin Connection
- HC-SR04 Ultrasonic Sensor
- Electrolytic Capacitors (-)
Code Documentation
Arduino UNO Code
#include <Servo.h>
#include <TM1637Display.h>

#define ULTRASONIC_TRIG_PIN 4
#define ULTRASONIC_ECHO_PIN 5
#define MAIN_DOOR_SERVO_PIN 6
#define LED_PIN 7
#define RELAY_PIN 3
#define DISPLAY_CLK 11
#define DISPLAY_DIO 12

Servo mainDoorServo;
TM1637Display display(DISPLAY_CLK, DISPLAY_DIO);

bool chargingActive = false;
unsigned long chargingStartTime = 0;
unsigned long extraChargingTime = 0;
const unsigned long CHARGING_DURATION = 300000;

const int SERVO_OPEN_POS = 90;
const int SERVO_CLOSE_POS = 5;
const int SERVO_STEP_DELAY = 10;

void setup() {
  pinMode(ULTRASONIC