ESP8266 NodeMCU with DHT11 Sensor for Wi-Fi Temperature and Humidity Monitoring

Circuit Documentation
Summary
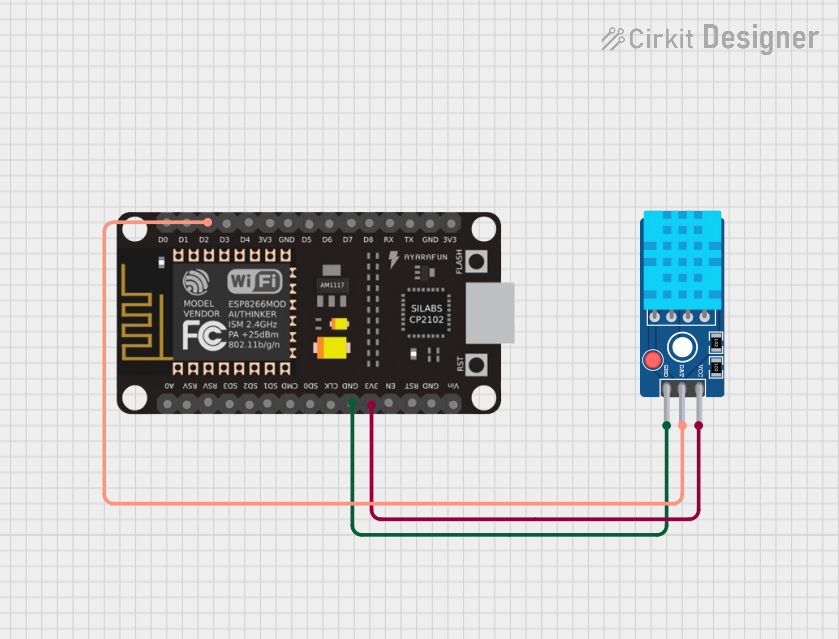
The circuit in question is designed to interface an ESP8266 NodeMCU microcontroller with a DHT11 Sensor V2. The ESP8266 NodeMCU is responsible for reading temperature and humidity data from the DHT11 sensor and then sending this data to a ThingSpeak server over WiFi. The ESP8266 NodeMCU is powered by a 3.3V supply and communicates with the DHT11 sensor via one of its digital pins.
Component List
ESP8266 NodeMCU
- Description: A WiFi-enabled microcontroller module based on the ESP8266 chip.
- Pins: D0, D1, D2, D3, D4, 3V3, GND, D5, D6, D7, D8, RX, TX, A0, RSV, SD3, SD2, SD1, CMD, SD0, CLK, EN, RST, VIN
DHT11 Sensor V2
- Description: A basic, ultra low-cost digital temperature and humidity sensor.
- Pins: GND, DAT, VCC
Wiring Details
ESP8266 NodeMCU
- 3V3 - Connected to the VCC of the DHT11 Sensor V2 to provide power.
- GND - Connected to the GND of the DHT11 Sensor V2 to complete the power circuit.
- D2 - Connected to the DAT pin of the DHT11 Sensor V2 for data communication.
DHT11 Sensor V2
- VCC - Connected to the 3V3 pin of the ESP8266 NodeMCU to receive power.
- GND - Connected to the GND pin of the ESP8266 NodeMCU to complete the power circuit.
- DAT - Connected to the D2 pin of the ESP8266 NodeMCU for data communication.
Documented Code
The following code is written for the ESP8266 NodeMCU to interact with the DHT11 sensor and send data to ThingSpeak.
#include <DHT.h>      // Library for DHT11 sensor
#include <WiFi.h>    // Library for ESP32 WiFi

String apiKey = "DJZHJBBFHBZY0RYK";   // Enter your Write API key from ThingSpeak
const char *ssid = "Redmi 9 Prime";    // Replace with your WiFi SSID
const char *pass = "Redmi 9 Prime";    // Replace with your WiFi password
const char* server = "api.thingspeak.com";

#define DHTPIN 4         // Pin where the DHT11 is connected (change to your actual pin)

DHT dht(DHTPIN, DHT11);
WiFiClient client;

void setup() {
  Serial.begin(115200);
  delay(10);
  dht.begin();

  Serial.println("Connecting to ");
  Serial.println(ssid);

  WiFi.begin(ssid, pass);

  while (WiFi.status() != WL_CONNECTED) {
    delay(500);
    Serial.print(".");
  }
  Serial.println("");
  Serial.println("WiFi connected");
}

void loop() {
  float h = dht.readHumidity();
  float t = dht.readTemperature();

  if (isnan(h) || isnan(t)) {
    Serial.println("Failed to read from DHT sensor!");
    return;
  }

  if (client.connect(server, 80)) {
    String postStr = "api_key=" + apiKey;
    postStr += "&field1=" + String(t);
    postStr += "&field2=" + String(h);
    postStr += "\r\n\r\n";

    client.print("POST /update HTTP/1.1\n");
    client.print("Host: api.thingspeak.com\n");
    client.print("Connection: close\n");
    client.print("X-THINGSPEAKAPIKEY: " + apiKey + "\n");
    client.print("Content-Type: application/x-www-form-urlencoded\n");
    client.print("Content-Length: ");
    client.print(postStr.length());
    client.print("\n\n");
    client.print(postStr);

    Serial.print("Temperature: ");
    Serial.print(t);
    Serial.print(" degrees Celsius, Humidity: ");
    Serial.print(h);
    Serial.println("% sent to ThingSpeak.");
  }
  client.stop();

  Serial.println("Waiting...");

  // ThingSpeak requires a minimum 15-second delay between updates
  delay(15000);
}
This code initializes the DHT11 sensor and the WiFi connection, reads temperature and humidity data, and sends it to the ThingSpeak server. It also includes error handling for failed sensor readings and prints the data to the serial monitor for debugging purposes.