Arduino Pro Mini Based Soil Moisture Monitoring System with Sleep Mode
Soil Moisture Indicator Circuit Documentation
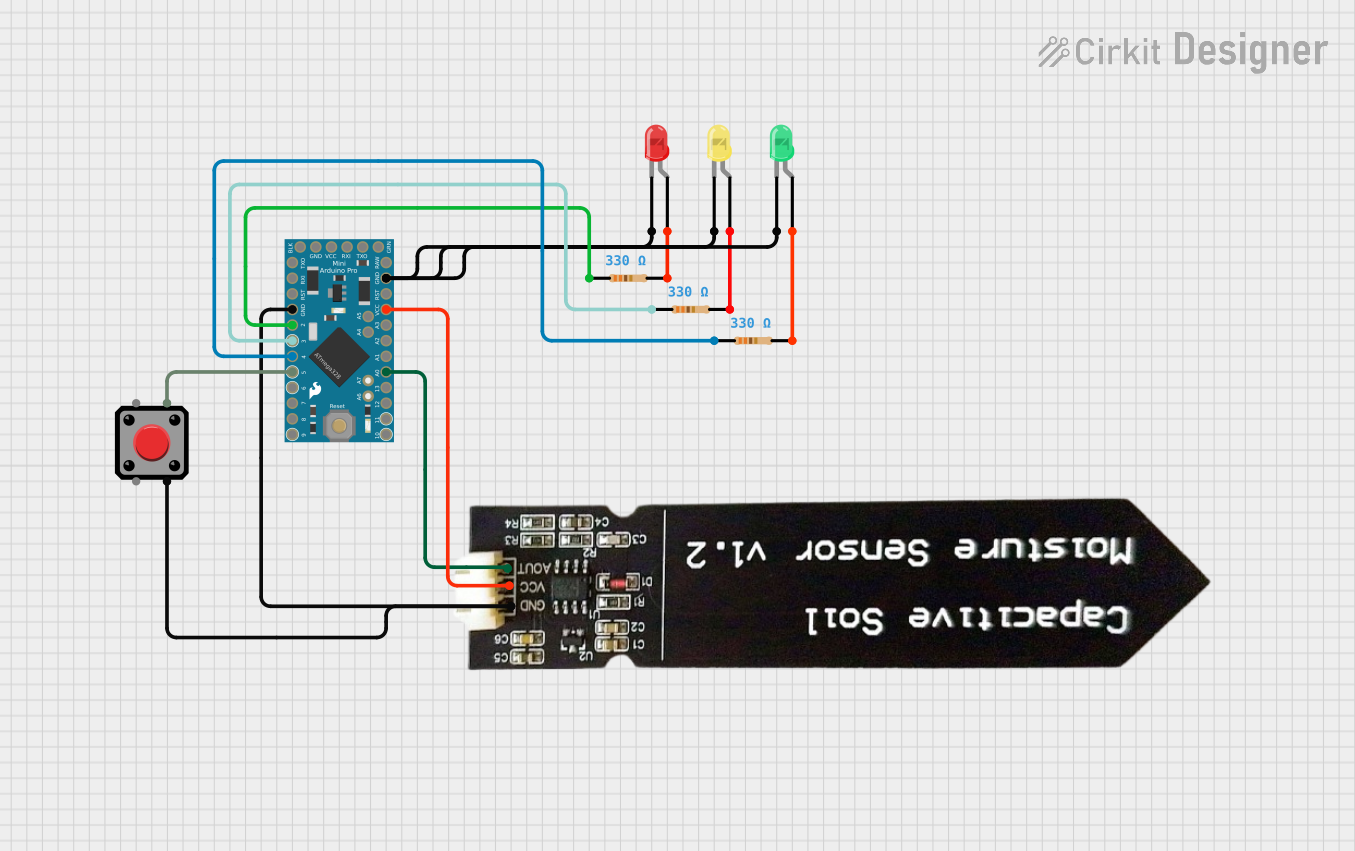
Summary
This circuit is designed to measure soil moisture levels using a capacitive soil moisture sensor and visually indicate the moisture level through a set of three LEDs (red, yellow, and green). The Arduino Pro Mini serves as the central processing unit, reading sensor data and controlling the LEDs based on the moisture level. The circuit also features a pushbutton to activate the system and initiate a reading. After 30 seconds of inactivity, the system enters sleep mode to conserve power, which can be exited by pressing the button again.
Component List
Arduino Pro Mini
- Microcontroller board based on the ATmega328
- Operating Voltage: 3.3V or 5V (depending on the model)
- Digital I/O Pins: 14 (of which 6 provide PWM output)
- Analog Input Pins: 8
- Flash Memory: 32 KB (ATmega328) of which 0.5 KB used by bootloader
- SRAM: 2 KB (ATmega328)
- EEPROM: 1 KB (ATmega328)
- Clock Speed: 8 MHz (3.3V model) or 16 MHz (5V model)
Capacitive Soil Moisture Sensor V1.2
- Measures soil moisture levels by capacitive sensing rather than resistive sensing
- Operating Voltage: 3.3V to 5V
- Output: Analog
LED: Two Pin (red)
- Standard red LED
- Forward Voltage: Typically 1.8V to 2.2V
- Current: 20mA (requires current-limiting resistor)
LED: Two Pin (yellow)
- Standard yellow LED
- Forward Voltage: Typically 1.8V to 2.2V
- Current: 20mA (requires current-limiting resistor)
LED: Two Pin (green)
- Standard green LED
- Forward Voltage: Typically 1.8V to 2.2V
- Current: 20mA (requires current-limiting resistor)
Resistor (330 Ohms)
- Resistance: 330 Ohms
- Purpose: Current-limiting for LEDs
Pushbutton
- Standard tactile pushbutton
- Normally open, momentary switch
Wiring Details
Arduino Pro Mini
GNDconnected to the cathodes of all three LEDs and the GND pin of the Capacitive Soil Moisture Sensor V1.2VCCconnected to the VCC pin of the Capacitive Soil Moisture Sensor V1.2A0connected to the AOUT pin of the Capacitive Soil Moisture Sensor V1.2D2,D3,D4connected to the anodes of the red, yellow, and green LEDs through 330 Ohm resistors, respectivelyD5connected to one terminal of the Pushbutton
Capacitive Soil Moisture Sensor V1.2
GNDconnected to Arduino Pro Mini GNDVCCconnected to Arduino Pro Mini VCCAOUTconnected to Arduino Pro Mini A0
LEDs (red, yellow, green)
cathodeof each LED connected to Arduino Pro Mini GNDanodeof each LED connected to Arduino Pro Mini digital pins D2, D3, and D4 through 330 Ohm resistors, respectively
Resistor (330 Ohms)
- One end connected to the anodes of each LED
- Other end connected to the corresponding digital pins D2, D3, and D4 on the Arduino Pro Mini
Pushbutton
- One terminal connected to Arduino Pro Mini D5
- Another terminal connected to Arduino Pro Mini GND
Documented Code
/*
 * This Arduino Sketch reads soil moisture levels using a capacitive sensor and
 * indicates the moisture level via three LEDs (red, yellow, green). The device
 * also outputs the reading to the serial monitor. The device enters sleep mode
 * after 30 seconds of inactivity to conserve battery power.
 */

#include <EEPROM.h>
#include <avr/sleep.h>

const int redLED = 2;
const int yellowLED = 3;
const int greenLED = 4;
const int buttonPin = 5;
const int sensorPin = A0;

const int MaxDry = 607;
const int MaxWet = 221;

void setup() {
  pinMode(redLED, OUTPUT);
  pinMode(yellowLED, OUTPUT);
  pinMode(greenLED, OUTPUT);
  pinMode(buttonPin, INPUT_PULLUP);
  Serial.begin(9600);
  EEPROM.write(0, MaxDry);
  EEPROM.write(1, MaxWet);
}

void loop() {
  if (digitalRead(buttonPin) == LOW) {
    int sensorValue = analogRead(sensorPin);
    if (sensorValue >= 478.34 && sensorValue <= MaxDry) {
      flashLED(redLED, "Dry Reading: ", sensorValue);
    } else if (sensorValue >= 349.67 && sensorValue < 478.34) {
      flashLED(yellowLED, "Moderate Reading: ", sensorValue);
    } else if (sensorValue >= MaxWet && sensorValue < 349.67) {
      flashLED(greenLED, "Wet Reading: ", sensorValue);
    }
    delay(30000); // Wait for 30 seconds
    enterSleepMode();
  }
}

void flashLED(int ledPin, const char* message, int value) {
  for (int i = 0; i < 2; i++) {
    digitalWrite(ledPin, HIGH);
    delay(1000);
    digitalWrite(ledPin, LOW);
    delay(1000);
  }
  Serial.print(message);
  Serial.println(value);
}

void enterSleepMode() {
  set_sleep_mode(SLEEP_MODE_PWR_DOWN);
  sleep_enable();
  attachInterrupt(digitalPinToInterrupt(buttonPin), wakeUp, LOW);
  sleep_mode();
  sleep_disable();
  detachInterrupt(digitalPinToInterrupt(buttonPin));
}

void wakeUp() {
  // This function will be called when the interrupt occurs
}
This code is designed to be uploaded to the Arduino Pro Mini. It initializes the pins connected to the LEDs and the pushbutton, sets up the serial communication, and writes calibration values to EEPROM. The main loop checks for button presses and reads the moisture sensor, lighting the appropriate LED and printing the reading to the serial monitor. After a delay, it enters sleep mode to save power.