
Arduino UNO Controlled Relay Switch with LM393 Sensor Interface
View and Edit Project In Cirkit Designer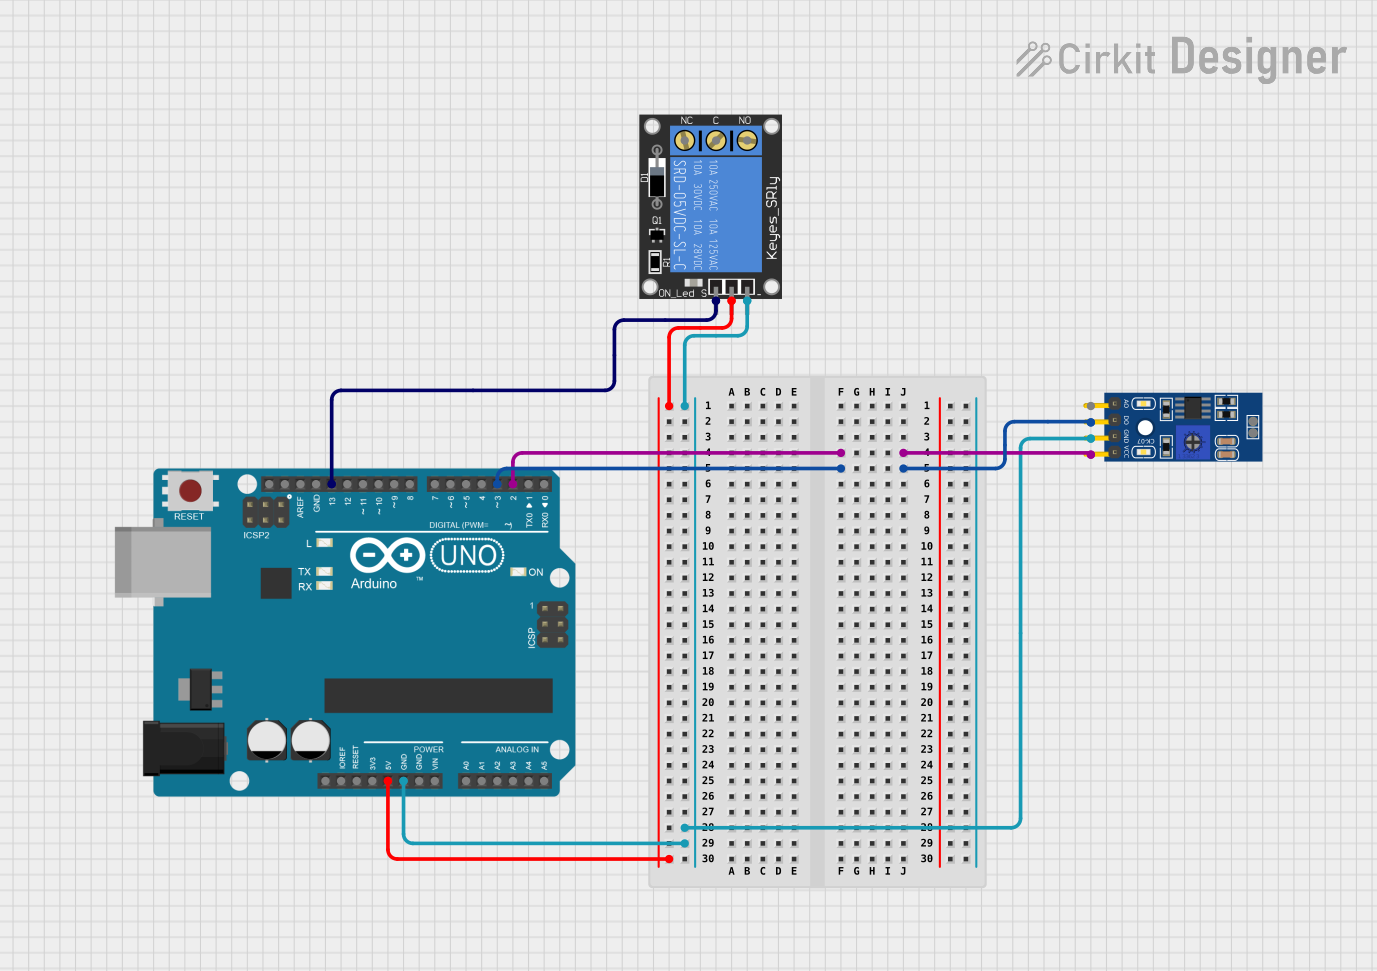
Circuit Documentation
Summary of the Circuit
This circuit integrates an Arduino UNO microcontroller with a 1-Channel Relay and an LM393 comparator module. The Arduino UNO is used as the central processing unit, controlling the relay and receiving signals from the LM393. The relay allows for controlling high-power devices, while the LM393 provides analog and digital signals based on voltage comparisons. The circuit is designed to operate at 5V, with common ground connections.
Component List
Arduino UNO
- Description: A microcontroller board based on the ATmega328P.
- Pins: UNUSED, IOREF, Reset, 3.3V, 5V, GND, Vin, A0-A5, SCL, SDA, AREF, D0-D13.
- Purpose: Acts as the central control unit for the circuit.
1-Channel Relay (5V 10A)
- Description: An electromechanical switch that can control a large current or voltage load.
- Pins: NC (Normally Closed), signal, C (Common), power, NO (Normally Open), ground.
- Purpose: Allows the Arduino to control high-power devices.
LM393
- Description: A dual differential comparator module.
- Pins: A0, D0, GND, VCC.
- Purpose: Provides analog and digital signals based on comparisons between voltages.
Wiring Details
Arduino UNO
- 5V: Supplies power to the 1-Channel Relay.
- GND: Common ground for the Relay and LM393.
- D13: Sends control signals to the Relay's signal pin.
- D3: Receives digital output from the LM393.
- D2: Supplies power to the LM393.
1-Channel Relay (5V 10A)
- power: Connected to the 5V output from the Arduino UNO.
- ground: Shares a common ground with the Arduino UNO.
- signal: Receives control signals from the Arduino UNO's D13 pin.
LM393
- GND: Shares a common ground with the Arduino UNO.
- VCC: Powered by the Arduino UNO's D2 pin.
- D0: Sends digital output to the Arduino UNO's D3 pin.
Documented Code
void setup() {
  // put your setup code here, to run once:

}

void loop() {
  // put your main code here, to run repeatedly:

}
Filename: sketch.ino
This code is a template for the Arduino UNO microcontroller. The setup() function is called once when the microcontroller is powered on or reset. It is used to initialize the pins and set the initial state of the circuit. The loop() function is called repeatedly and contains the main logic of the program. Currently, both functions are empty and should be filled with the user's specific logic to control the relay and process signals from the LM393.