
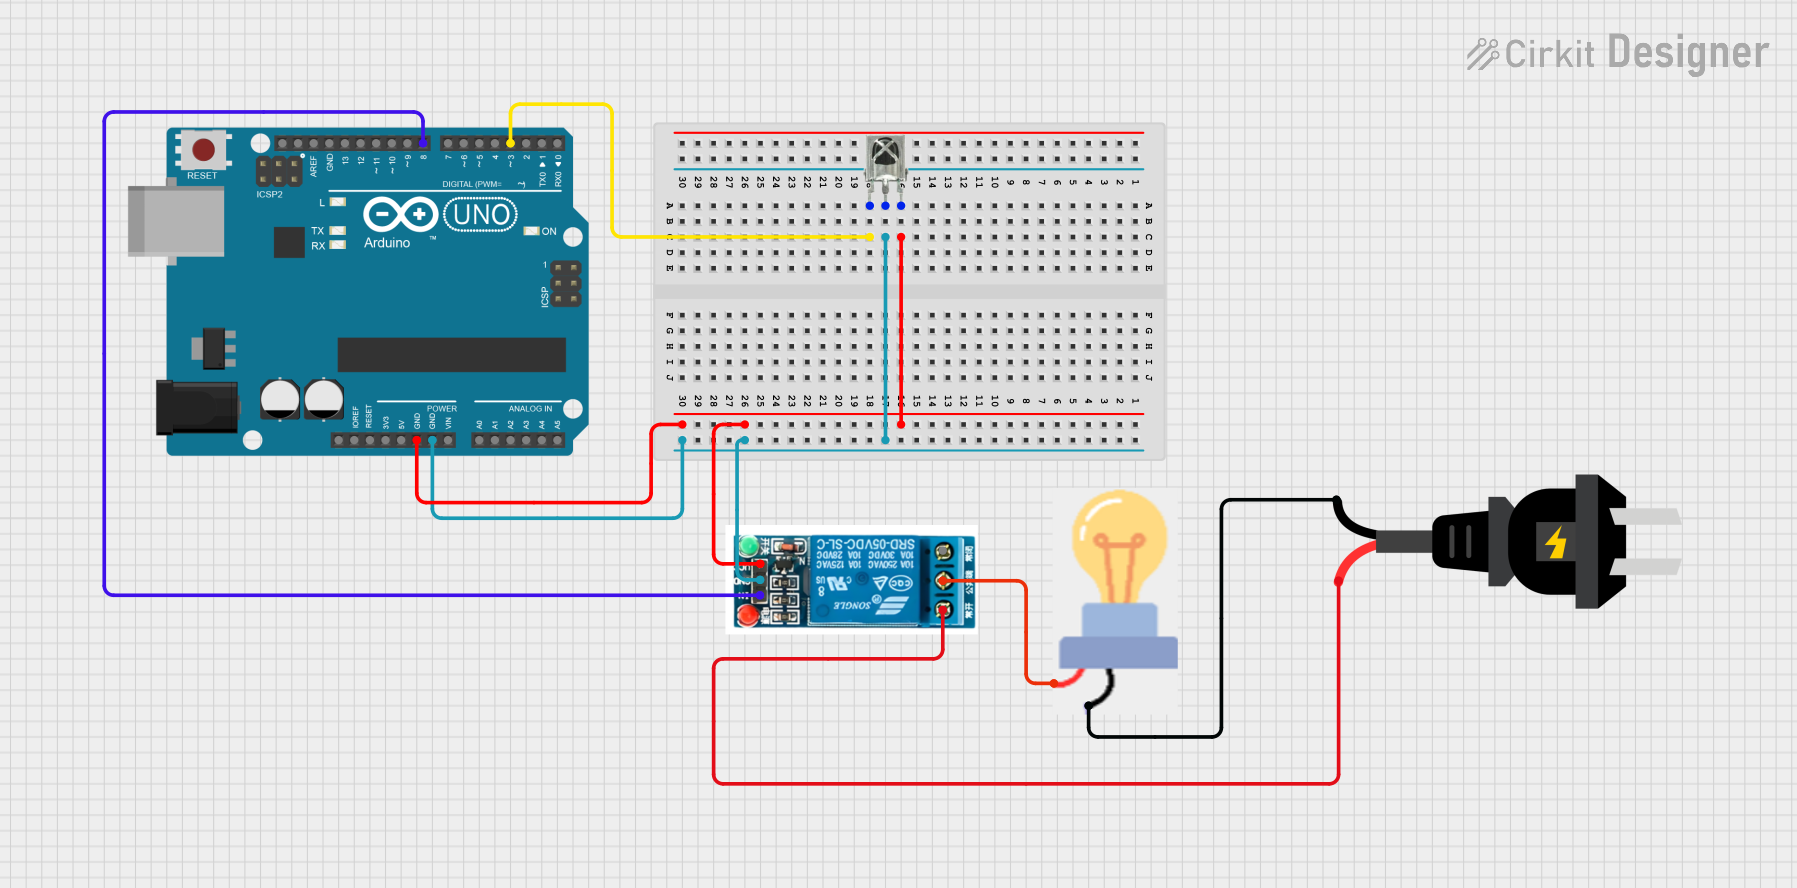
Circuit Documentation
Summary of the Circuit
This circuit is designed to control an AC-powered bulb using an Arduino UNO microcontroller in conjunction with a VS1838B IR receiver and a 5V relay. The Arduino UNO is programmed to interact with the IR receiver to receive signals, which in turn controls the relay to switch the bulb on or off. The relay acts as an electrically operated switch that allows the low-voltage circuitry on the Arduino to control the high-voltage AC circuit of the bulb.
Component List
Arduino UNO
- Description: A microcontroller board based on the ATmega328P.
- Purpose: Acts as the central controller for the circuit, interfacing with the IR receiver and controlling the relay.
VS1838B IR Receiver
- Description: An infrared receiver that receives IR signals at 38 kHz.
- Purpose: Receives IR signals and sends the data to the Arduino UNO for processing.
5V Relay
- Description: An electromechanical switch that can be controlled with a low-voltage signal.
- Purpose: Switches the AC bulb on or off based on the command from the Arduino UNO.
Bulb
- Description: An AC-powered light bulb.
- Purpose: The load in the circuit, which is to be controlled by the relay.
AC Source
- Description: A source of alternating current to power the bulb.
- Purpose: Provides the necessary power to the bulb.
Wiring Details
Arduino UNO
- GND: Connected to the ground of the IR receiver and the ground of the 5V relay.
- D8: Connected to the input pin of the 5V relay to control it.
- D3: Connected to the output pin of the VS1838B IR receiver to receive data.
VS1838B IR Receiver
- OUT: Connected to pin D3 on the Arduino UNO to send the received IR signal.
- GND: Connected to the ground pin on the Arduino UNO.
- VCC: Connected to the 5V power supply from the Arduino UNO.
5V Relay
- In: Connected to pin D8 on the Arduino UNO to receive control signals.
- GND: Connected to the ground pin on the Arduino UNO.
- VCC: Connected to the 5V power supply from the Arduino UNO.
- Normally Open: Connected to the positive pin of the AC source.
- Common terminal: Connected to the power pin of the bulb.
Bulb
- Power: Connected to the common terminal of the 5V relay.
- GND: Connected to the negative pin of the AC source.
AC Source
- +: Connected to the normally open pin of the 5V relay.
- -: Connected to the ground pin of the bulb.
Documented Code
Arduino UNO Code (sketch.ino)
void setup() {
  // put your setup code here, to run once:

}

void loop() {
  // put your main code here, to run repeatedly:

}
Note: The code provided for the Arduino UNO is a template and does not contain any functional code to control the relay or read from the IR receiver. This will need to be implemented based on the specific requirements of the circuit's use case.