Cirkit Designer
Your all-in-one circuit design IDE
Home /
Project Documentation
Arduino Nano Controlled Dual LED Blinker with Pushbutton Activation
Circuit Documentation
Summary of the Circuit
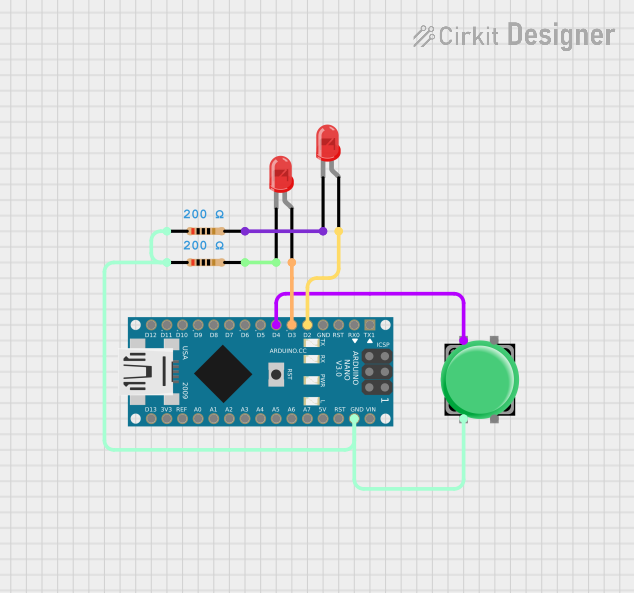
This circuit is designed to control two LEDs using an Arduino Nano microcontroller. The LEDs are turned on for a fixed duration when a pushbutton is pressed. The circuit uses non-blocking timers to manage the LED on-time, which allows the microcontroller to perform other tasks concurrently if necessary.
Component List
Pushbutton
- Description: A standard pushbutton used to trigger an event in the circuit.
- Pins: Pin 1, Pin 2, Pin 3, Pin 4
Arduino Nano
- Description: A compact microcontroller board based on the ATmega328P, used as the central controller of the circuit.
- Pins: D1/TX, D0/RX, RESET, GND, D2, D3, D4, D5, D6, D7, D8, D9, D10, D11/MOSI, D12/MISO, VIN, 5V, A7, A6, A5, A4, A3, A2, A1, A0, AREF, 3V3, D13/SCK
LED: Two Pin (red)
- Description: A red light-emitting diode used as an indicator.
- Pins: cathode, anode
Resistor
- Description: A resistor with a resistance value of 200 Ohms, used to limit current through the LEDs.
- Pins: pin1, pin2
- Properties: Resistance: 200 Ohms
Wiring Details
Pushbutton
- Pin 1: Connected to Arduino Nano pin D4
- Pin 2: Connected to GND through a net that includes two 200 Ohm resistors
Arduino Nano
- GND: Connected to Pushbutton Pin 2 through a net that includes two 200 Ohm resistors
- D2: Connected to the anode of the first LED
- D3: Connected to the anode of the second LED
- D4: Connected to Pushbutton Pin 1
LED: Two Pin (red)
- Anode: Connected to Arduino Nano pin D2 (first LED) and pin D3 (second LED)
- Cathode: Connected to one end of a 200 Ohm resistor
Resistor
- Pin 1: Connected to GND through a net that includes the Pushbutton Pin 2
- Pin 2: Connected to the cathode of the corresponding LED
Documented Code
/*
 * This Arduino Sketch controls two LEDs connected to pins D2 and D3. When a pushbutton
 * connected to pin D4 is pressed, both LEDs will turn on for 5 seconds. The code uses
 * non-blocking timers to manage the LED on-time, allowing the microcontroller to
 * perform other tasks if needed.
 */

const int buttonPin = 4; // Pin connected to the pushbutton
const int ledPin1 = 2;   // Pin connected to the first LED
const int ledPin2 = 3;   // Pin connected to the second LED

bool buttonState = false; // Current state of the button
bool lastButtonState = false; // Previous state of the button
unsigned long ledOnTime = 5000; // LED on duration in milliseconds
unsigned long previousMillis = 0; // Stores the last time the LEDs were turned on

void setup() {
  pinMode(buttonPin, INPUT);
  pinMode(ledPin1, OUTPUT);
  pinMode(ledPin2, OUTPUT);
  digitalWrite(ledPin1, LOW);
  digitalWrite(ledPin2, LOW);
}

void loop() {
  unsigned long currentMillis = millis();
  buttonState = digitalRead(buttonPin);

  // Check if the button is pressed
  if (buttonState && !lastButtonState) {
    // Turn on the LEDs
    digitalWrite(ledPin1, HIGH);
    digitalWrite(ledPin2, HIGH);
    previousMillis = currentMillis; // Record the time the LEDs were turned on
  }

  // Check if the LEDs should be turned off
  if (currentMillis - previousMillis >= ledOnTime) {
    digitalWrite(ledPin1, LOW);
    digitalWrite(ledPin2, LOW);
  }

  lastButtonState = buttonState; // Update the last button state
}
This code is written for the Arduino Nano and is saved as sketch.ino. It initializes the pushbutton and LEDs, reads the button state, and controls the LEDs based on the button press. The LEDs are turned on for 5 seconds when the button is pressed.