
Arduino UNO Bluetooth-Enabled Safety Alert System with Relay and LED
View and Edit Project In Cirkit Designer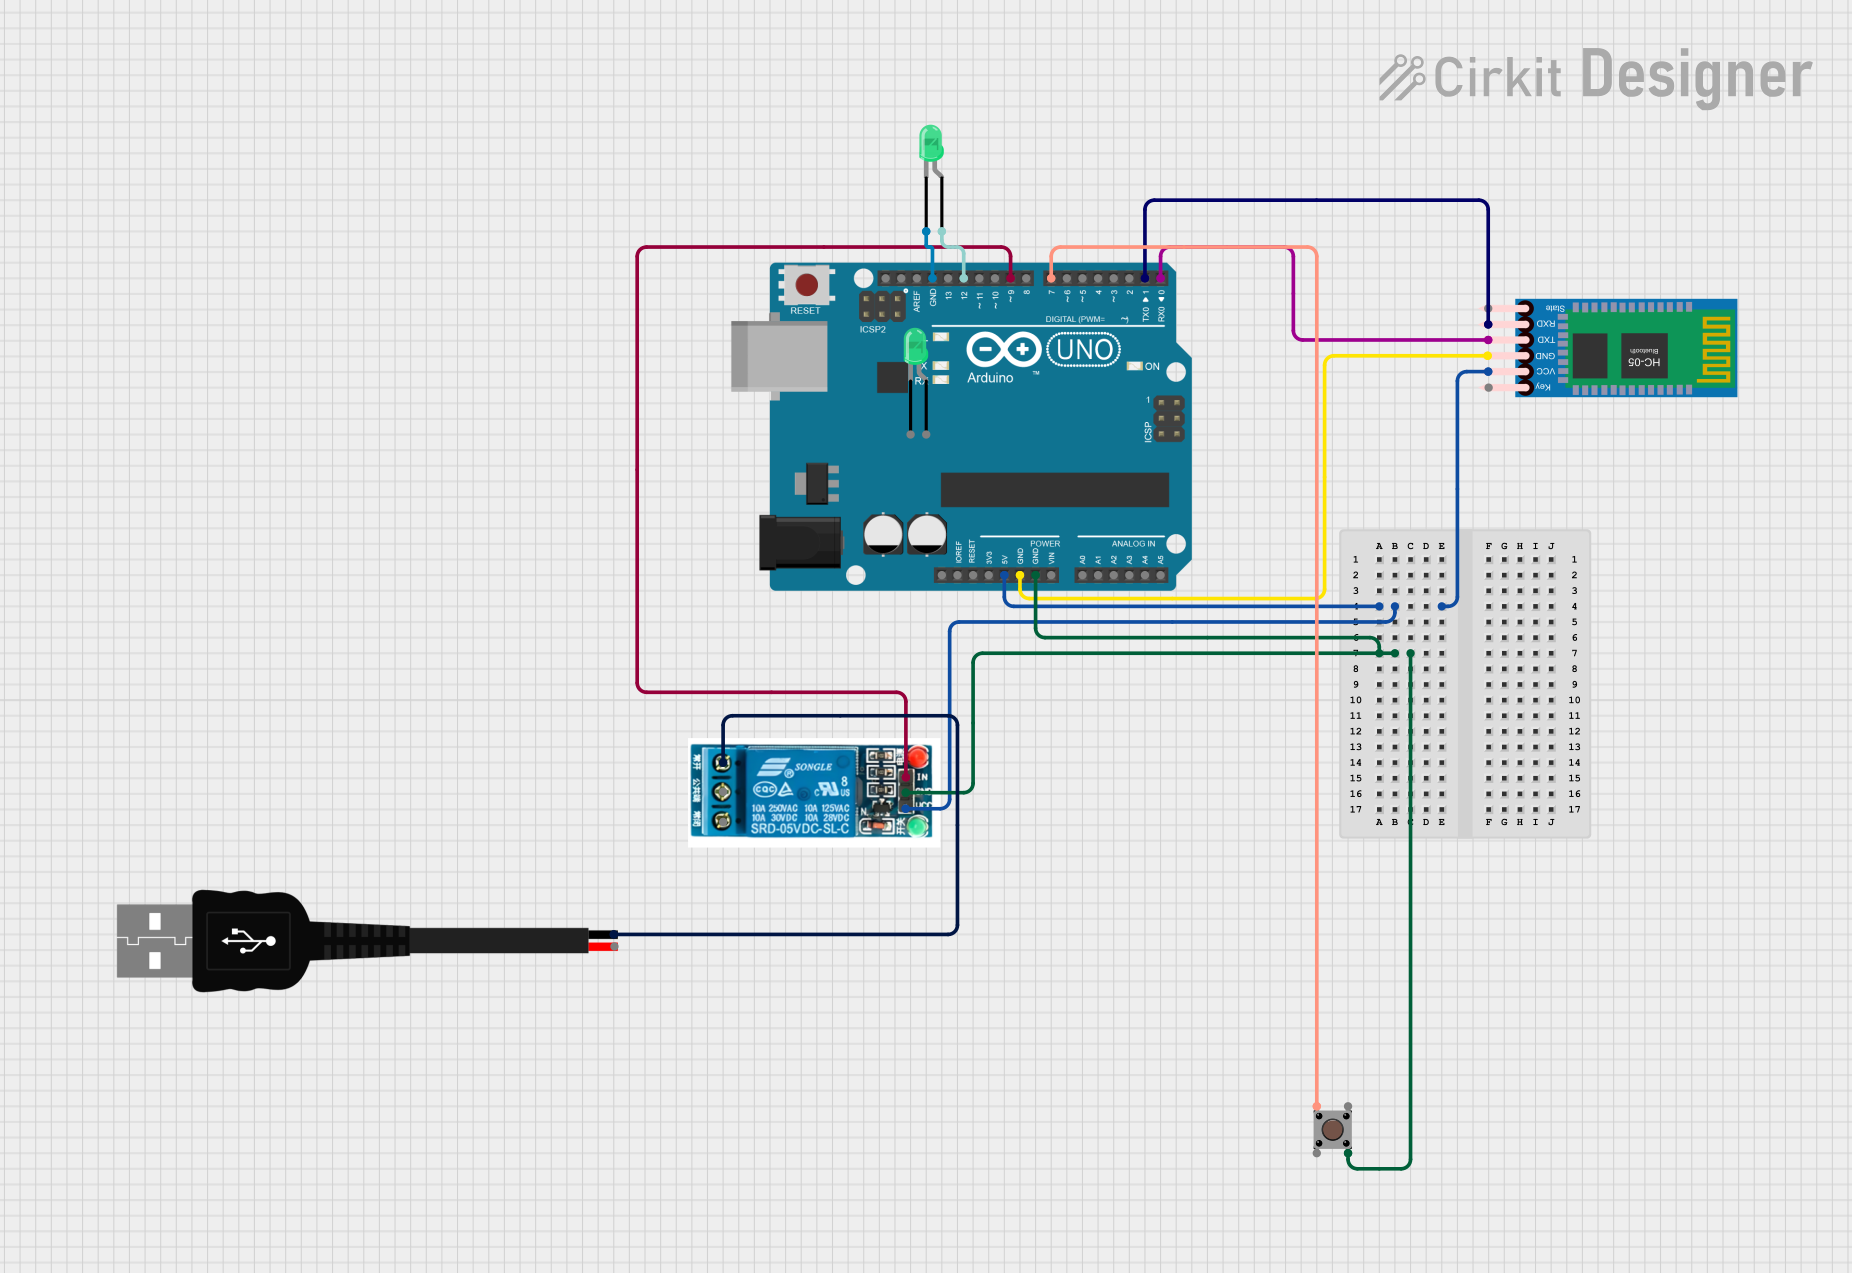
Circuit Documentation
Summary
This project involves an Arduino UNO microcontroller interfaced with an HC-05 Bluetooth module, a 5V relay, a pushbutton, and two green LEDs. The circuit is designed to control a relay and an LED based on the input from a pushbutton. Additionally, the system can send alerts via Bluetooth when certain conditions are met.
Component List
Arduino UNO
- Description: A microcontroller board based on the ATmega328P.
- Pins: UNUSED, IOREF, Reset, 3.3V, 5V, GND, Vin, A0, A1, A2, A3, A4, A5, SCL, SDA, AREF, D13, D12, D11, D10, D9, D8, D7, D6, D5, D4, D3, D2, D1, D0
HC-05 Bluetooth Module
- Description: A Bluetooth module used for wireless communication.
- Pins: Key, VCC, TXD, RXD, State, GND
5V Relay
- Description: An electromechanical switch used to control a high-power circuit with a low-power signal.
- Pins: Normally Open, Common terminal, Normally Closed, In, GND, VCC
USB Male 2 Pin Connection
- Description: A connector used to provide power to the circuit.
- Pins: Negative -, Positive +
Pushbutton
- Description: A simple pushbutton switch used to provide user input.
- Pins: Pin 3 (out), Pin 4 (out), Pin 1 (in), Pin 2 (in)
LED: Two Pin (green)
- Description: A green LED used for visual indication.
- Pins: cathode, anode
Wiring Details
Arduino UNO
- 5V: Connected to VCC of HC-05 Bluetooth Module and VCC of 5V Relay.
- GND: Connected to GND of 5V Relay, GND of HC-05 Bluetooth Module, GND of Pushbutton, and cathode of LED (green).
- D12: Connected to anode of LED (green).
- D9: Connected to In of 5V Relay.
- D7: Connected to Pin 1 (in) of Pushbutton.
- D1: Connected to RXD of HC-05 Bluetooth Module.
- D0: Connected to TXD of HC-05 Bluetooth Module.
HC-05 Bluetooth Module
- VCC: Connected to 5V of Arduino UNO.
- GND: Connected to GND of Arduino UNO.
- RXD: Connected to D1 of Arduino UNO.
- TXD: Connected to D0 of Arduino UNO.
5V Relay
- VCC: Connected to 5V of Arduino UNO.
- GND: Connected to GND of Arduino UNO.
- In: Connected to D9 of Arduino UNO.
- Normally Open: Connected to Negative - of USB Male 2 Pin Connection.
USB Male 2 Pin Connection
- Negative -: Connected to Normally Open of 5V Relay.
Pushbutton
- Pin 4 (out): Connected to GND of Arduino UNO.
- Pin 1 (in): Connected to D7 of Arduino UNO.
LED: Two Pin (green)
- cathode: Connected to GND of Arduino UNO.
- anode: Connected to D12 of Arduino UNO.
Documented Code
#include <SoftwareSerial.h>

// Define pin numbers
const int inputPin = 7;       // Digital signal input pin
const int relayPin = 9;       // Relay control pin
const int ledPin = 12;        // LED pin

// Define SoftwareSerial pins for HC-05
const int bluetoothTx = 10;  // Bluetooth TX to Arduino RX
const int bluetoothRx = 11;  // Bluetooth RX to Arduino TX

SoftwareSerial bluetooth(bluetoothRx, bluetoothTx); // RX, TX

// Timer variables
unsigned long relayStartTime = 0; // Stores the time when the relay turns ON
bool relayActive = false;         // Tracks if the relay is currently ON

void setup() {
  // Initialize the pins
  pinMode(inputPin, INPUT_PULLUP);  // Set inputPin as input with internal pull-up
  pinMode(relayPin, OUTPUT);        // Set relayPin as output
  pinMode(ledPin, OUTPUT);          // Set ledPin as output

  // Initialize outputs to ensure relay and LED are OFF initially
  digitalWrite(relayPin, HIGH); // Relay OFF (active LOW)
  digitalWrite(ledPin, LOW);    // LED OFF

  // Initialize Serial Monitor
  Serial.begin(9600);

  // Initialize SoftwareSerial for Bluetooth communication
  bluetooth.begin(9600);  // HC-05 works at 9600 baud rate
}

void loop() {
  // Read the input signal (active LOW due to INPUT_PULLUP)
  int signalState = digitalRead(inputPin);

  // Display the signal state in the Serial Monitor
  // Serial.print("Button State: ");
  // Serial.println(signalState);

  if (signalState == LOW) { // Button pressed (active LOW)
    // Turn on the relay
    digitalWrite(relayPin, LOW); // Relay ON

    // Start the relay timer if not already active
    if (!relayActive) {
      relayStartTime = millis(); // Capture the start time
      relayActive = true;
    }

    // Calculate elapsed time
    unsigned long elapsedTime = millis() - relayStartTime;

    // Display the elapsed time on the Serial Monitor
    // Serial.print("Relay ON for: ");
    // Serial.print(elapsedTime / 1000.0, 2);
    // Serial.println(" seconds");

    // Turn on the LED if the relay has been ON for 3 seconds or more
    if (elapsedTime >= 3000) {
      digitalWrite(ledPin, HIGH); // LED ON

      // Send alert message via Bluetooth
      // bluetooth.println("");
      Serial.println("Alert! The girl is not safe. Last known location: Latitude 12.3456, Longitude -78.9101.");
    }
  } else { // Button released (active HIGH)
    // Reset relay and LED when the button is released
    relayActive = false;
    relayStartTime = 0; // Reset the timer
    digitalWrite(relayPin, HIGH); // Relay OFF
    digitalWrite(ledPin, LOW);    // LED OFF

    // Indicate signal is HIGH (button released) in the Serial Monitor
    // Serial.println("Button Released");

    // Send alert message via Bluetooth when LED turns OFF
    // bluetooth.println("Alert !! LED is OFF");
    // Serial.println("Alert sent via Bluetooth: LED is OFF");
  }

  delay(100); // Small delay to stabilize the loop
}
This code initializes the necessary pins and sets up the Bluetooth communication. The main loop reads the state of the pushbutton and controls the relay and LED accordingly. If the button is pressed for more than 3 seconds, an alert message is sent via Bluetooth.