
Circuit Documentation
Summary of the Circuit
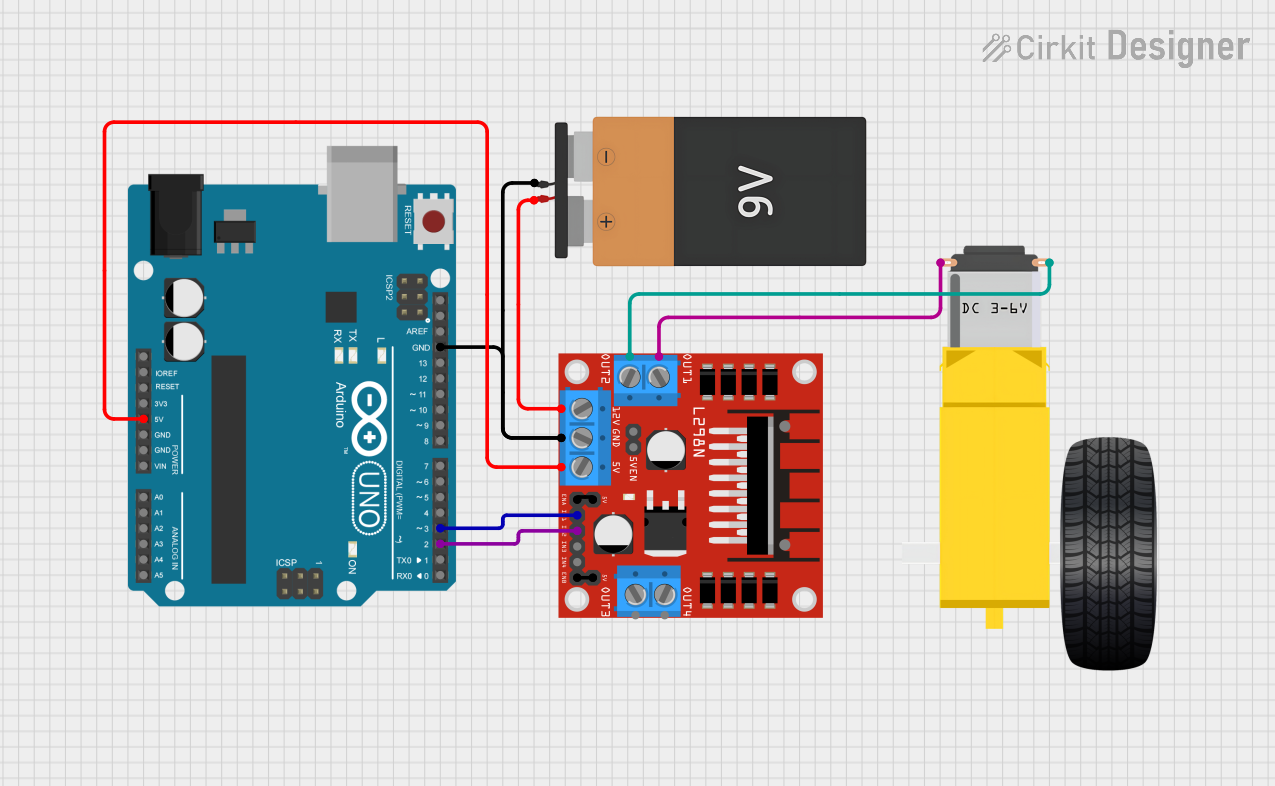
This circuit is designed to control a DC motor using an Arduino UNO microcontroller and an L298N DC motor driver. The Arduino UNO is responsible for providing control signals to the L298N driver, which in turn drives the Gearmotor DC Wheels Right. A 9V battery is used to power the motor driver, which also receives a regulated 5V from the Arduino for logic operations.
Component List
Arduino UNO
- Description: A microcontroller board based on the ATmega328P.
- Purpose: Acts as the central controller for the circuit, providing logic and control signals.
L298N DC Motor Driver
- Description: A dual H-bridge motor driver capable of driving two DC motors.
- Purpose: Receives control signals from the Arduino UNO to drive the DC motor.
Gearmotor DC Wheels Right
- Description: A geared DC motor with two connection pins.
- Purpose: Converts electrical energy into mechanical motion when driven by the motor driver.
Battery 9V
- Description: A standard 9V battery.
- Purpose: Provides power to the L298N motor driver.
Wiring Details
Arduino UNO
- 5V: Provides power to the L298N motor driver's logic circuitry.
- GND: Common ground for the circuit.
- D3: Connected to IN1 on the L298N to control motor direction.
- D2: Connected to IN2 on the L298N to control motor direction.
L298N DC Motor Driver
- 5V: Receives power from the Arduino UNO for logic operations.
- GND: Connected to the common ground and the 9V battery's ground.
- 12V: Connected to the 9V battery's VCC to power the motor.
- OUT1 and OUT2: Connected to the Gearmotor DC Wheels Right to drive the motor.
- ENA and +5V-J1: Jumpered together to enable motor driver channel A.
- ENB and +5V-J2: Jumpered together to enable motor driver channel B.
- IN1 and IN2: Receive control signals from Arduino UNO to control the motor.
Gearmotor DC Wheels Right
- PIN1: Connected to OUT2 on the L298N motor driver.
- PIN2: Connected to OUT1 on the L298N motor driver.
Battery 9V
- VCC: Provides power to the L298N motor driver's motor circuitry.
- GND: Connected to the common ground.
Documented Code
Arduino UNO Code (sketch.ino)
void setup() {
  // put your setup code here, to run once:

}

void loop() {
  // put your main code here, to run repeatedly:

}
Note: The provided code is a template and does not contain any functional code to control the motor. The user must implement the setup and loop functions to initialize the motor control pins and to define the motor behavior, respectively.