
Arduino-Controlled Solenoid with TIP120 Transistor and 9V Battery
View and Edit Project In Cirkit Designer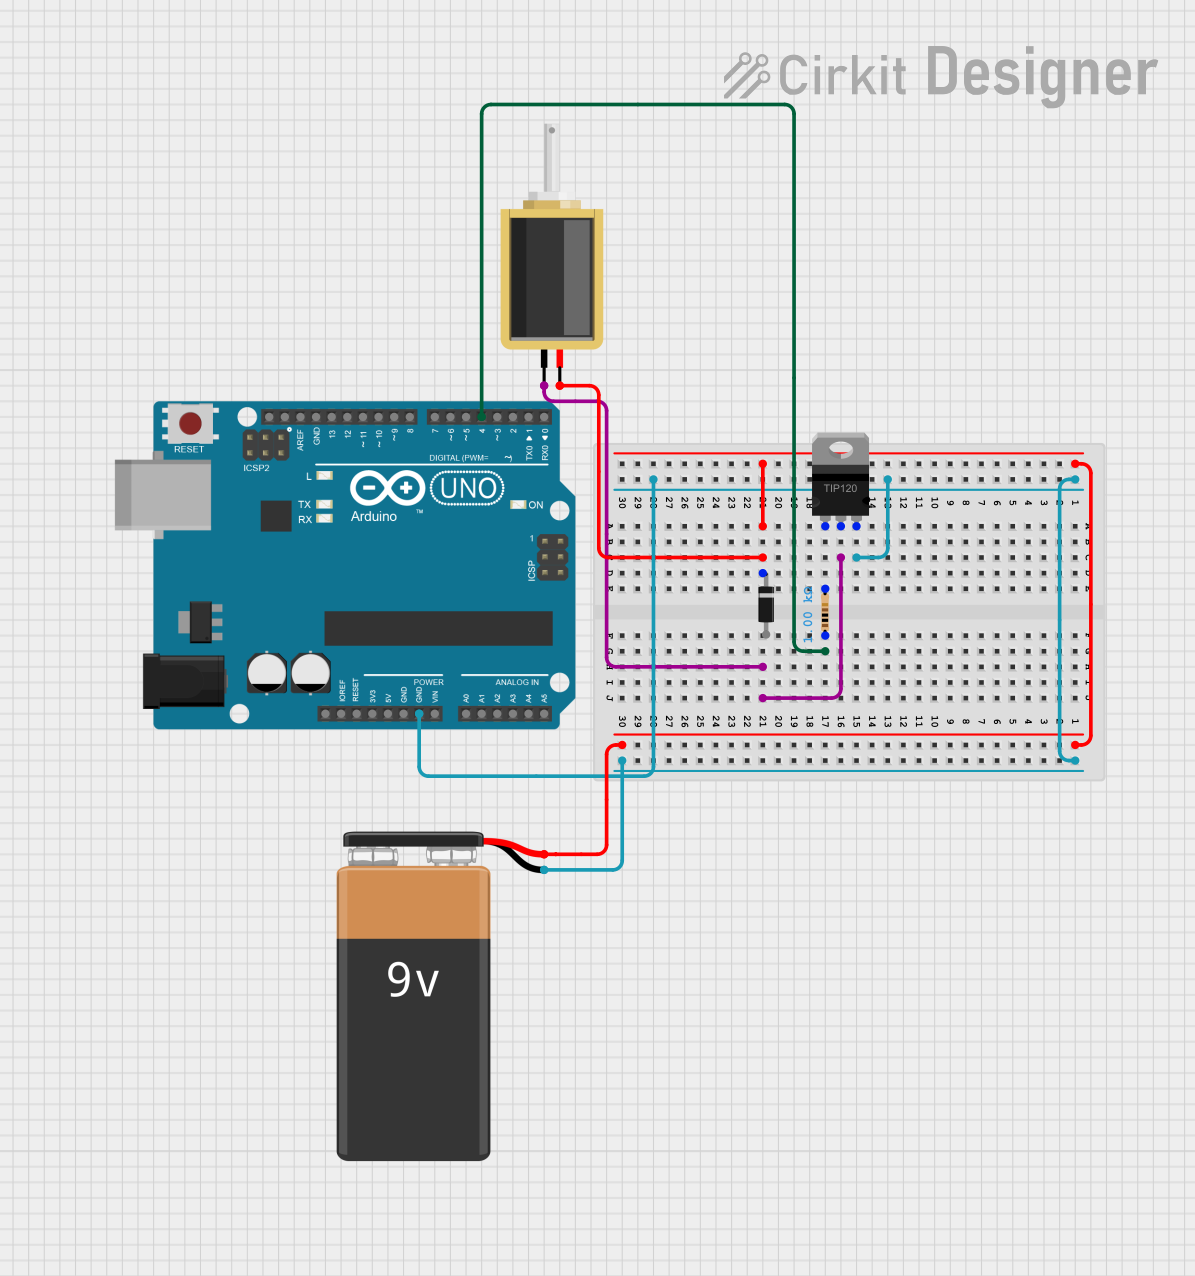
Circuit Documentation
Summary
This circuit is designed to control a solenoid using an Arduino UNO. The solenoid is powered by a 9V battery and is switched on and off using a TIP120 Hi-Current Darlington Transistor. A diode is used to protect the circuit from back EMF generated by the solenoid, and a resistor is used to limit the current to the base of the transistor.
Component List
Solenoid
- Description: Electromagnetic device used to convert electrical energy into mechanical motion.
- Pins: pin1, pin2
Arduino UNO
- Description: Microcontroller board based on the ATmega328P.
- Pins: UNUSED, IOREF, Reset, 3.3V, 5V, GND, Vin, A0, A1, A2, A3, A4, A5, SCL, SDA, AREF, D13, D12, D11, D10, D9, D8, D7, D6, D5, D4, D3, D2, D1, D0
9V Battery
- Description: Power source for the circuit.
- Pins: -, +
TIP120 Hi-Current Darlington Transistor
- Description: NPN power transistor used for switching and amplification.
- Pins: BASE, COLLECTOR, EMITTER
Diode
- Description: Semiconductor device that allows current to flow in one direction only.
- Pins: cathode, anode
Resistor
- Description: Passive electrical component that limits current flow.
- Pins: pin1, pin2
- Properties: Resistance: 1000 Ohms
Wiring Details
Solenoid
- pin1 is connected to the COLLECTOR of the TIP120 Hi-Current Darlington Transistor.
- pin2 is connected to the cathode of the Diode and the + terminal of the 9V Battery.
Arduino UNO
- GND is connected to the EMITTER of the TIP120 Hi-Current Darlington Transistor and the - terminal of the 9V Battery.
- D4 is connected to pin1 of the Resistor.
9V Battery
- - is connected to the GND of the Arduino UNO and the EMITTER of the TIP120 Hi-Current Darlington Transistor.
- + is connected to the cathode of the Diode and pin2 of the Solenoid.
TIP120 Hi-Current Darlington Transistor
- EMITTER is connected to the GND of the Arduino UNO and the - terminal of the 9V Battery.
- COLLECTOR is connected to pin1 of the Solenoid.
- BASE is connected to pin2 of the Resistor.
Diode
- cathode is connected to pin2 of the Solenoid and the + terminal of the 9V Battery.
- anode is not connected to any other component.
Resistor
- pin1 is connected to D4 of the Arduino UNO.
- pin2 is connected to the BASE of the TIP120 Hi-Current Darlington Transistor.
Documented Code
int solenoidPin = 4; // This is the output pin on the Arduino we are using

void setup() {
  // put your setup code here, to run once:
  pinMode(solenoidPin, OUTPUT); // Sets the pin as an output
}

void loop() {
  // put your main code here, to run repeatedly:
  digitalWrite(solenoidPin, HIGH); // Switch Solenoid ON
  delay(1000); // Wait 1 Second
  digitalWrite(solenoidPin, LOW); // Switch Solenoid OFF
  delay(1000); // Wait 1 Second
}
This code sets up pin 4 on the Arduino as an output to control the solenoid. In the loop function, the solenoid is switched on and off every second.