
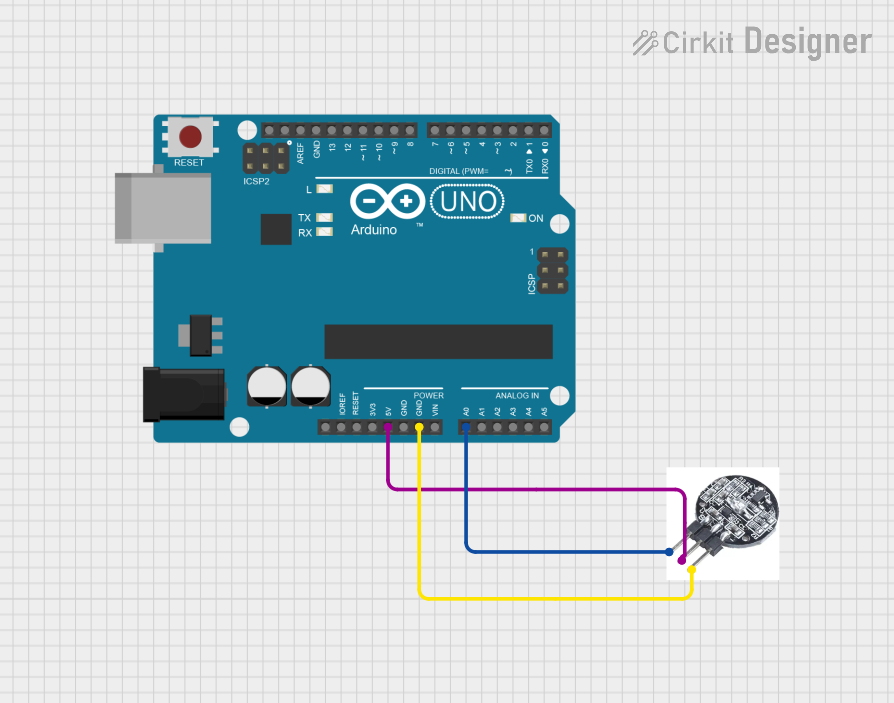
Circuit Documentation
Summary
This document provides a detailed overview of a circuit designed to read heart rate using a heartbeat sensor connected to an Arduino UNO. The circuit includes the following components:
- Arduino UNO
- Heartbeat sensor
The heartbeat sensor is powered by the Arduino UNO and sends its signal to one of the analog input pins on the Arduino. The Arduino reads this signal and outputs the heart rate data via serial communication.
Component List
Arduino UNO
- Description: A microcontroller board based on the ATmega328P. It has 14 digital input/output pins, 6 analog inputs, a 16 MHz quartz crystal, a USB connection, a power jack, an ICSP header, and a reset button.
- Pins: UNUSED, IOREF, Reset, 3.3V, 5V, GND, Vin, A0, A1, A2, A3, A4, A5, SCL, SDA, AREF, D13, D12, D11, D10, D9, D8, D7, D6, D5, D4, D3, D2, D1, D0
Heartbeat Sensor
- Description: A sensor used to measure heart rate. It typically includes an infrared LED and a photodetector to detect the pulse.
- Pins: S (Signal), VCC (Power), GND (Ground)
Wiring Details
Arduino UNO
- 5V: Connected to VCC of the heartbeat sensor
- GND: Connected to GND of the heartbeat sensor
- A0: Connected to S (Signal) of the heartbeat sensor
Heartbeat Sensor
- VCC: Connected to 5V of the Arduino UNO
- GND: Connected to GND of the Arduino UNO
- S (Signal): Connected to A0 of the Arduino UNO
Code Documentation
/*
 * Arduino Sketch for reading heart rate using a heartbeat sensor
 * Components:
 * - Arduino UNO
 * - Heartbeat sensor
 * Connections:
 * - Heartbeat sensor GND to Arduino GND
 * - Heartbeat sensor VCC to Arduino 5V
 * - Heartbeat sensor S to Arduino A0
 */

const int sensorPin = A0; // Pin connected to the sensor's signal output
int sensorValue = 0; // Variable to store the sensor value

void setup() {
  Serial.begin(9600); // Initialize serial communication at 9600 baud
}

void loop() {
  sensorValue = analogRead(sensorPin); // Read the analog value from the sensor
  Serial.print("Heart Rate Sensor Value: ");
  Serial.println(sensorValue); // Print the sensor value to the Serial Monitor
  delay(1000); // Wait for 1 second before taking another reading
}
This code initializes the Arduino's serial communication and reads the analog value from the heartbeat sensor connected to pin A0. The sensor value is printed to the Serial Monitor every second.