
Arduino Nano-Based Automated Waste Segregator with Load Cell, Ultrasonic Sensor, and Motor Control
View and Edit Project In Cirkit Designer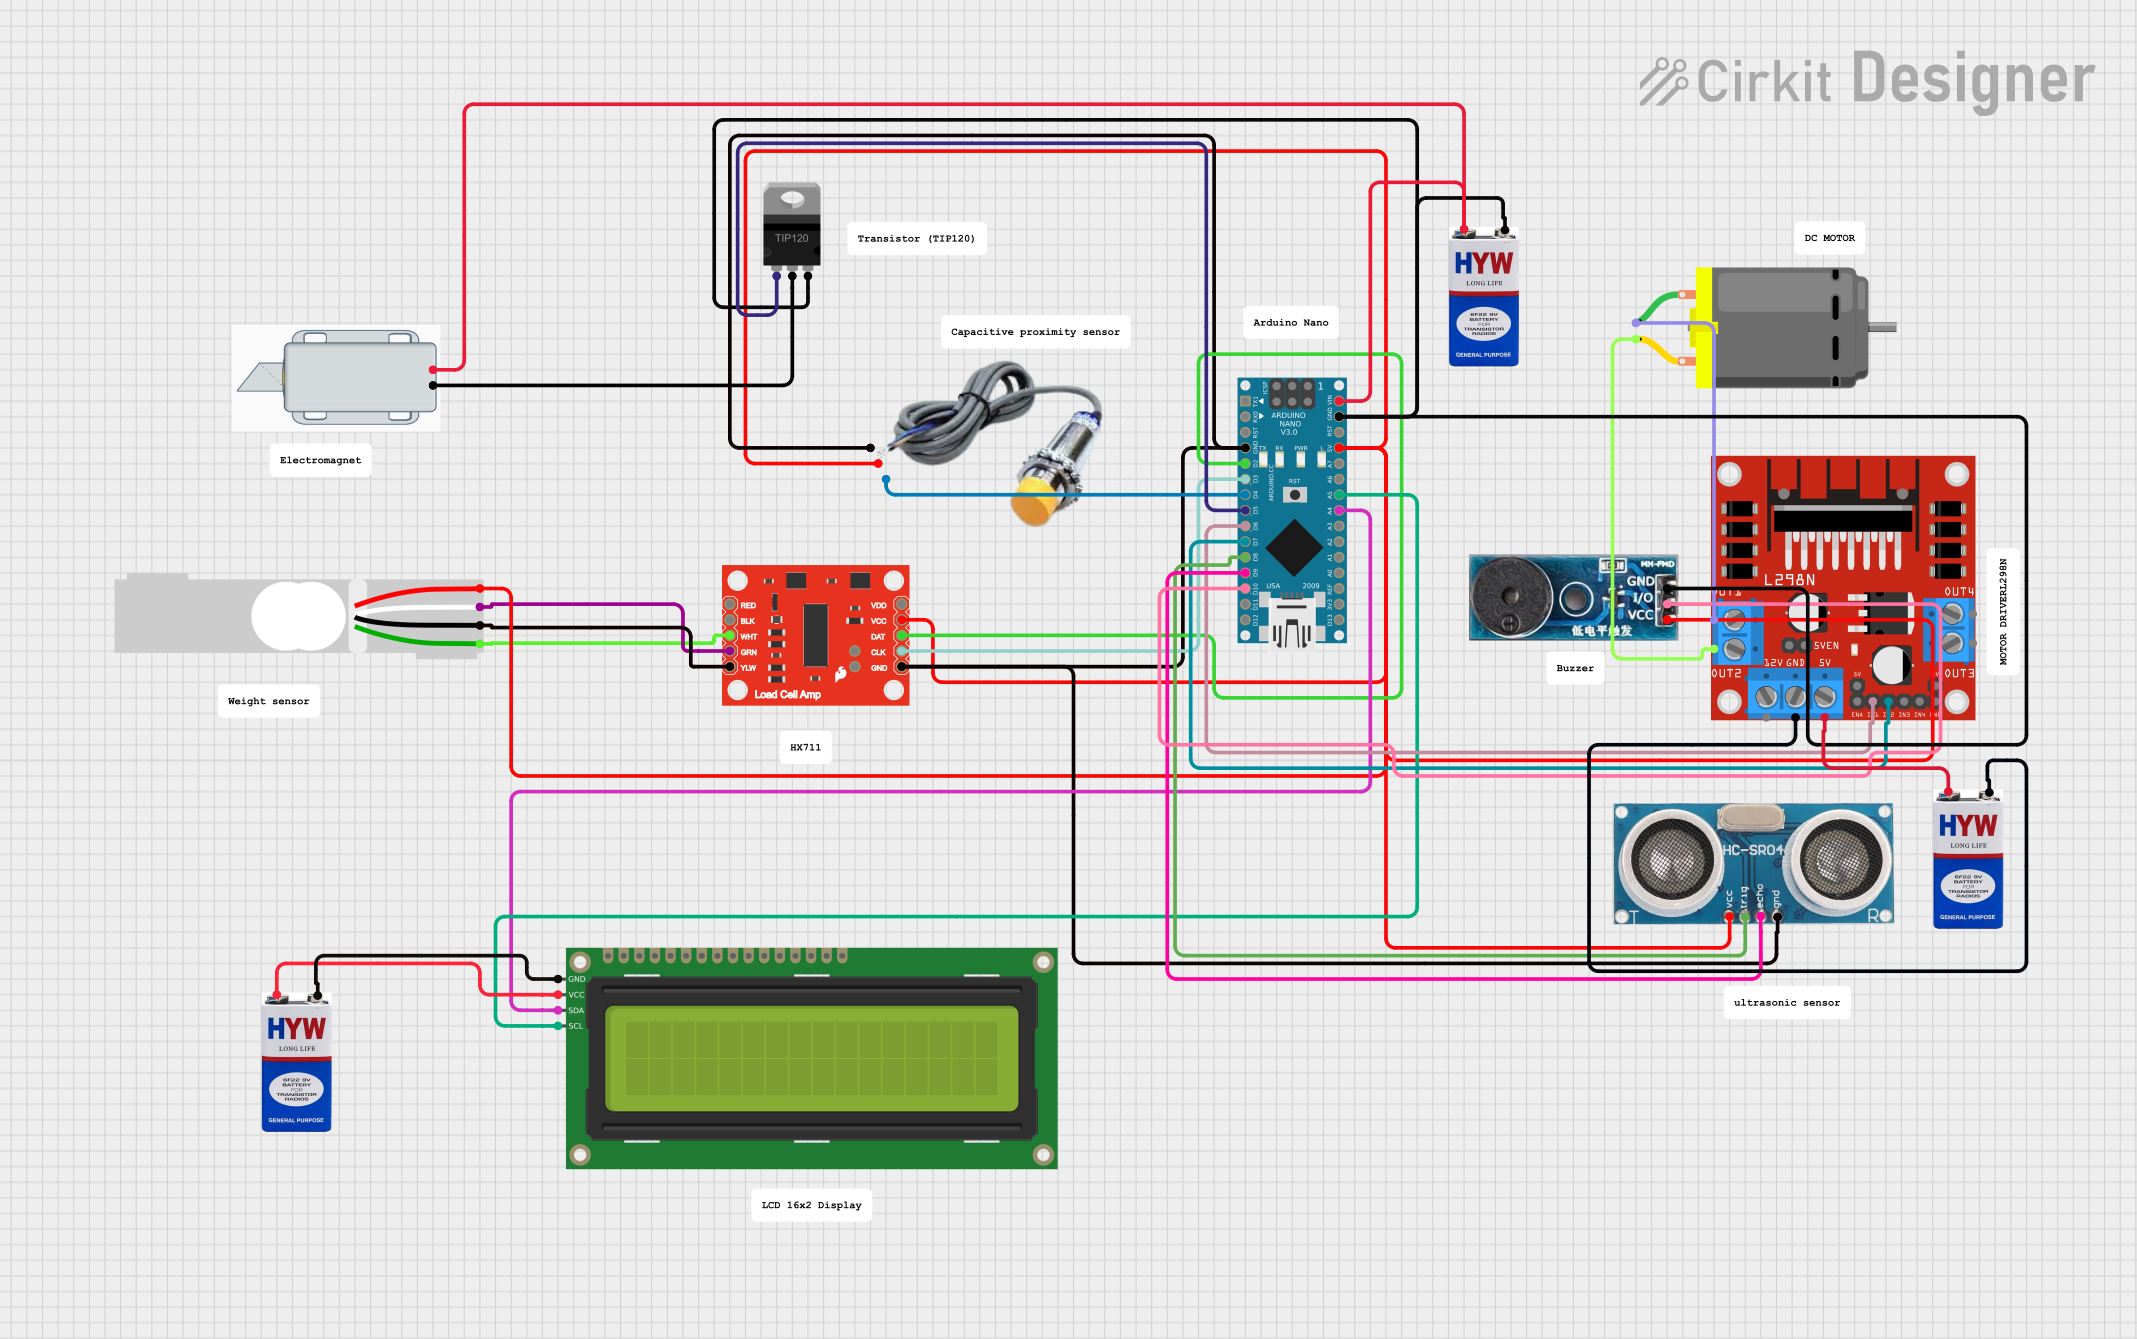
Circuit Documentation
Summary
The circuit in question appears to be designed for a waste segregation system that uses various sensors and actuators to sort and manage waste. An Arduino Nano serves as the central microcontroller, interfacing with a load cell amplifier (HX711) for weight measurement, a capacitive sensor for material detection, an ultrasonic sensor for fullness detection, a DC motor driver (L298N) to drive a motor, a buzzer for alerts, and an I2C LCD for user interface. The system is powered by 9V batteries, and a TIP120 transistor is used to control a 12V solenoid lock.
Component List
- Arduino Nano: A compact microcontroller board based on the ATmega328P, featuring digital and analog I/O pins.
- SparkFun Load Cell Amplifier - HX711: An amplifier for load cells that allows you to easily read load cells to measure weight.
- Load Cell - Red/white/black/green: A transducer that generates an electrical signal whose magnitude is directly proportional to the force being measured.
- Capacitive Sensor: A sensor used to detect the presence or absence of virtually any object regardless of material.
- L298N DC Motor Driver: A high current dual full-bridge driver designed to accept standard TTL logic levels to drive inductive loads such as relays, solenoids, and DC and stepping motors.
- DC Motor: An electric motor that runs on direct current electricity.
- Ultrasonic Sensor: A sensor that measures distance by using ultrasonic waves.
- Buzzer Module: An electronic buzzer, which can generate sound with a specific frequency.
- 12V Solenoid Lock: An electronic lock driven by a solenoid, which operates on 12V.
- 16x2 I2C LCD: A liquid crystal display capable of displaying 16 characters per line in 2 lines, with an I2C interface.
- 9V Battery: A standard 9V battery used to power electronic circuits.
- TIP120 Hi-Current Darlington Transistor: A high-voltage, high-current Darlington transistor with a collector current rating of 5 A.
Wiring Details
Arduino Nano
- GND: Connected to GND of HX711, Capacitive Sensor, Ultrasonic Sensor, Buzzer Module, and 9V battery.
- D2: Connected to DAT of HX711.
- D3: Connected to SCK of HX711.
- D4: Connected to SIGNAL of Capacitive Sensor.
- D5: Connected to BASE of TIP120 Transistor.
- D6: Connected to IN1 of L298N Motor Driver.
- D7: Connected to IN2 of L298N Motor Driver.
- D8: Connected to Trigger of Ultrasonic Sensor.
- D9: Connected to Echo of Ultrasonic Sensor.
- D10: Connected to I/O of Buzzer Module.
- VIN: Connected to "+" of 9V battery and "+" of 12V Solenoid Lock.
- 5V: Connected to VCC of HX711, VCC of Capacitive Sensor, Vcc of Buzzer Module, and +VCC of Ultrasonic Sensor.
- A4: Connected to SDA of 16x2 I2C LCD.
- A5: Connected to SCL of 16x2 I2C LCD.
SparkFun Load Cell Amplifier - HX711
- GND: Connected to GND of Load Cell and Arduino Nano.
- VCC: Connected to 5V of Arduino Nano.
- DAT: Connected to D2 of Arduino Nano.
- SCK: Connected to D3 of Arduino Nano.
- A-: Connected to A+ of Load Cell.
- A+: Connected to A- of Load Cell.
Load Cell - Red/white/black/green
- E+: Connected to VCC of HX711.
- E-: Connected to GND of HX711.
- A+: Connected to A- of HX711.
- A-: Connected to A+ of HX711.
Capacitive Sensor
- GND: Connected to GND of Arduino Nano.
- VCC: Connected to 5V of Arduino Nano.
- SIGNAL: Connected to D4 of Arduino Nano.
L298N DC Motor Driver
- IN1: Connected to D6 of Arduino Nano.
- IN2: Connected to D7 of Arduino Nano.
- OUT1: Connected to pin 1 of DC Motor.
- OUT2: Connected to pin 2 of DC Motor.
- GND: Connected to "-" of 9V battery.
- 5V: Connected to "+" of 9V battery.
DC Motor
- Pin 1: Connected to OUT1 of L298N Motor Driver.
- Pin 2: Connected to OUT2 of L298N Motor Driver.
Ultrasonic Sensor
- GND: Connected to GND of Arduino Nano.
- +VCC: Connected to 5V of Arduino Nano.
- Trigger: Connected to D8 of Arduino Nano.
- Echo: Connected to D9 of Arduino Nano.
Buzzer Module
- GND: Connected to GND of Arduino Nano.
- Vcc: Connected to 5V of Arduino Nano.
- I/O: Connected to D10 of Arduino Nano.
12V Solenoid Lock
- +: Connected to VIN of Arduino Nano.
- -: Connected to COLLECTOR of TIP120 Transistor.
16x2 I2C LCD
- GND: Connected to "-" of 9V battery.
- VCC: Connected to "+" of 9V battery.
- SDA: Connected to A4 of Arduino Nano.
- SCL: Connected to A5 of Arduino Nano.
TIP120 Hi-Current Darlington Transistor
- BASE: Connected to D5 of Arduino Nano.
- COLLECTOR: Connected to "-" of 12V Solenoid Lock.
- EMITTER: Connected to "-" of 9V battery.
Documented Code
Arduino Nano Code
#include <HX711.h>
#include <LiquidCrystal_I2C.h>

#define DOUT  2  // HX711 Data pin
#define CLK   3  // HX711 Clock pin
#define PROXIMITY_PIN 4
#define MOTOR_A1 6
#define MOTOR_A2 7
#define BUZZER_PIN 10
#define TRIG_PIN 8
#define ECHO_PIN 9

HX711 scale;
LiquidCrystal_I2C lcd(0x27, 16, 2); // I2C address of LCD is typically 0x27

float weightThreshold = 5.0;  // Threshold weight (kg)
long weight = 0;
long lastWeight = 0;

void setup() {
  Serial.begin(9600);
  scale.begin(DOUT, CLK);
  scale.set_scale(2280.f);  // Set the calibration factor for your load cell
  scale.tare();  // Tare the scale to 0

  lcd.begin();
  lcd.print("Waste Segregator");

  pinMode(PROXIMITY_PIN, INPUT);
  pinMode(MOTOR_A1, OUTPUT);
  pinMode(MOTOR_A2, OUTPUT);
  pinMode(BUZZER_PIN, OUTPUT);
  pinMode(TRIG_PIN, OUTPUT);
  pinMode(ECHO_PIN, INPUT);
}

void loop() {
  weight = scale.get_units(10);  // Read weight (average of 10 samples)
  float weightInKg = weight / 1000.0;  // Convert to kilograms

  lcd.clear();
  lcd.setCursor(0, 0);
  lcd.print("Weight: ");
  lcd.print(weightInKg);
  lcd.print(" kg");

  // If weight reaches threshold
  if (weightInKg >= weightThreshold) {
    bool isMetal = digitalRead(PROXIMITY_PIN);  // Check if metal is detected
    if (isMetal) {
      // Activate electromagnet to attract metallic waste
      digitalWrite(MOTOR_A1, HIGH);
      digitalWrite(MOTOR_A2, LOW);  // Motor clockwise to tilt container
      delay(2000);  // Wait for non-metal waste to fall
      digitalWrite(MOTOR_A1, LOW);
      digitalWrite(MOTOR_A2, HIGH);  // Motor counter-clockwise to drop metallic waste
    }
  }

  // Check if the compartment is full using ultrasonic sensor
  long distance = readUltrasonicDistance();
  if (distance < 10) {  // Compartment full if distance < 10 cm
    lcd.setCursor(0, 1);
    lcd.print("Waste Full!");
    digitalWrite(BUZZER_PIN, HIGH);  //
}
Note: The readUltrasonicDistance function is not included in the provided code snippet. It should be implemented to measure the distance using the ultrasonic sensor.
12V Solenoid Lock Code
The code for the 12V Solenoid Lock is not provided, but it would typically involve setting the appropriate pin connected to the TIP120 transistor's base to HIGH to activate the lock and LOW to deactivate it. The TIP120 transistor acts as a switch to control the higher current required by the solenoid lock.