
Arduino Nano-Based Battery-Powered Weather Station with Servo Control
View and Edit Project In Cirkit Designer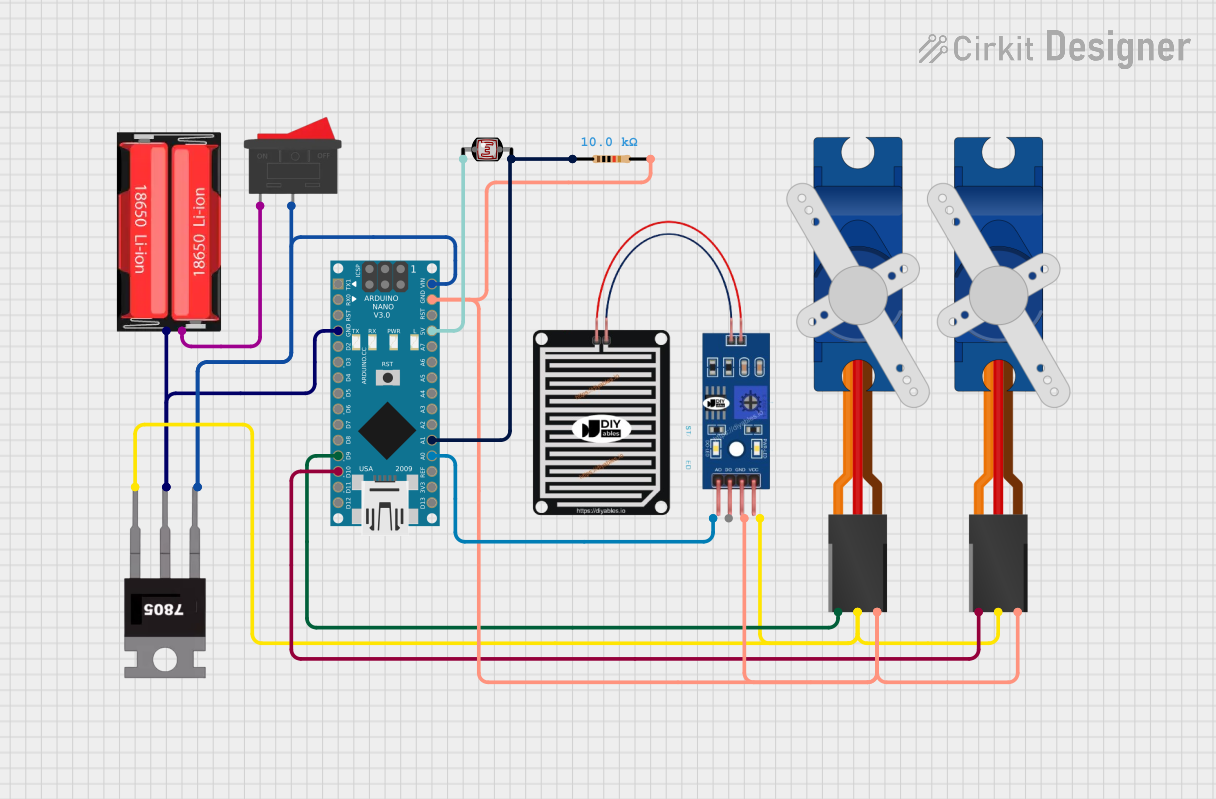
Circuit Documentation
Summary
This circuit involves an Arduino Nano microcontroller interfacing with various sensors and actuators, including two Tower Pro SG90 servos, a photocell (LDR), a rain sensor, and a 7805 voltage regulator. The circuit is powered by a 18650 Li-Ion battery and includes a rocker switch for power control. The Arduino Nano reads data from the sensors and controls the servos based on the sensor inputs.
Component List
Arduino Nano
- Description: A small, complete, and breadboard-friendly board based on the ATmega328P.
- Pins: D1/TX, D0/RX, RESET, GND, D2, D3, D4, D5, D6, D7, D8, D9, D10, D11/MOSI, D12/MISO, VIN, 5V, A7, A6, A5, A4, A3, A2, A1, A0, AREF, 3V3, D13/SCK
Tower Pro SG90 servo
- Description: A micro servo motor used for precise control of angular position.
- Pins: Signal, +5V, GND
Photocell (LDR)
- Description: A light-dependent resistor that changes its resistance based on the light intensity.
- Pins: pin 0, pin 1
Resistor
- Description: A 10k Ohm resistor used to limit current.
- Pins: pin1, pin2
- Properties: Resistance: 10k Ohms
7805
- Description: A voltage regulator that outputs a stable 5V.
- Pins: Vin, Gnd, Vout
RAIN SENSOR
- Description: A sensor used to detect the presence of rain.
- Pins: AO, DO, GRD, VCC
18650 Li-Ion
- Description: A rechargeable lithium-ion battery.
- Pins: Positive, Negative
Rocker Switch
- Description: A switch used to control the power supply.
- Pins: 1, 2
Wiring Details
Arduino Nano
GND connected to:
- 7805 (Gnd)
- 18650 Li-Ion (Negative)
- RAIN SENSOR (GRD)
- Tower Pro SG90 servo (GND)
- Resistor (pin2)
- Tower Pro SG90 servo (GND)
D9 connected to:
- Tower Pro SG90 servo (Signal)
D10 connected to:
- Tower Pro SG90 servo (Signal)
VIN connected to:
- 7805 (Vin)
- Rocker Switch (2)
5V connected to:
- Photocell (LDR) (pin 0)
A1 connected to:
- Resistor (pin1)
- Photocell (LDR) (pin 1)
A0 connected to:
- RAIN SENSOR (AO)
Tower Pro SG90 servo
Signal connected to:
- Arduino Nano (D9)
- Arduino Nano (D10)
+5V connected to:
- 7805 (Vout)
GND connected to:
- Arduino Nano (GND)
Photocell (LDR)
pin 0 connected to:
- Arduino Nano (5V)
pin 1 connected to:
- Resistor (pin1)
- Arduino Nano (A1)
Resistor
pin1 connected to:
- Photocell (LDR) (pin 1)
- Arduino Nano (A1)
pin2 connected to:
- Arduino Nano (GND)
7805
Gnd connected to:
- Arduino Nano (GND)
- 18650 Li-Ion (Negative)
Vin connected to:
- Rocker Switch (2)
- Arduino Nano (VIN)
Vout connected to:
- RAIN SENSOR (VCC)
- Tower Pro SG90 servo (+5V)
RAIN SENSOR
GRD connected to:
- Arduino Nano (GND)
AO connected to:
- Arduino Nano (A0)
VCC connected to:
- 7805 (Vout)
18650 Li-Ion
Positive connected to:
- Rocker Switch (1)
Negative connected to:
- 7805 (Gnd)
- Arduino Nano (GND)
Rocker Switch
1 connected to:
- 18650 Li-Ion (Positive)
2 connected to:
- 7805 (Vin)
- Arduino Nano (VIN)
Documented Code
Arduino Nano Code (sketch.ino)
void setup() {
  // put your setup code here, to run once:

}

void loop() {
  // put your main code here, to run repeatedly:

}
Additional Documentation (documentation.txt)