ESP32-S3 Controlled Security System with Fingerprint Authentication and Solenoid Lock
Circuit Documentation
Summary
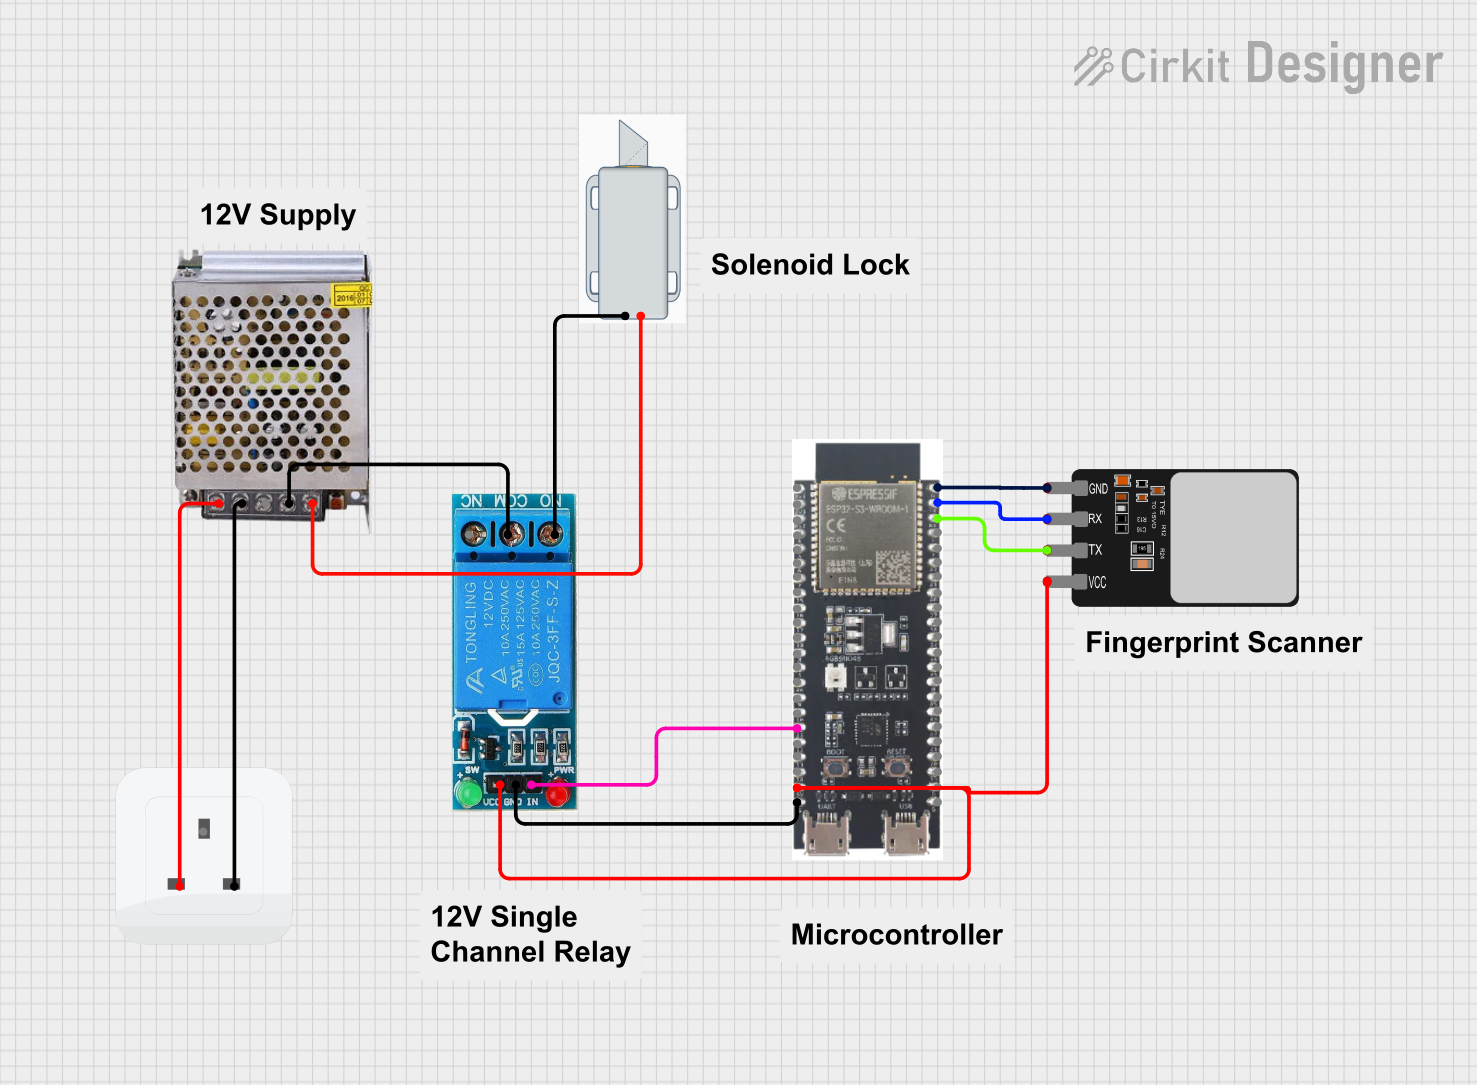
This circuit is designed to control a 12V Solenoid Lock using an ESP32-S3 microcontroller, which interfaces with a Fingerprint Scanner for authentication. The lock is driven by a 12V power supply, which also powers the microcontroller and the relay module. The relay module acts as an intermediary to control the high-power circuit of the solenoid lock. The ESP32-S3 microcontroller is programmed to communicate with the Fingerprint Scanner and control the relay based on the authentication result.
Component List
12V Solenoid Lock
- Description: An electromechanical lock that is actuated by a 12V DC voltage.
- Pins:
-(Ground),+(Positive)
12V Single Channel Relay
- Description: A relay module that allows a low-power signal to switch a higher power circuit.
- Pins:
NC(Normally Closed),COM(Common),NO(Normally Open),IN(Input Signal),GND(Ground),VCC(Voltage Supply)
Socket
- Description: An AC power socket to provide mains electricity.
- Pins:
earth,life,neutral
Fingerprint Scanner
- Description: A biometric sensor that captures fingerprints for authentication purposes.
- Pins:
VCC(Voltage Supply),TX(Transmit),RX(Receive),GND(Ground)
Power Supply 12V 5Amp
- Description: A power supply unit that converts 220V AC to 12V DC.
- Pins:
220V Positive Pole (AC),220V Negative Pole (AC),GND(Ground),GND (DC),12V-24V Output (DC)
ESP32-S3
- Description: A microcontroller with Wi-Fi and Bluetooth capabilities.
- Pins: Multiple GPIOs,
3v3,EN,5V,GND
Wiring Details
12V Solenoid Lock
-connected toNOon 12V Single Channel Relay+connected to12V-24V Output (DC)on Power Supply 12V 5Amp
12V Single Channel Relay
INconnected toGPIO11on ESP32-S3VCCconnected to5Von ESP32-S3GNDconnected toGNDon ESP32-S3NOconnected to-on 12V Solenoid LockCOMconnected toGND (DC)on Power Supply 12V 5Amp
Socket
lifeconnected to220V Positive Pole (AC)on Power Supply 12V 5Ampneutralconnected to220V Negative Pole (AC)on Power Supply 12V 5Amp
Fingerprint Scanner
VCCconnected to5Von ESP32-S3GNDconnected toGNDon ESP32-S3TXconnected toGPIO44on ESP32-S3RXconnected toGPIO43on ESP32-S3
Power Supply 12V 5Amp
220V Positive Pole (AC)connected tolifeon Socket220V Negative Pole (AC)connected toneutralon Socket12V-24V Output (DC)connected to+on 12V Solenoid LockGND (DC)connected toCOMon 12V Single Channel Relay
Documented Code
ESP32-S3 Microcontroller Code (sketch.ino)
void setup() {
  // put your setup code here, to run once:

}

void loop() {
  // put your main code here, to run repeatedly:

}
Note: The actual functionality of the microcontroller needs to be implemented within the setup and loop functions. This will include initializing the fingerprint scanner, reading the fingerprint data, and controlling the relay to lock or unlock the solenoid lock based on the authentication result.