
Arduino UNO Gas Leak Detection System with Relay-Controlled Solenoid Valve
View and Edit Project In Cirkit Designer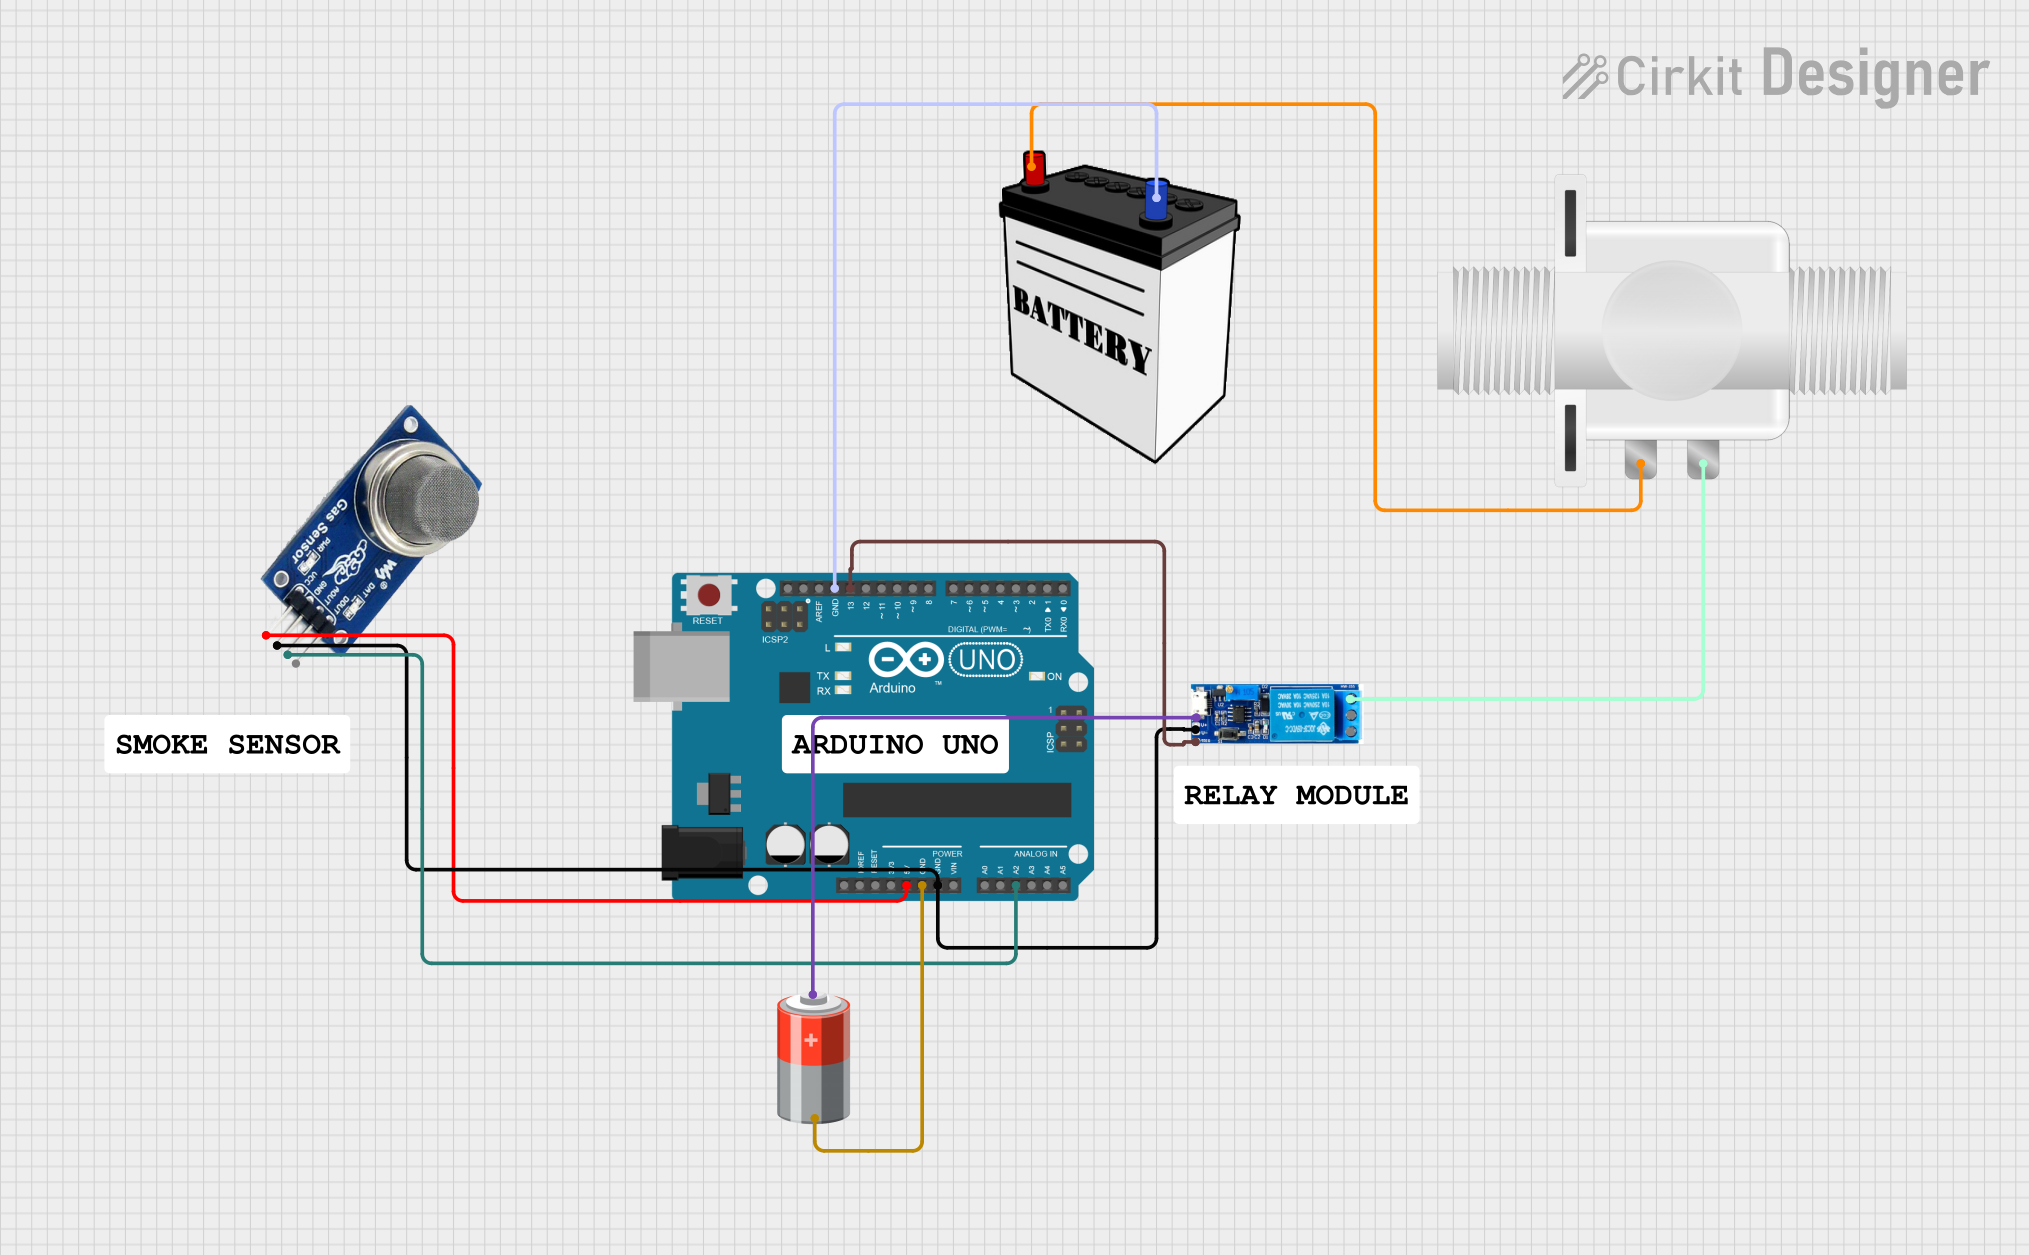
Circuit Documentation
Summary
This circuit is designed to monitor gas levels using an MQ2 gas sensor and control a relay module based on the sensor readings. The relay module, in turn, controls a plastic solenoid valve. The circuit is powered by a combination of a 5V battery and a 12V battery. An Arduino UNO microcontroller is used to read the sensor data and control the relay.
Component List
Arduino UNO
- Description: A microcontroller board based on the ATmega328P.
- Pins: UNUSED, IOREF, Reset, 3.3V, 5V, GND, Vin, A0, A1, A2, A3, A4, A5, SCL, SDA, AREF, D13, D12, D11, D10, D9, D8, D7, D6, D5, D4, D3, D2, D1, D0
Relay module 5v-30v
- Description: A relay module that can be triggered by a 5V signal to switch higher voltage loads.
- Pins: common contact, normally open, normally closed, trigger, V-, V+
Plastic Solenoid Valve
- Description: A valve that can be controlled electrically to allow or block fluid flow.
- Pins: pin1, pin2
12V Battery
- Description: A battery providing 12V power.
- Pins: VCC, GND
MQ2
- Description: A gas sensor that outputs an analog signal proportional to the concentration of gas.
- Pins: VCC, GND, AOUT, DOUT
5V Battery
- Description: A battery providing 5V power.
- Pins: +, -
Wiring Details
Arduino UNO
- 5V connected to VCC of MQ2
- GND connected to - of 5V Battery
- GND connected to V- of Relay module 5v-30v
- GND connected to GND of MQ2
- GND connected to GND of 12V Battery
- A2 connected to AOUT of MQ2
- D13 connected to trigger of Relay module 5v-30v
Relay module 5v-30v
- V- connected to GND of MQ2
- V- connected to GND of Arduino UNO
- trigger connected to D13 of Arduino UNO
- normally closed connected to pin2 of Plastic Solenoid Valve
- V+ connected to + of 5V Battery
Plastic Solenoid Valve
- pin2 connected to normally closed of Relay module 5v-30v
- pin1 connected to VCC of 12V Battery
12V Battery
- GND connected to GND of Arduino UNO
- VCC connected to pin1 of Plastic Solenoid Valve
MQ2
- VCC connected to 5V of Arduino UNO
- GND connected to V- of Relay module 5v-30v
- GND connected to GND of Arduino UNO
- AOUT connected to A2 of Arduino UNO
5V Battery
- - connected to GND of Arduino UNO
- + connected to V+ of Relay module 5v-30v
Code Documentation
Arduino UNO Code
const int threshold = 300;

void setup() {
  // Initialize serial communication at 9600 bits per second:
  Serial.begin(9600);

  // Set up the analog pin A2 for input:
  pinMode(A2, INPUT);

  // Set up the digital pin D13 for output (relay trigger):
  pinMode(13, OUTPUT);
}

void loop() {
  // Read the input on analog pin A2:
  int sensorValue2 = analogRead(A2);

  // Print out the value you read:
  Serial.print("MQ2 Sensor: ");
  Serial.println(sensorValue2);

  // Control the relay based on the sensor value:
  if (sensorValue2 > threshold) { // Replace 'threshold' with the appropriate value
    digitalWrite(13, HIGH); // Turn on the relay
  } else {
    digitalWrite(13, LOW); // Turn off the relay
  }

  // Delay a bit for stability:
  delay(1000);
}
This code initializes the Arduino UNO to read from the MQ2 sensor and control the relay module based on the sensor readings. The relay is triggered if the sensor value exceeds a predefined threshold, which can be adjusted as needed.