
Circuit Documentation
Summary
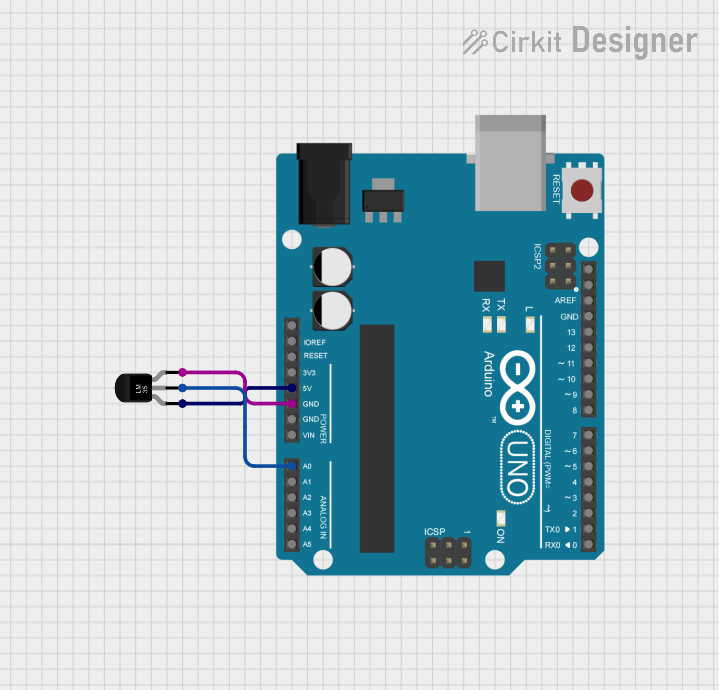
This circuit is designed to read the temperature using an LM35 temperature sensor and an Arduino UNO. The temperature data is read from the sensor and displayed on the Serial Monitor in Celsius.
Component List
Arduino UNO
- Description: A microcontroller board based on the ATmega328P.
- Pins: UNUSED, IOREF, Reset, 3.3V, 5V, GND, Vin, A0, A1, A2, A3, A4, A5, SCL, SDA, AREF, D13, D12, D11, D10, D9, D8, D7, D6, D5, D4, D3, D2, D1, D0
Temperature Sensor (LM35)
- Description: A precision integrated-circuit temperature sensor, whose output voltage is linearly proportional to the Celsius temperature.
- Pins: +Vs, Vout, GND
Wiring Details
Arduino UNO
- 5V: Connected to +Vs of the Temperature Sensor (LM35)
- GND: Connected to GND of the Temperature Sensor (LM35)
- A0: Connected to Vout of the Temperature Sensor (LM35)
Temperature Sensor (LM35)
- +Vs: Connected to 5V of the Arduino UNO
- GND: Connected to GND of the Arduino UNO
- Vout: Connected to A0 of the Arduino UNO
Code
/*
 * Arduino Sketch for Temperature Sensor Test
 * This code reads the analog value from an LM35 temperature sensor connected to
 * pin A0 of an Arduino UNO and prints the temperature in Celsius to the Serial
 * Monitor.
 */

const int sensorPin = A0; // Pin where the LM35 is connected

void setup() {
  Serial.begin(9600); // Initialize serial communication at 9600 baud
}

void loop() {
  int sensorValue = analogRead(sensorPin); // Read the analog value from the sensor
  float voltage = sensorValue * (5.0 / 1023.0); // Convert the analog value to voltage
  float temperatureC = voltage * 100.0; // Convert the voltage to temperature in Celsius
  Serial.print("Temperature: ");
  Serial.print(temperatureC);
  Serial.println(" °C");
  delay(1000); // Wait for 1 second before taking another reading
}
This code initializes the serial communication, reads the analog value from the LM35 temperature sensor, converts it to a voltage, then to a temperature in Celsius, and prints the temperature to the Serial Monitor every second.