Arduino UNO-Based Multi-Sensor Robotic Controller with Bluetooth and LCD Display
Circuit Documentation
Summary of the Circuit
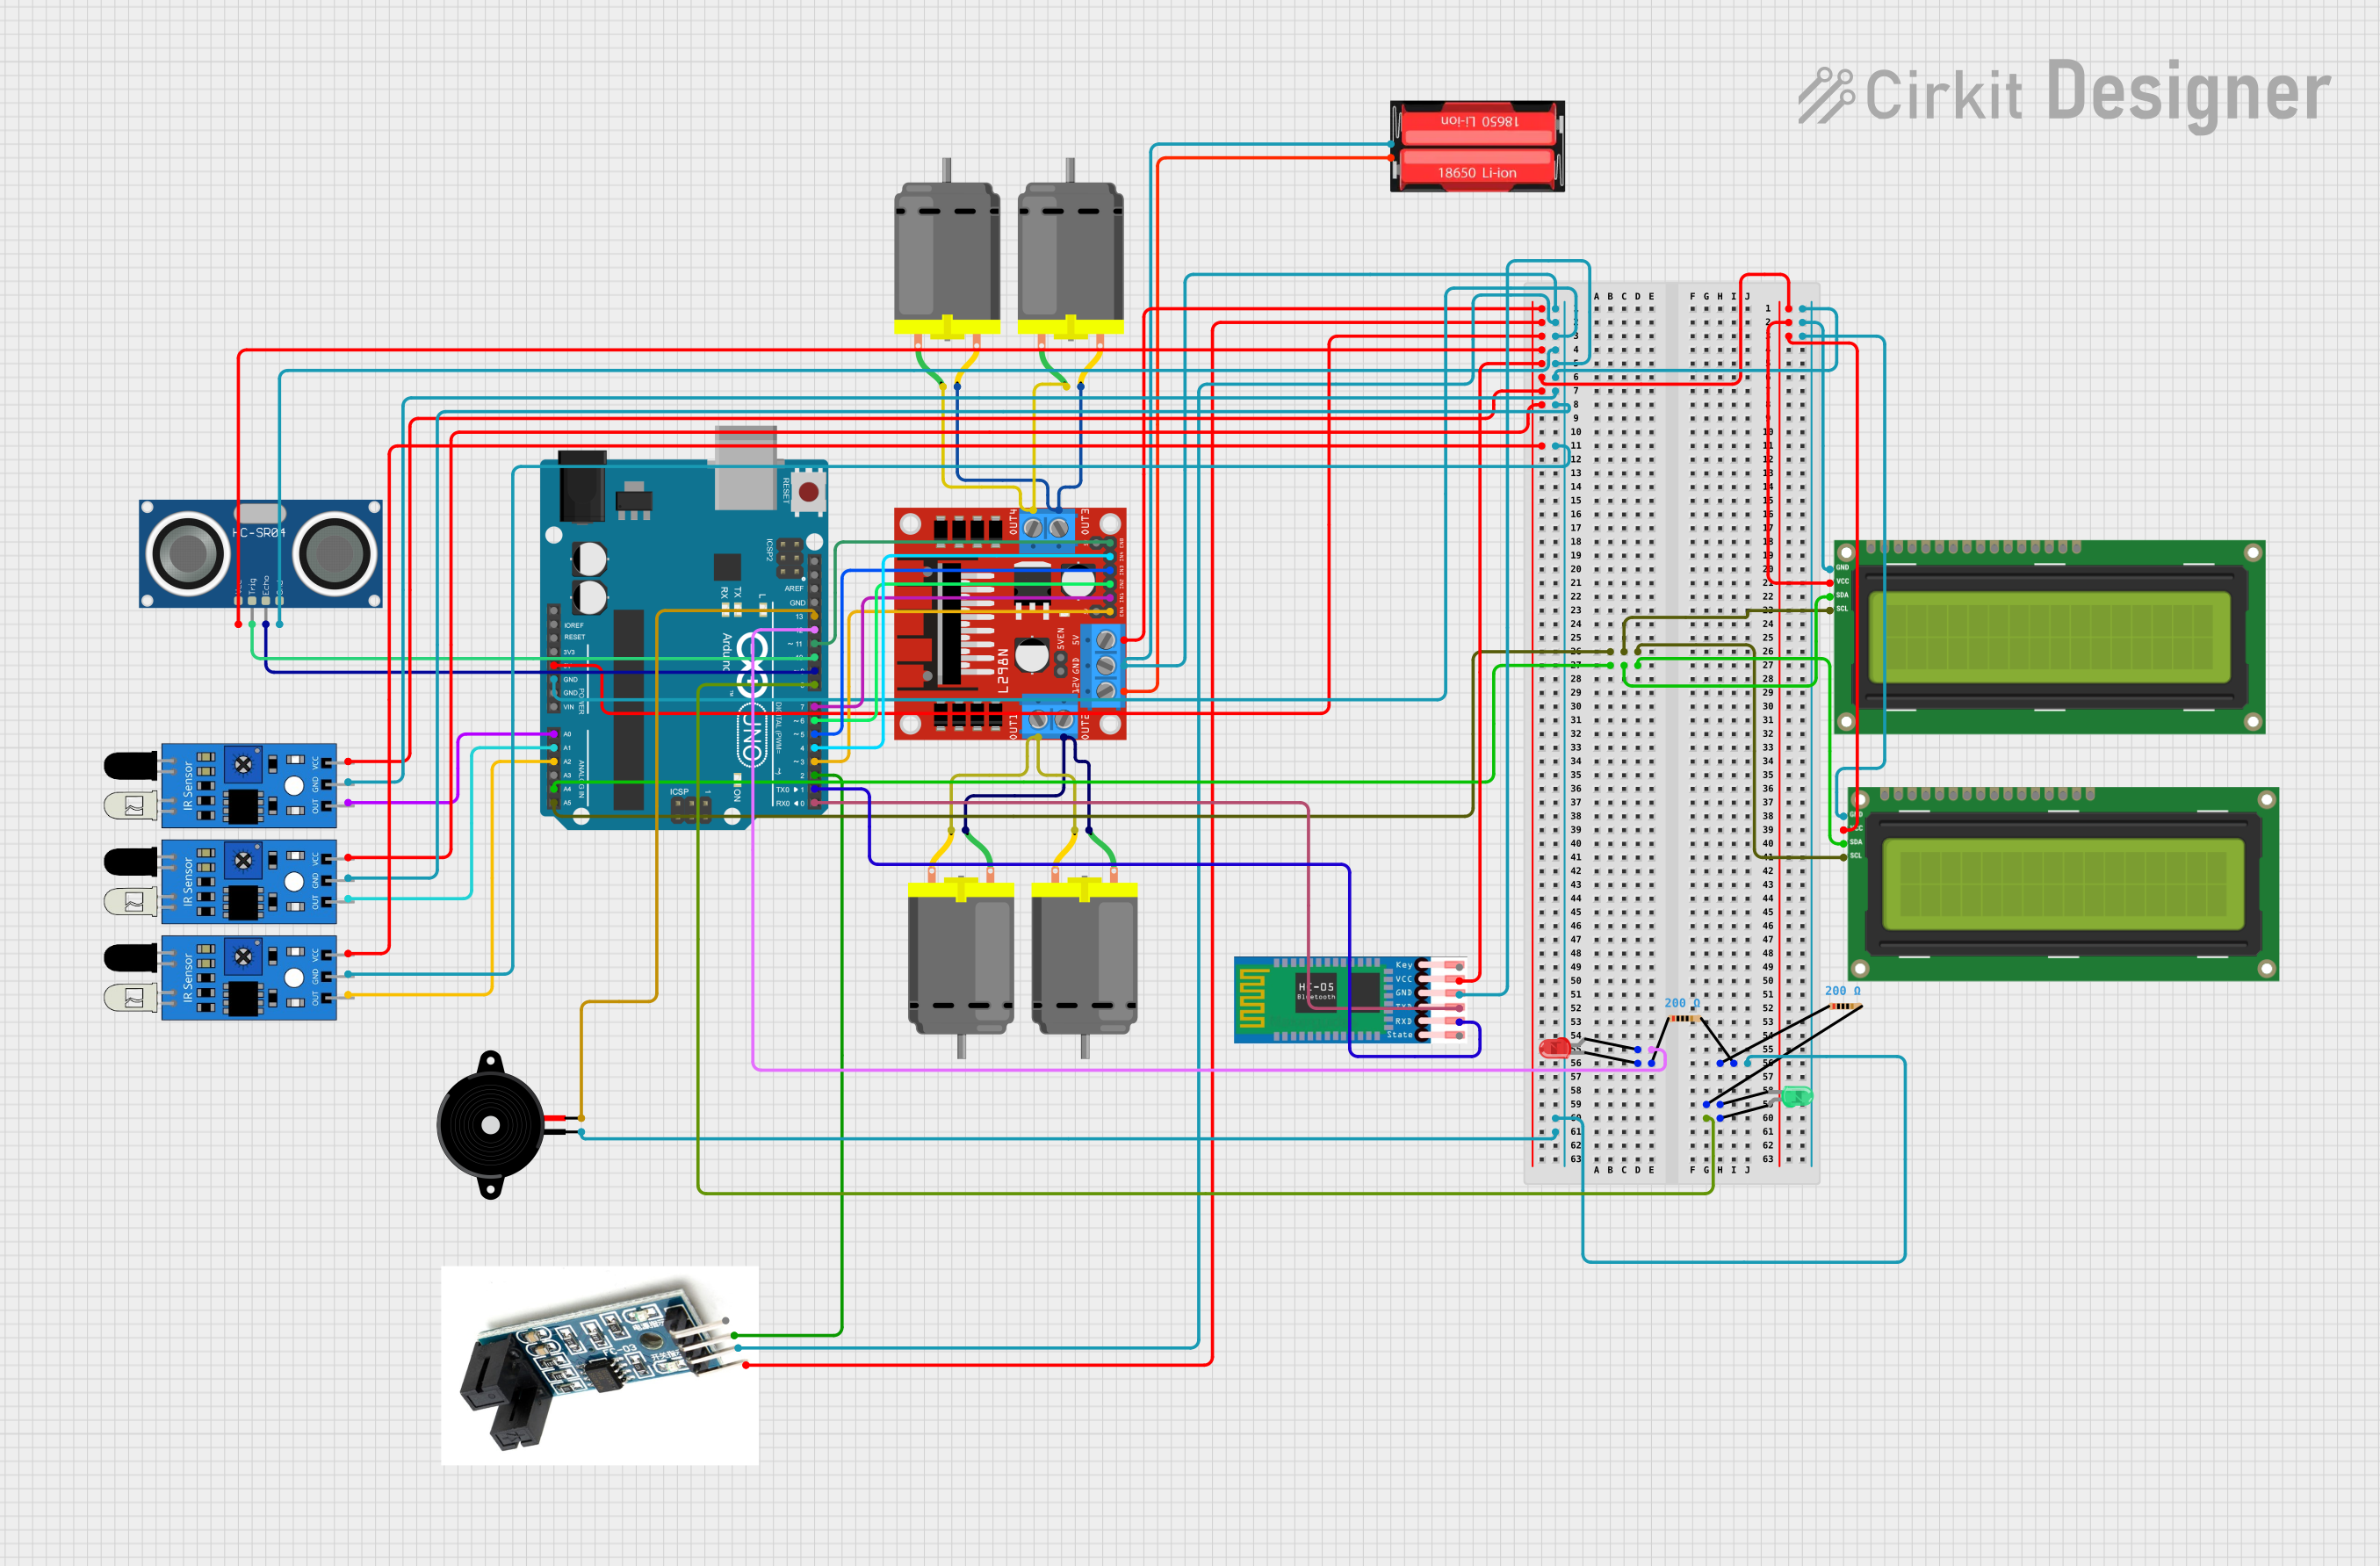
This circuit is designed around an Arduino UNO microcontroller, which serves as the central processing unit for controlling various peripherals including DC motors, an ultrasonic sensor (HC-SR04), a Bluetooth module (HC-05), IR sensors, an I2C LCD screen, a motor driver (L298N), a piezo speaker, and LEDs with resistors. The circuit is powered by an 18650 Li-Ion battery. The Arduino UNO facilitates the interaction between the input sensors and the output devices, allowing for a responsive and interactive system.
Component List
Microcontroller
- Arduino UNO: A microcontroller board based on the ATmega328P, featuring digital and analog I/O pins.
Actuators
- DC Motors: Four motors used for movement or other mechanical actions.
- Piezo Speaker: An electronic device that can produce sound when an electrical signal is applied.
Sensors
- HC-SR04 Ultrasonic Sensor: A sensor that measures distance by emitting ultrasonic waves and measuring the time taken for the echo to return.
- HC-05 Bluetooth Module: A wireless communication module that enables Bluetooth connectivity.
- IR Sensors: Sensors that detect infrared light to sense the presence or absence of objects.
Power Supply
- 18650 Li-Ion Battery: A rechargeable battery that provides power to the circuit.
Driver
- L298N DC Motor Driver: A module that allows for the control of DC motors, providing the necessary current and enabling direction control.
Display
- I2C LCD 16x2 Screen: A liquid crystal display capable of showing 16 characters per line on 2 lines, using the I2C communication protocol.
Indicators
- LEDs (Red and Green): Light-emitting diodes used as visual indicators.
Miscellaneous
- Resistors: Electrical components that limit or regulate the flow of electrical current in a circuit.
- Encoder V1: A sensor that provides feedback on the position, velocity, and direction of a rotating shaft.
Wiring Details
Arduino UNO
- A4 (SDA): Connected to I2C LCD screens (SDA pin).
- A5 (SCL): Connected to I2C LCD screens (SCL pin).
- D0-D13: Various connections to sensors, actuators, and the motor driver.
- GND: Common ground for the circuit.
- 5V: Power supply to various components.
- 3.3V, Reset, Vin, AREF: Unused in this circuit.
DC Motors
- Motor Pins: Connected to the L298N motor driver outputs.
HC-SR04 Ultrasonic Sensor
- VCC: Connected to 5V power supply.
- GND: Connected to common ground.
- TRIG: Connected to Arduino pin D10.
- ECHO: Connected to Arduino pin D9.
HC-05 Bluetooth Module
- VCC: Connected to 5V power supply.
- GND: Connected to common ground.
- TXD: Connected to Arduino pin D0.
- RXD: Connected to Arduino pin D1.
IR Sensors
- VCC: Connected to 5V power supply.
- GND: Connected to common ground.
- OUT: Connected to Arduino pins A0, A1, and A2.
I2C LCD 16x2 Screen
- SCL: Connected to Arduino pin A5.
- SDA: Connected to Arduino pin A4.
- VCC (5V): Connected to 5V power supply.
- GND: Connected to common ground.
L298N DC Motor Driver
- 12V: Connected to the positive terminal of the 18650 Li-Ion battery.
- GND: Connected to common ground.
- 5V: Connected to 5V power supply.
- ENA, ENB: Connected to Arduino pins D3 and D11.
- IN1-IN4: Connected to Arduino pins D4-D7.
- OUT1-OUT4: Connected to DC motor pins.
LEDs with Resistors
- Anode (LED): Connected to Arduino pins D8 (green LED) and D12 (red LED).
- Cathode (LED): Connected to one end of the resistors.
- Other End of Resistors: Connected to common ground.
Encoder V1
- VCC: Connected to 5V power supply.
- GND: Connected to common ground.
- D0: Connected to Arduino pin D2.
18650 Li-Ion Battery
- Positive: Connected to L298N motor driver 12V input.
- Negative: Connected to common ground.
Documented Code
void setup() {
  // put your setup code here, to run once:

}

void loop() {
  // put your main code here, to run repeatedly:

}
The provided code is a template with empty setup() and loop() functions, which are the standard structure for Arduino sketches. The setup() function is intended for initialization code that runs once when the program starts, such as configuring pin modes. The loop() function contains the main logic of the program, which runs continuously after setup() is complete. Additional code is required to control the components based on the wiring details provided.